
Pentesting is in beta and is available as an add-on. If you do not see Pentests in the sidebar, contact your Corgea administrator or sales@corgea.com.
How a Pentest Works
Each run follows the same three stages.1
Reconnaissance
Agents map the attack surface of your target — endpoints, authentication flows, parameters, and routes that are not linked from anywhere obvious.
2
Attack
Specialized agents work the target in parallel, each responsible for a domain. They attempt real exploitation rather than pattern matching, and they chain weaknesses across domains to reach higher-impact outcomes.
3
Report
Confirmed findings are written up with a description, business impact, attack chain, exploit script, and remediation guidance, then rolled into a downloadable report.
A Deep run adds an extended red-team agent that explores beyond those domains and builds multi-step attack chains across them.
Corgea only reports findings its agents were able to validate against the running application. A finding in the report has been reproduced, not merely suspected.
Before You Start
Your target URL must be publicly reachable overhttp or https. Corgea rejects targets that:
- Use a scheme other than
httporhttps - Embed credentials directly in the URL, such as
https://user:pass@example.com - Resolve to
localhost, a private network range, or a cloud metadata address
Targets
A target is a reusable configuration: where to attack, which credentials to use, and any standing instructions. Each run executes against a target, so you configure it once and re-run whenever you ship.
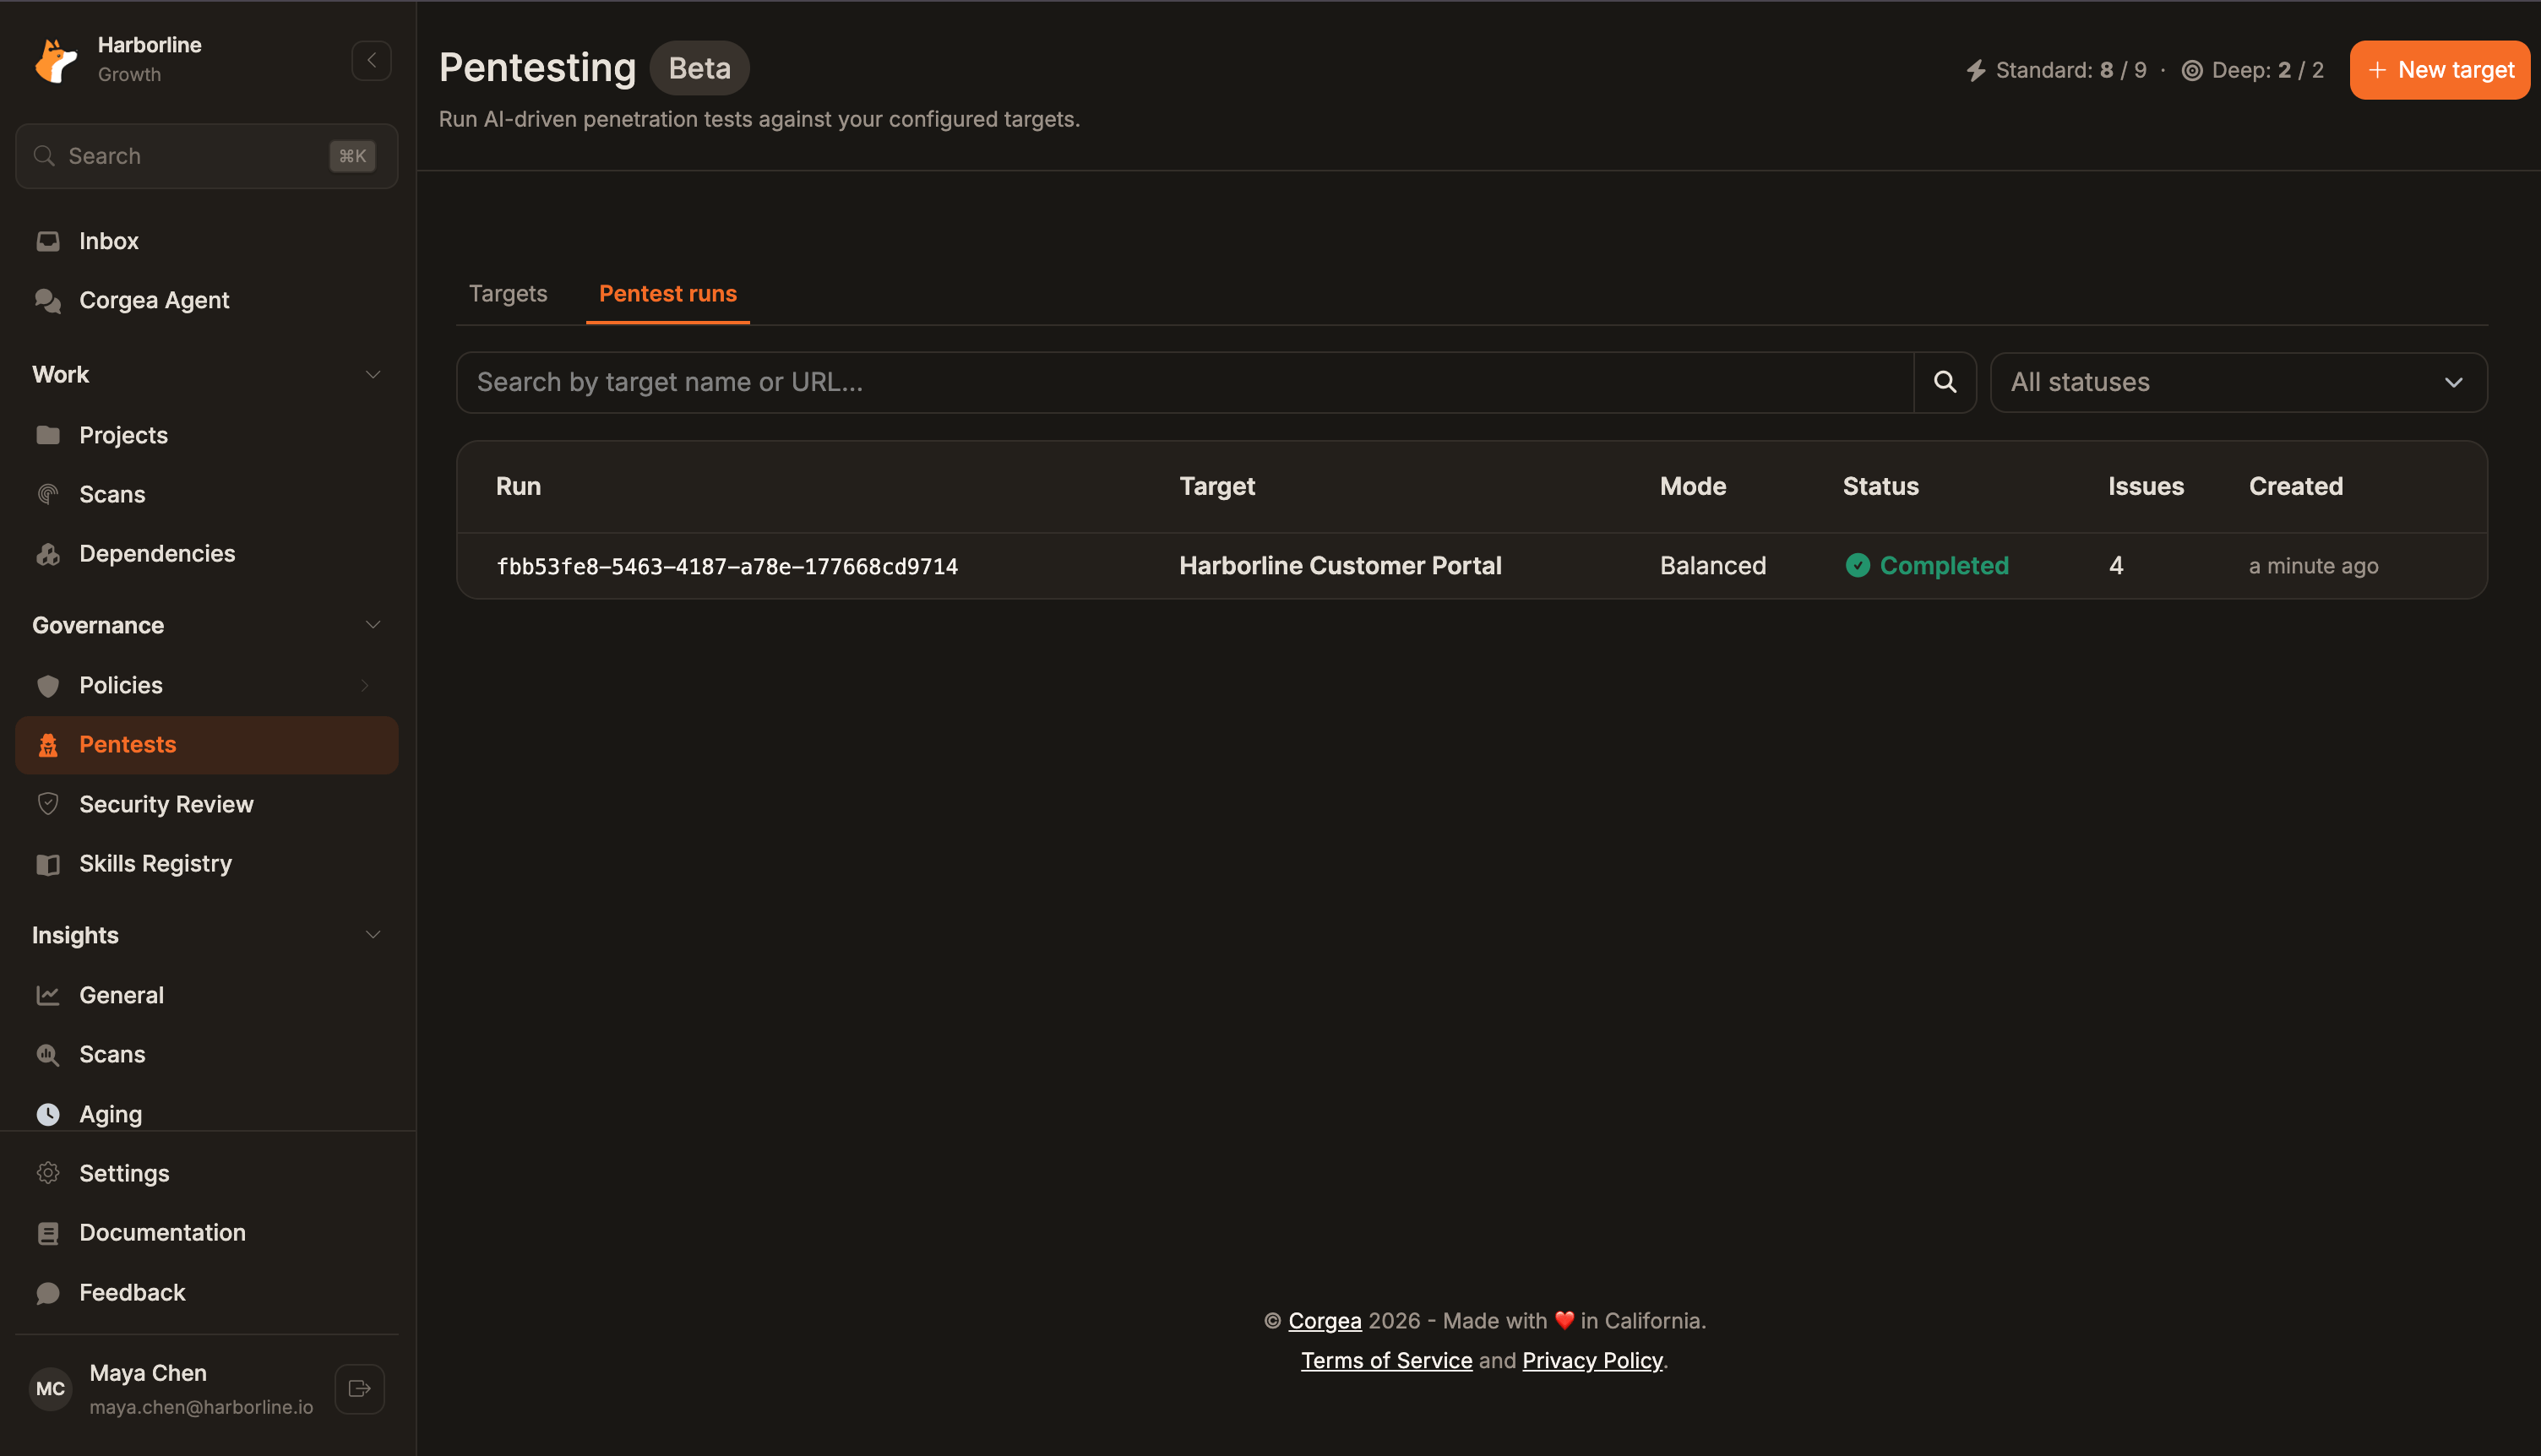
Create a Target
1
Open Pentests
Select Pentests from the sidebar, then click New target.
2
Name the target and choose a scan mode
Enter a recognizable name, the application root URL, and a default mode: Balanced or Deep. You can override the mode per run.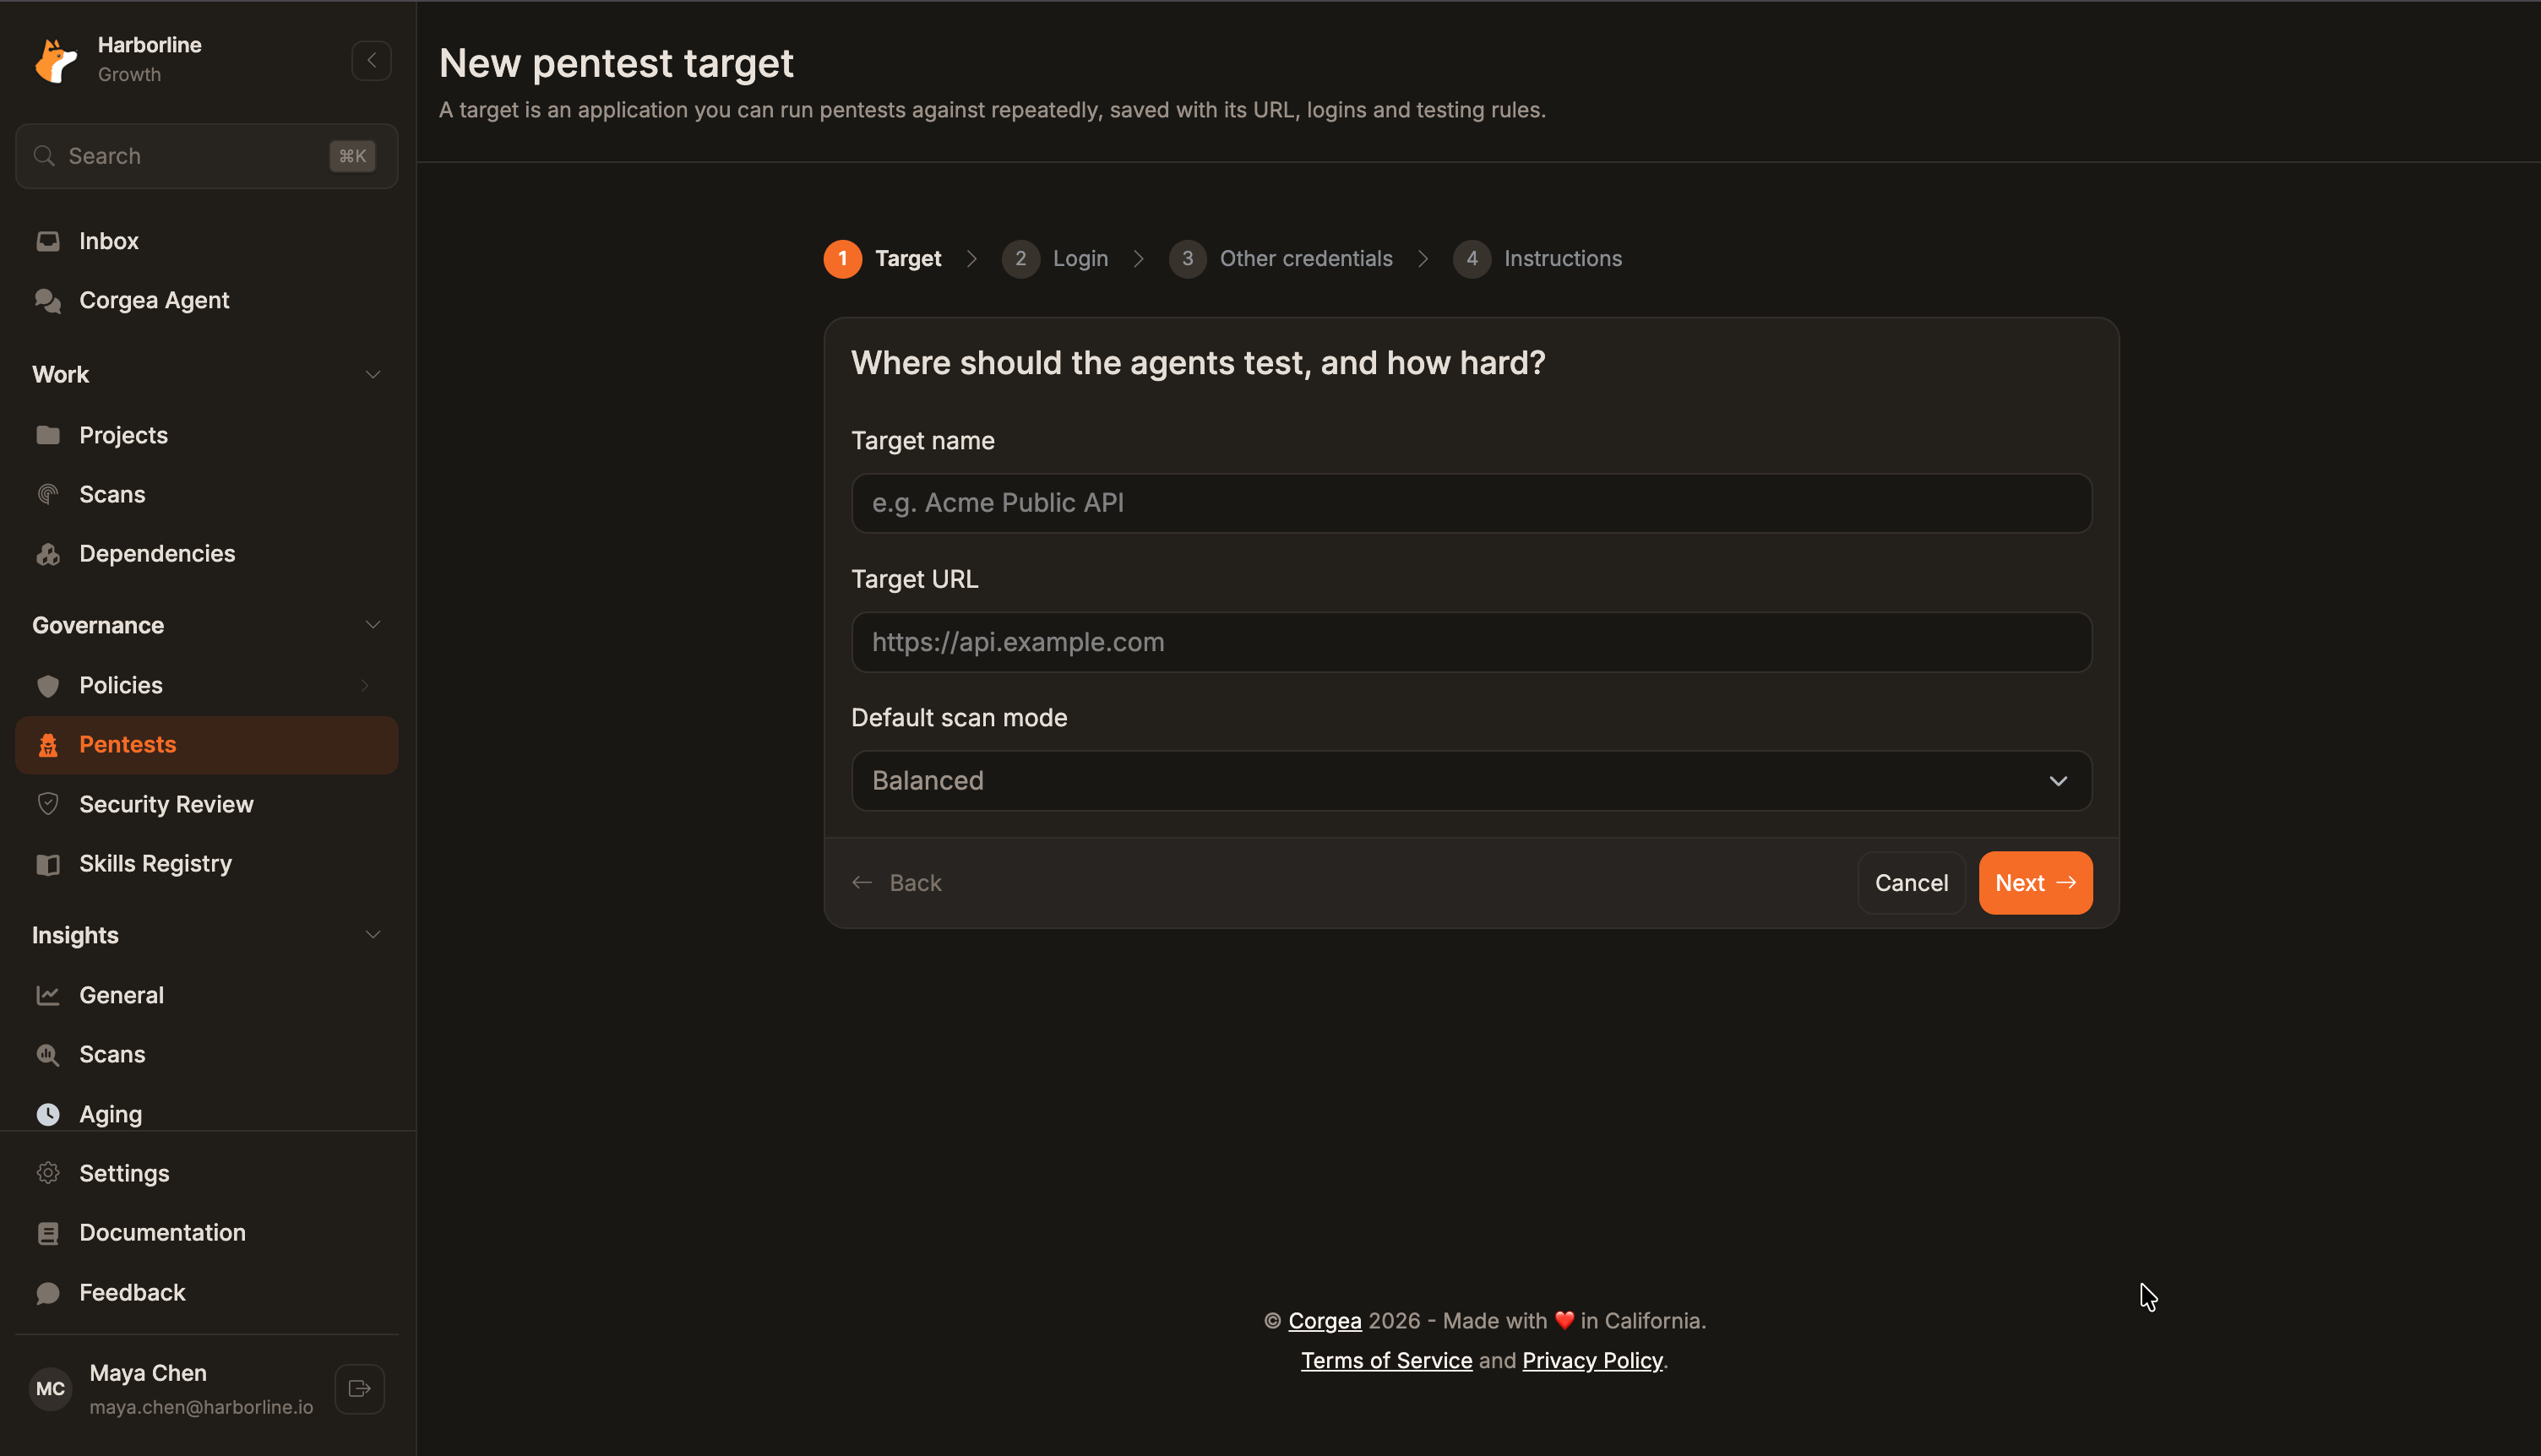
3
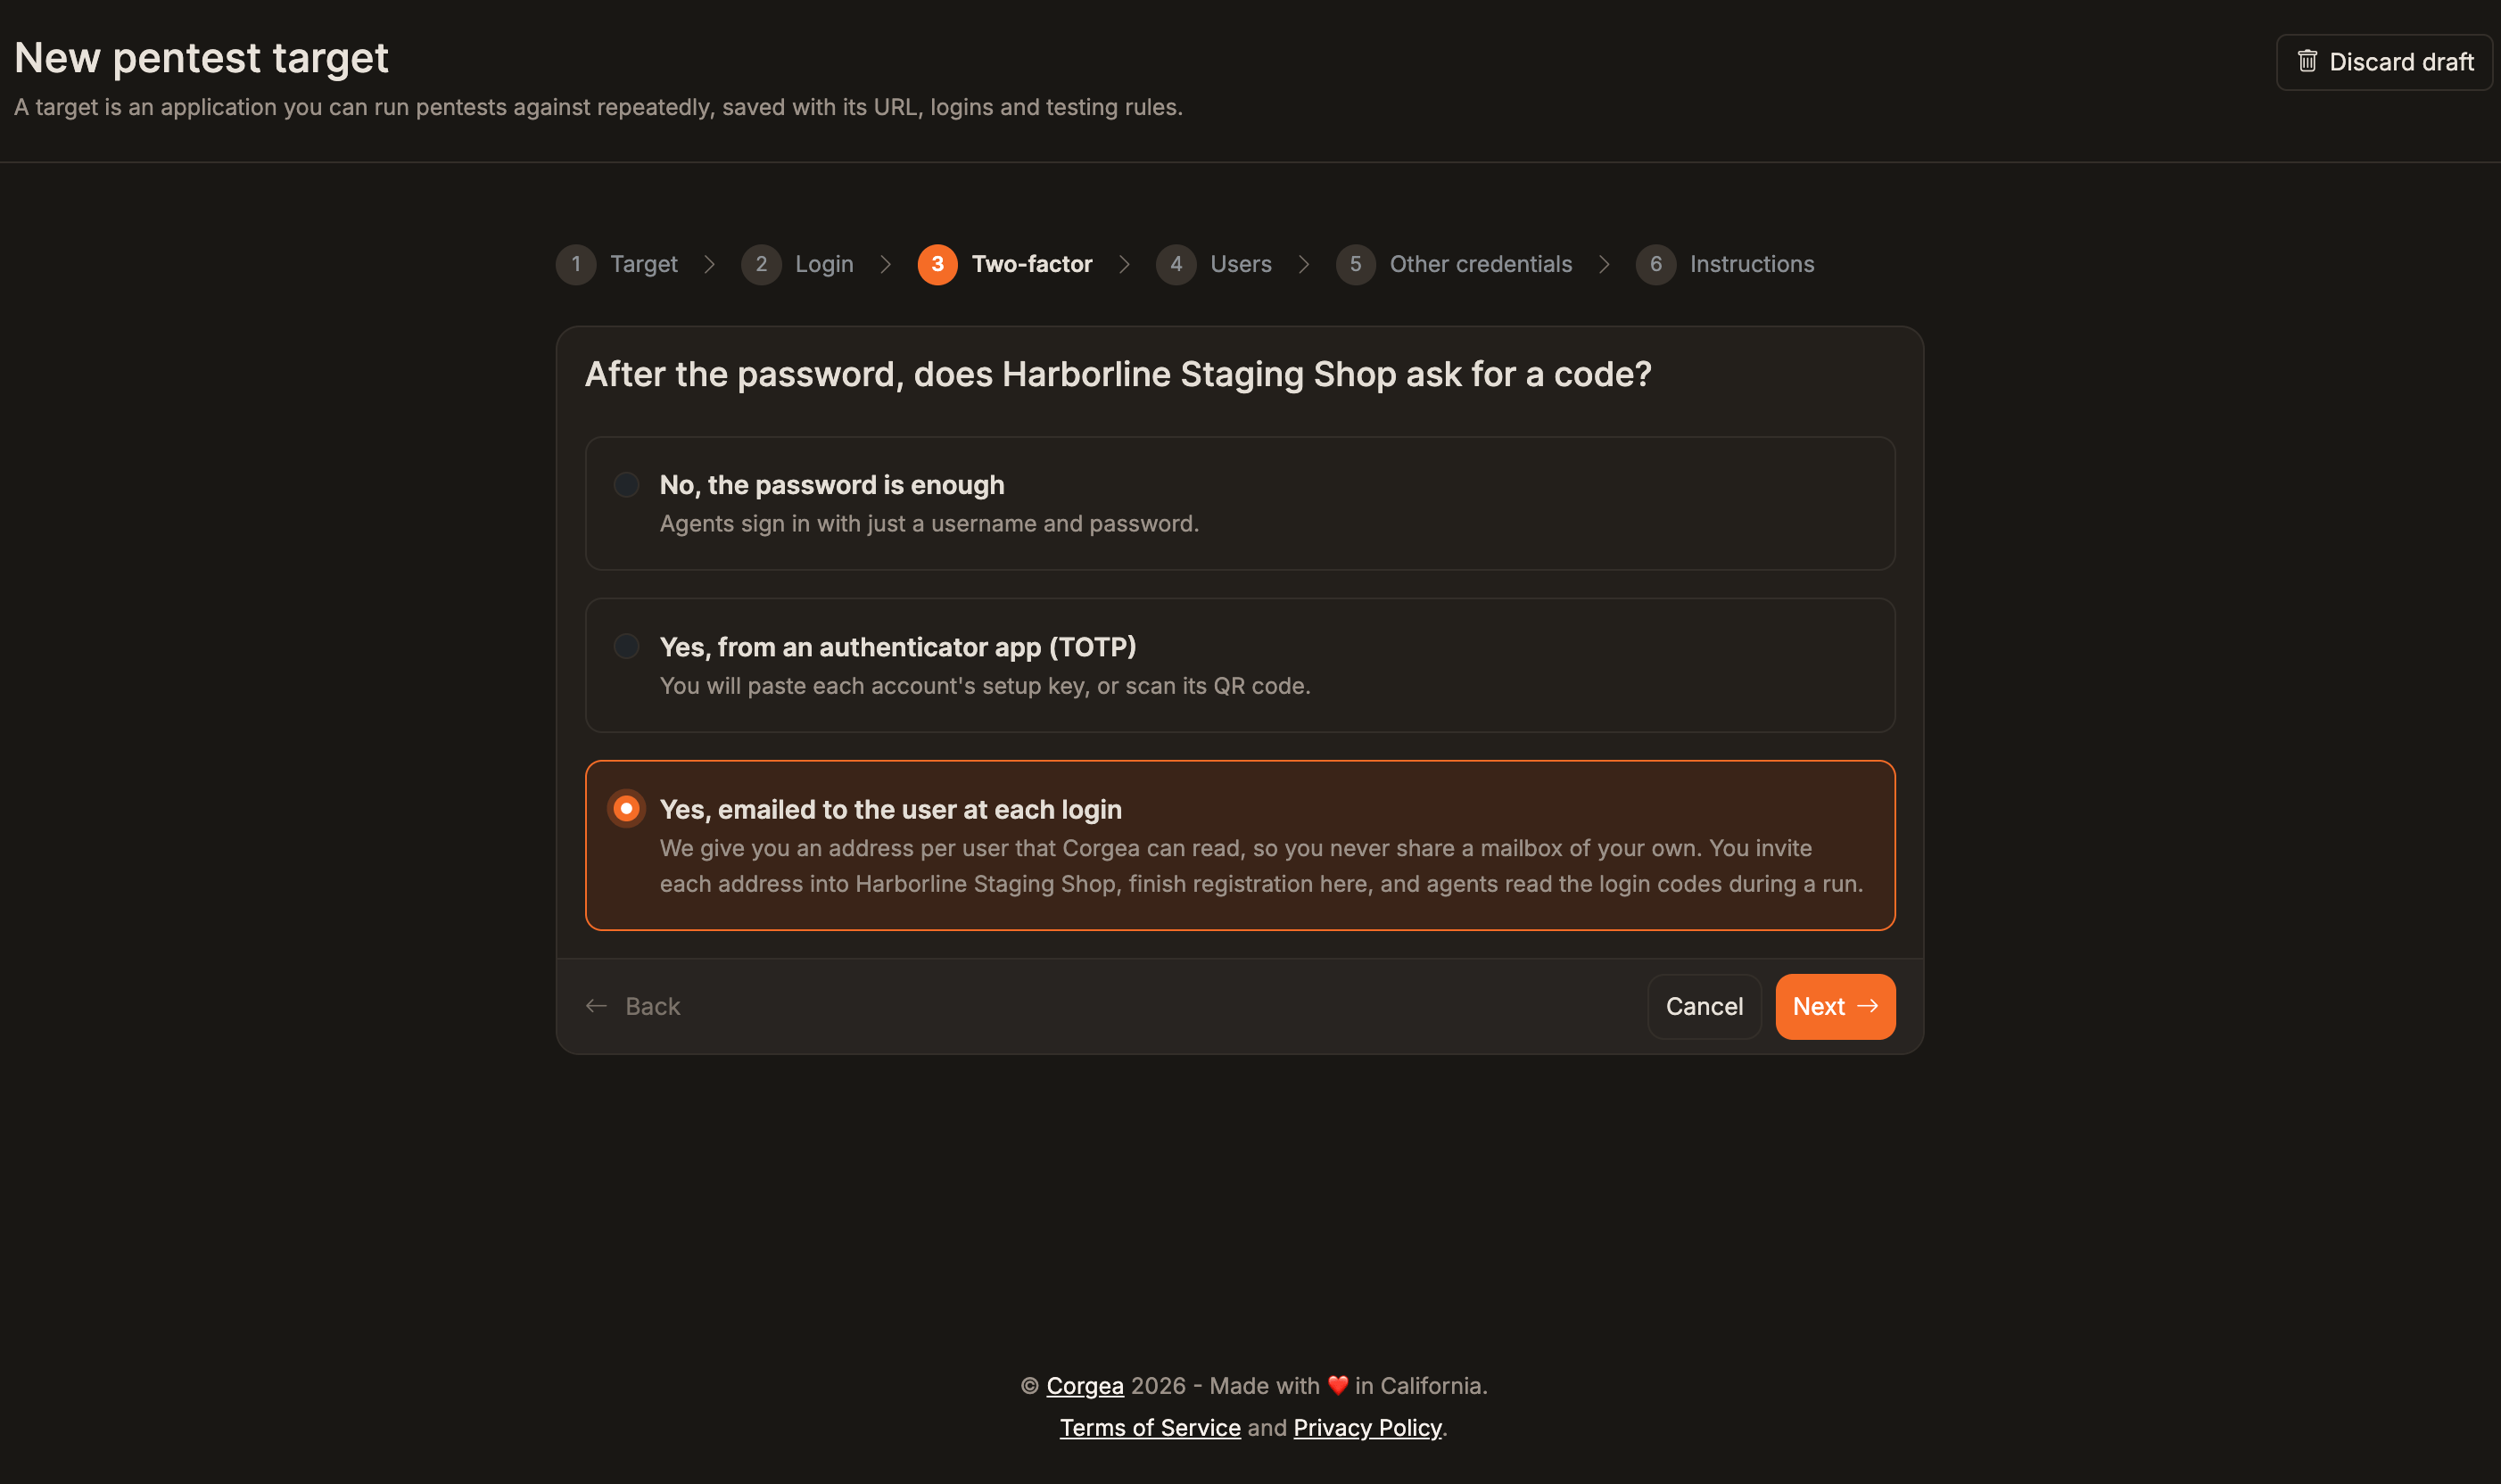
Choose how agents sign in
Choose anonymous testing or authenticated testing. For authenticated testing, select password only, an authenticator app (TOTP), or emailed login codes when available on your deployment.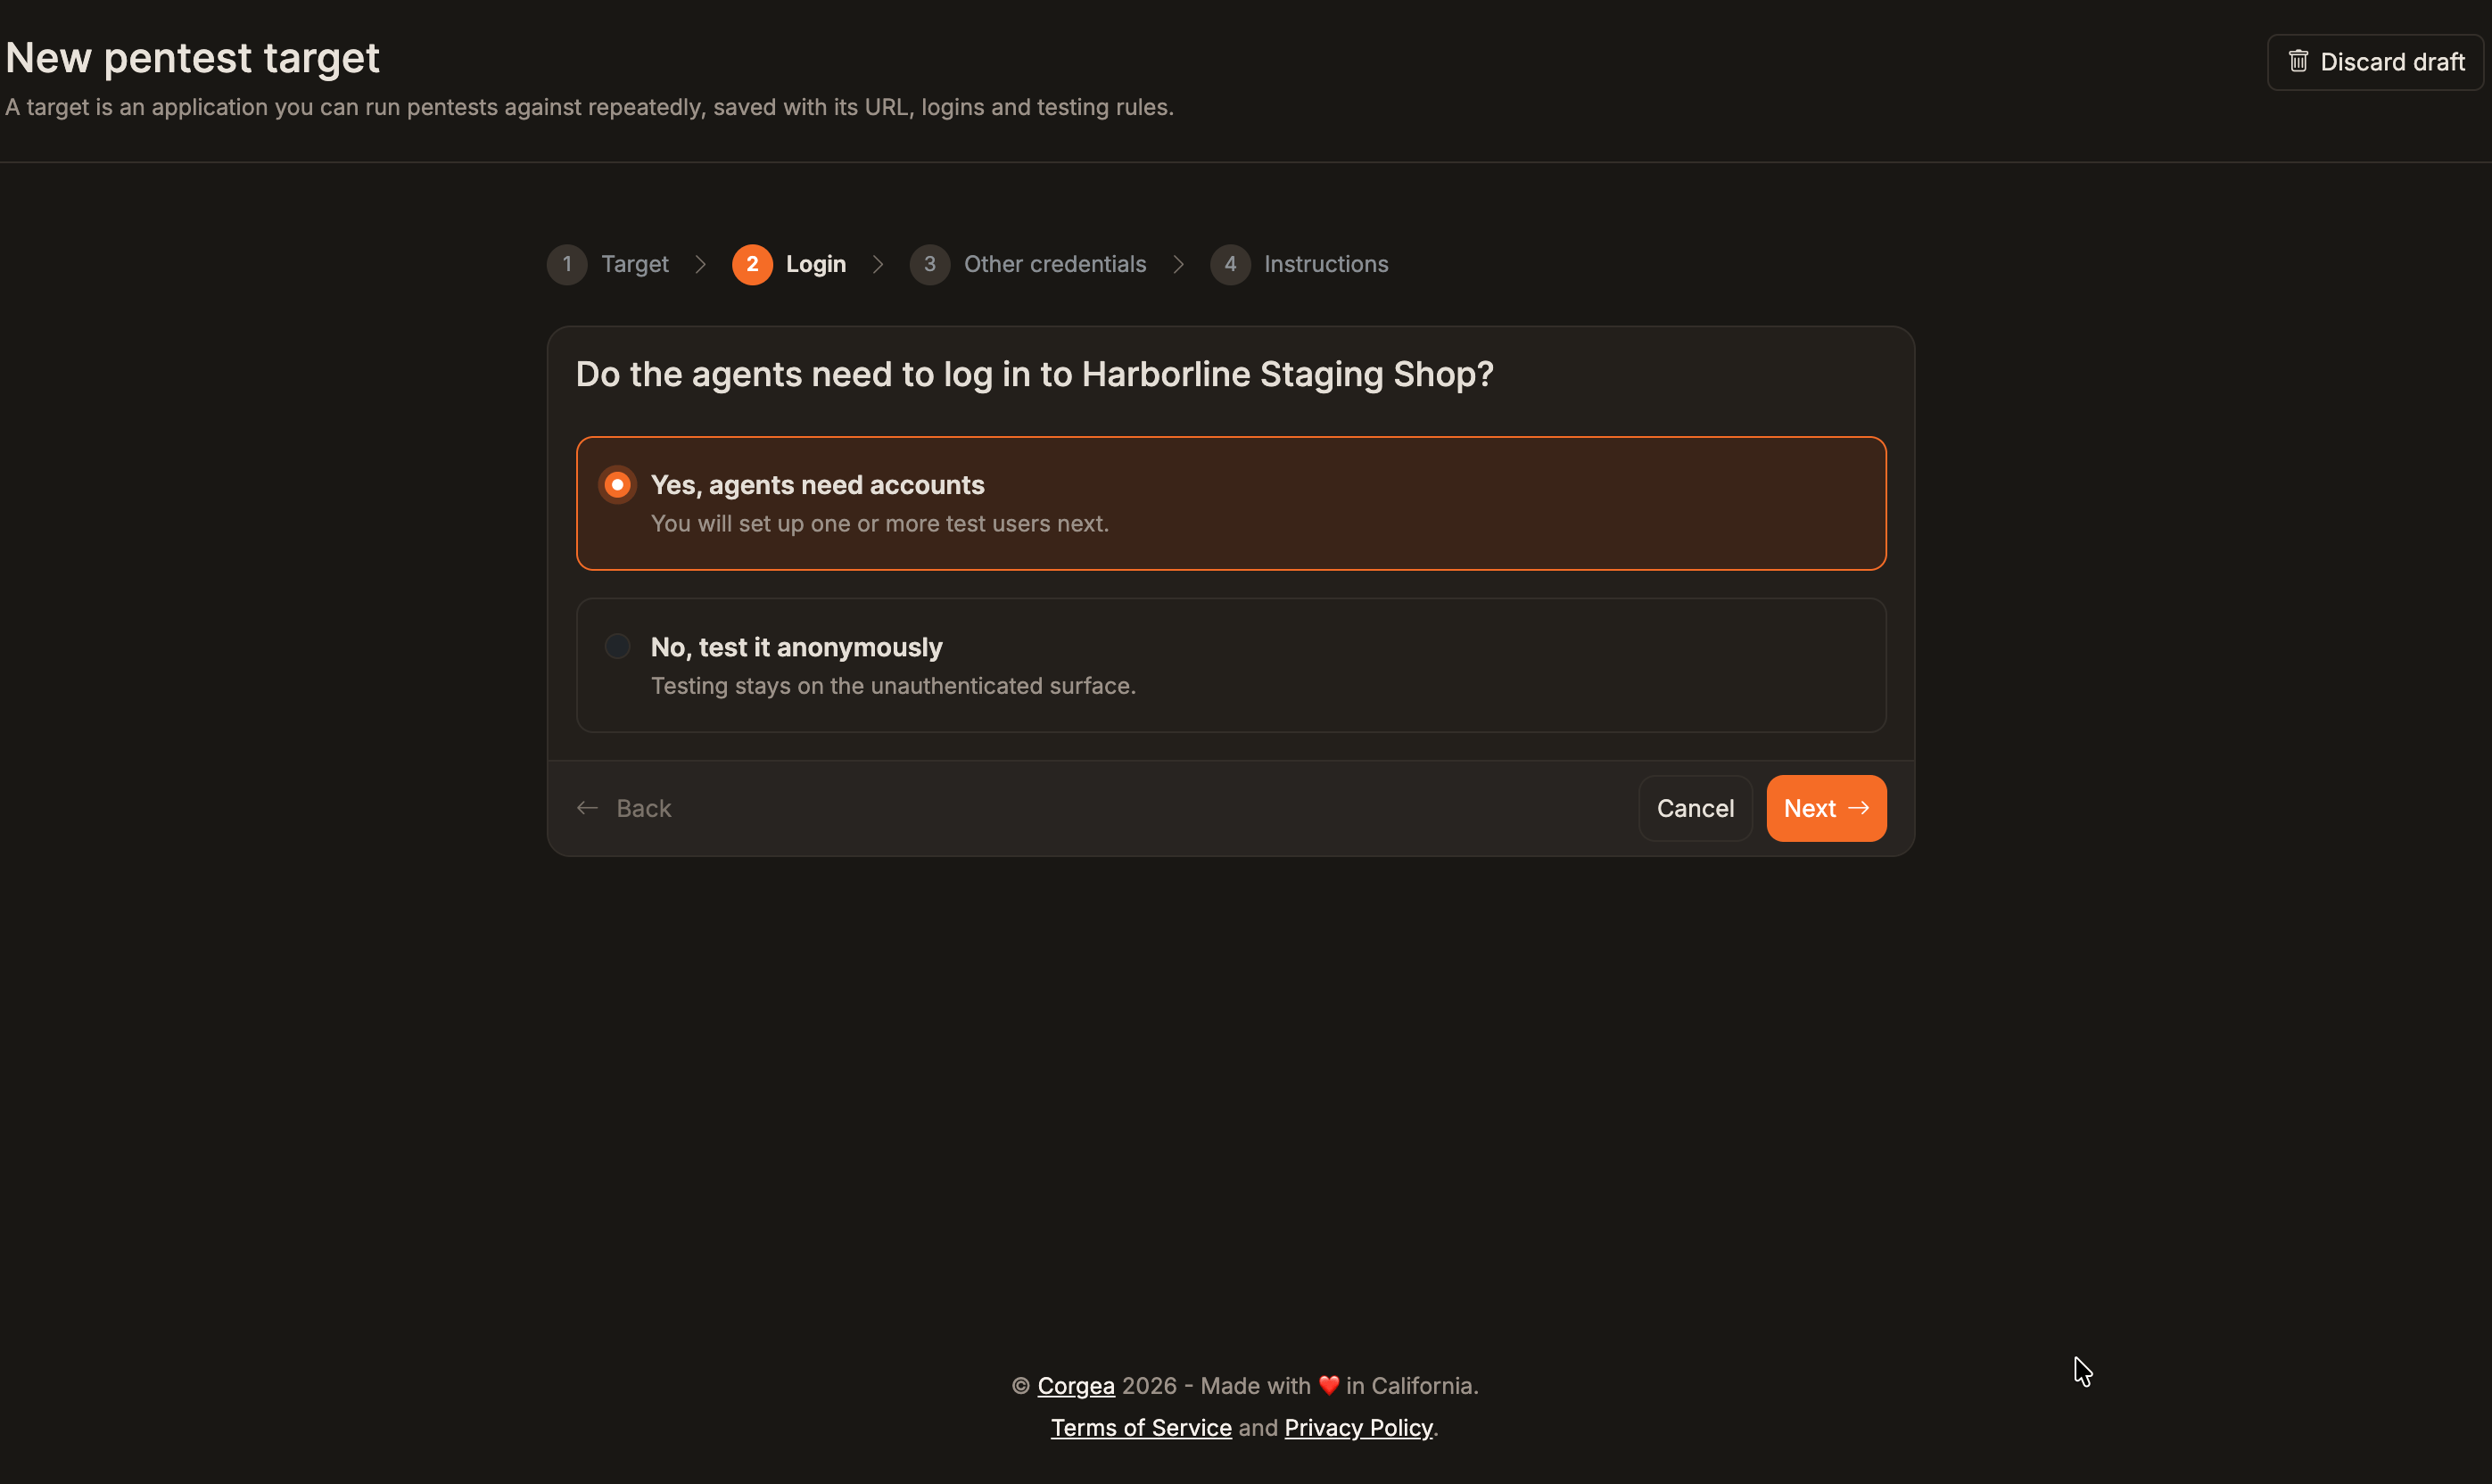
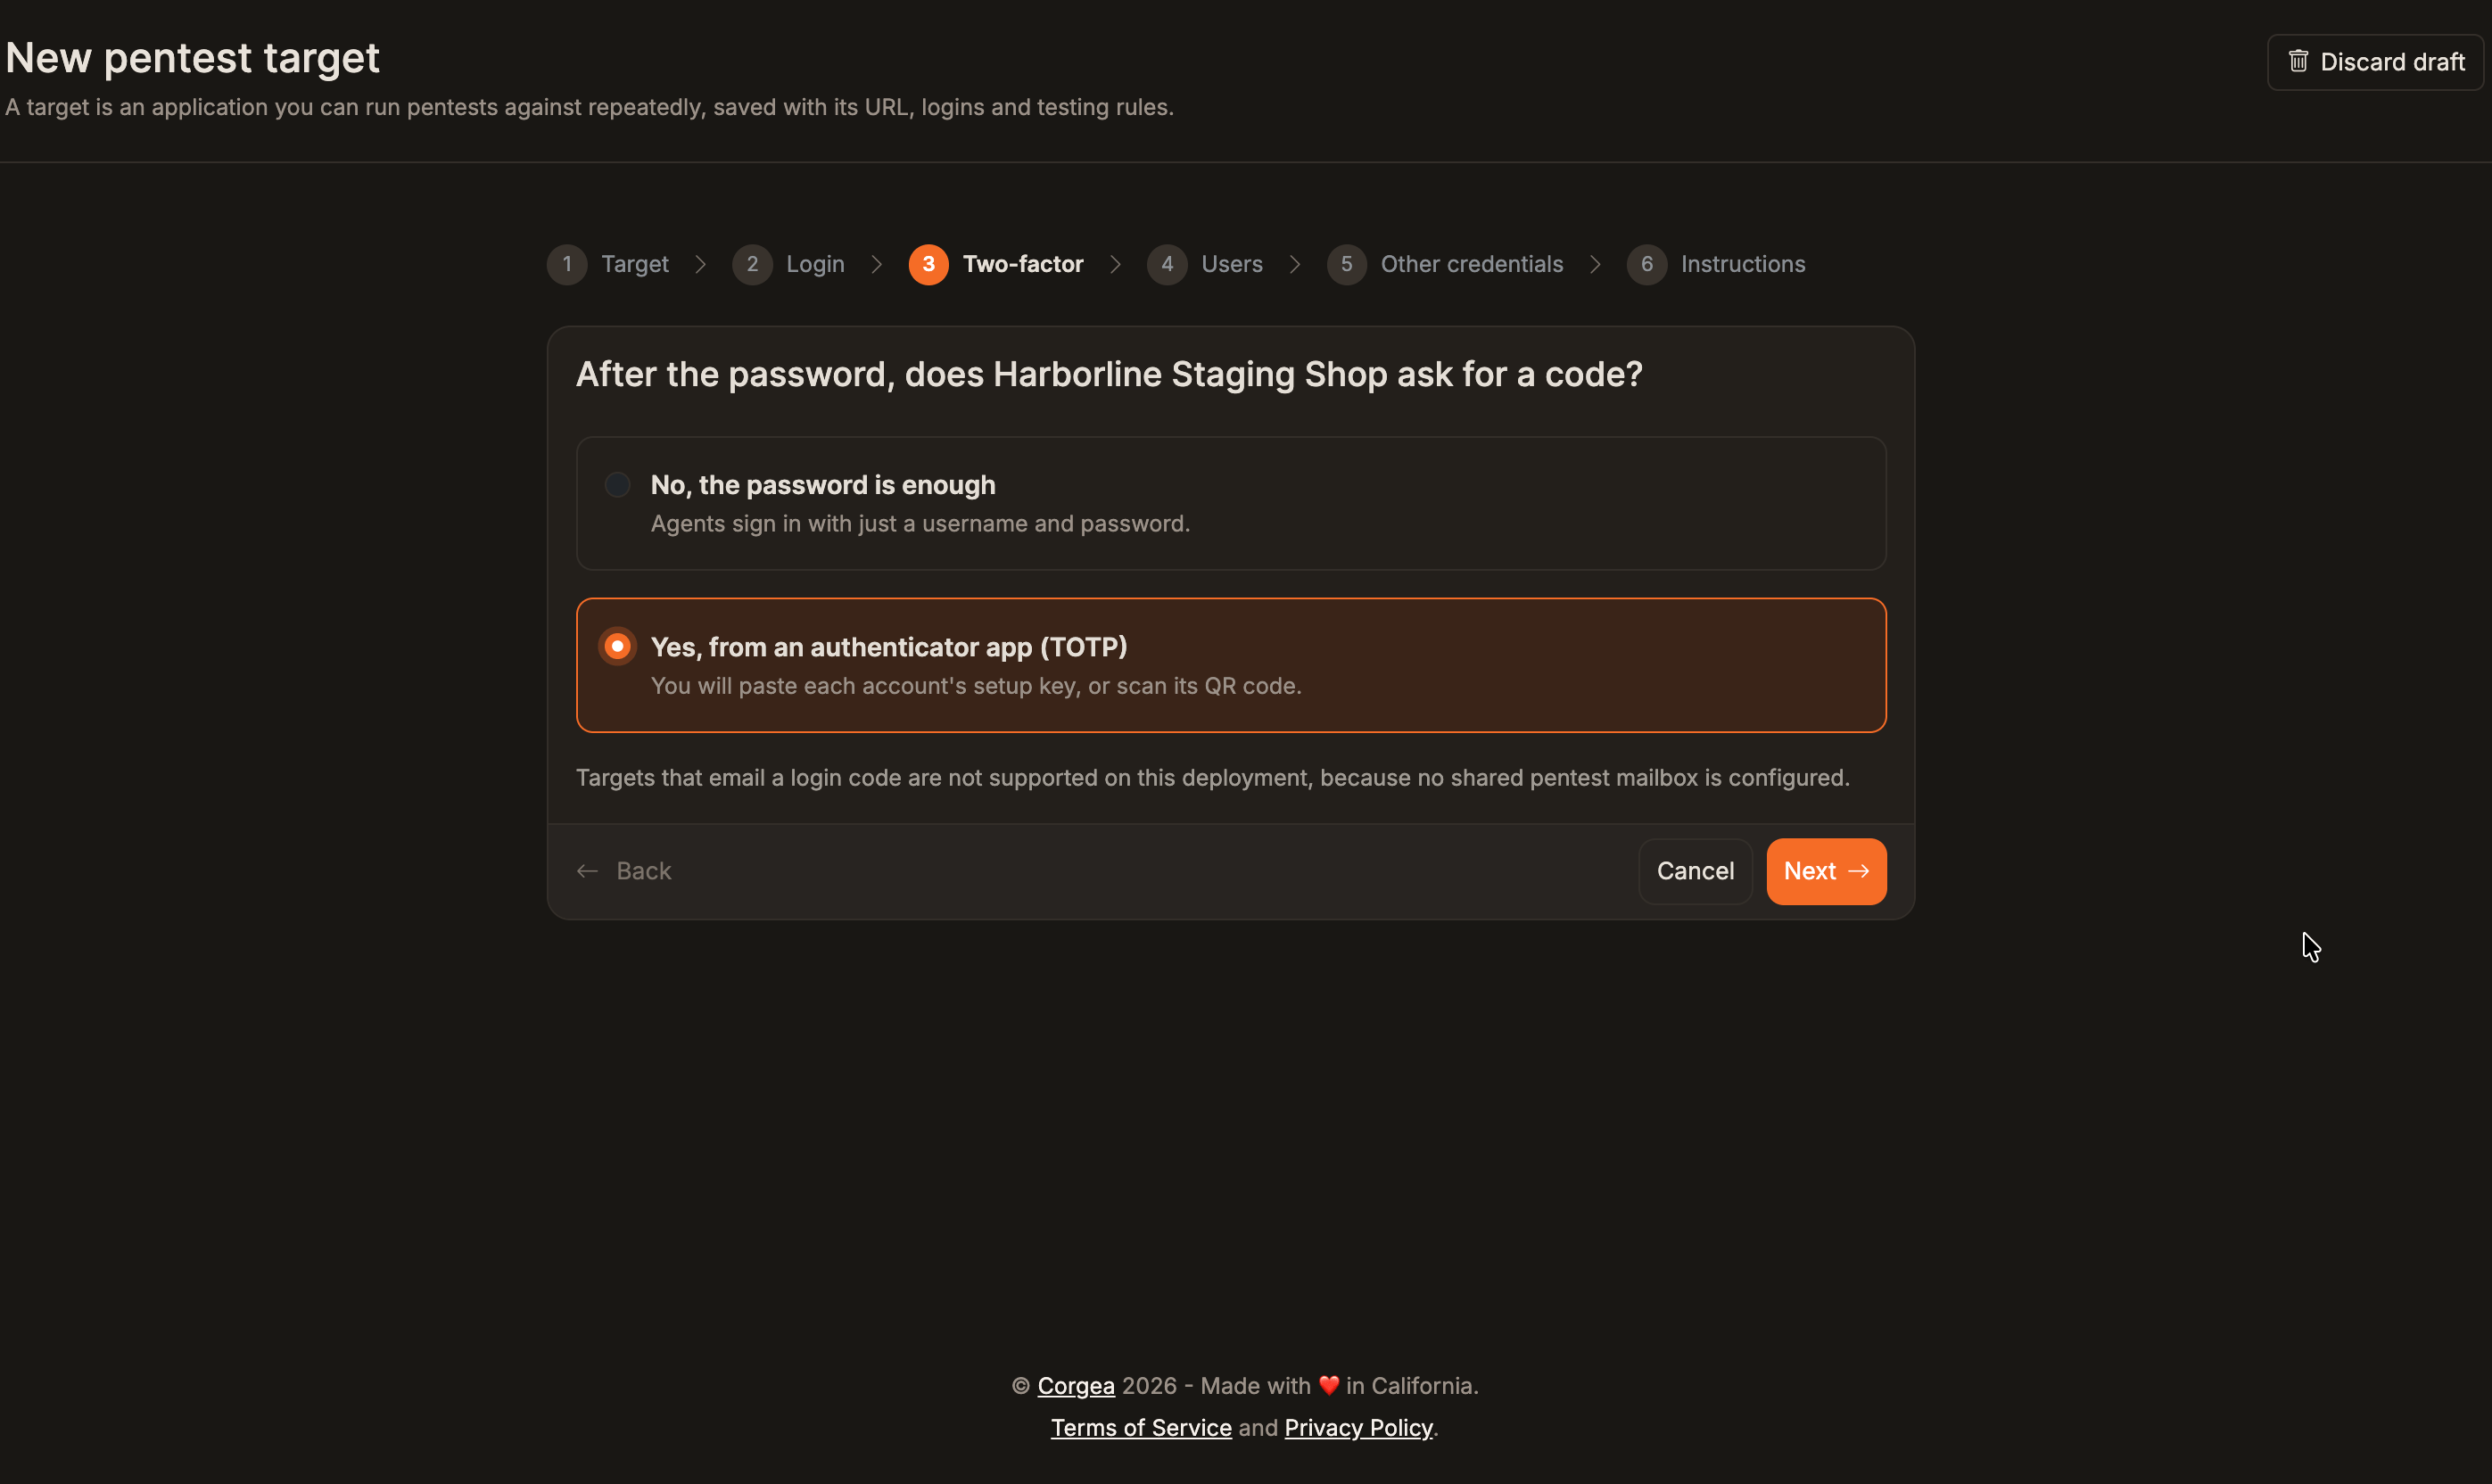
4
Set up test users
Add a username or email and password for each account. Multiple accounts let agents test access between users. For TOTP, enter the account’s TOTP URI or select a QR image; the image is read in your browser and is not uploaded.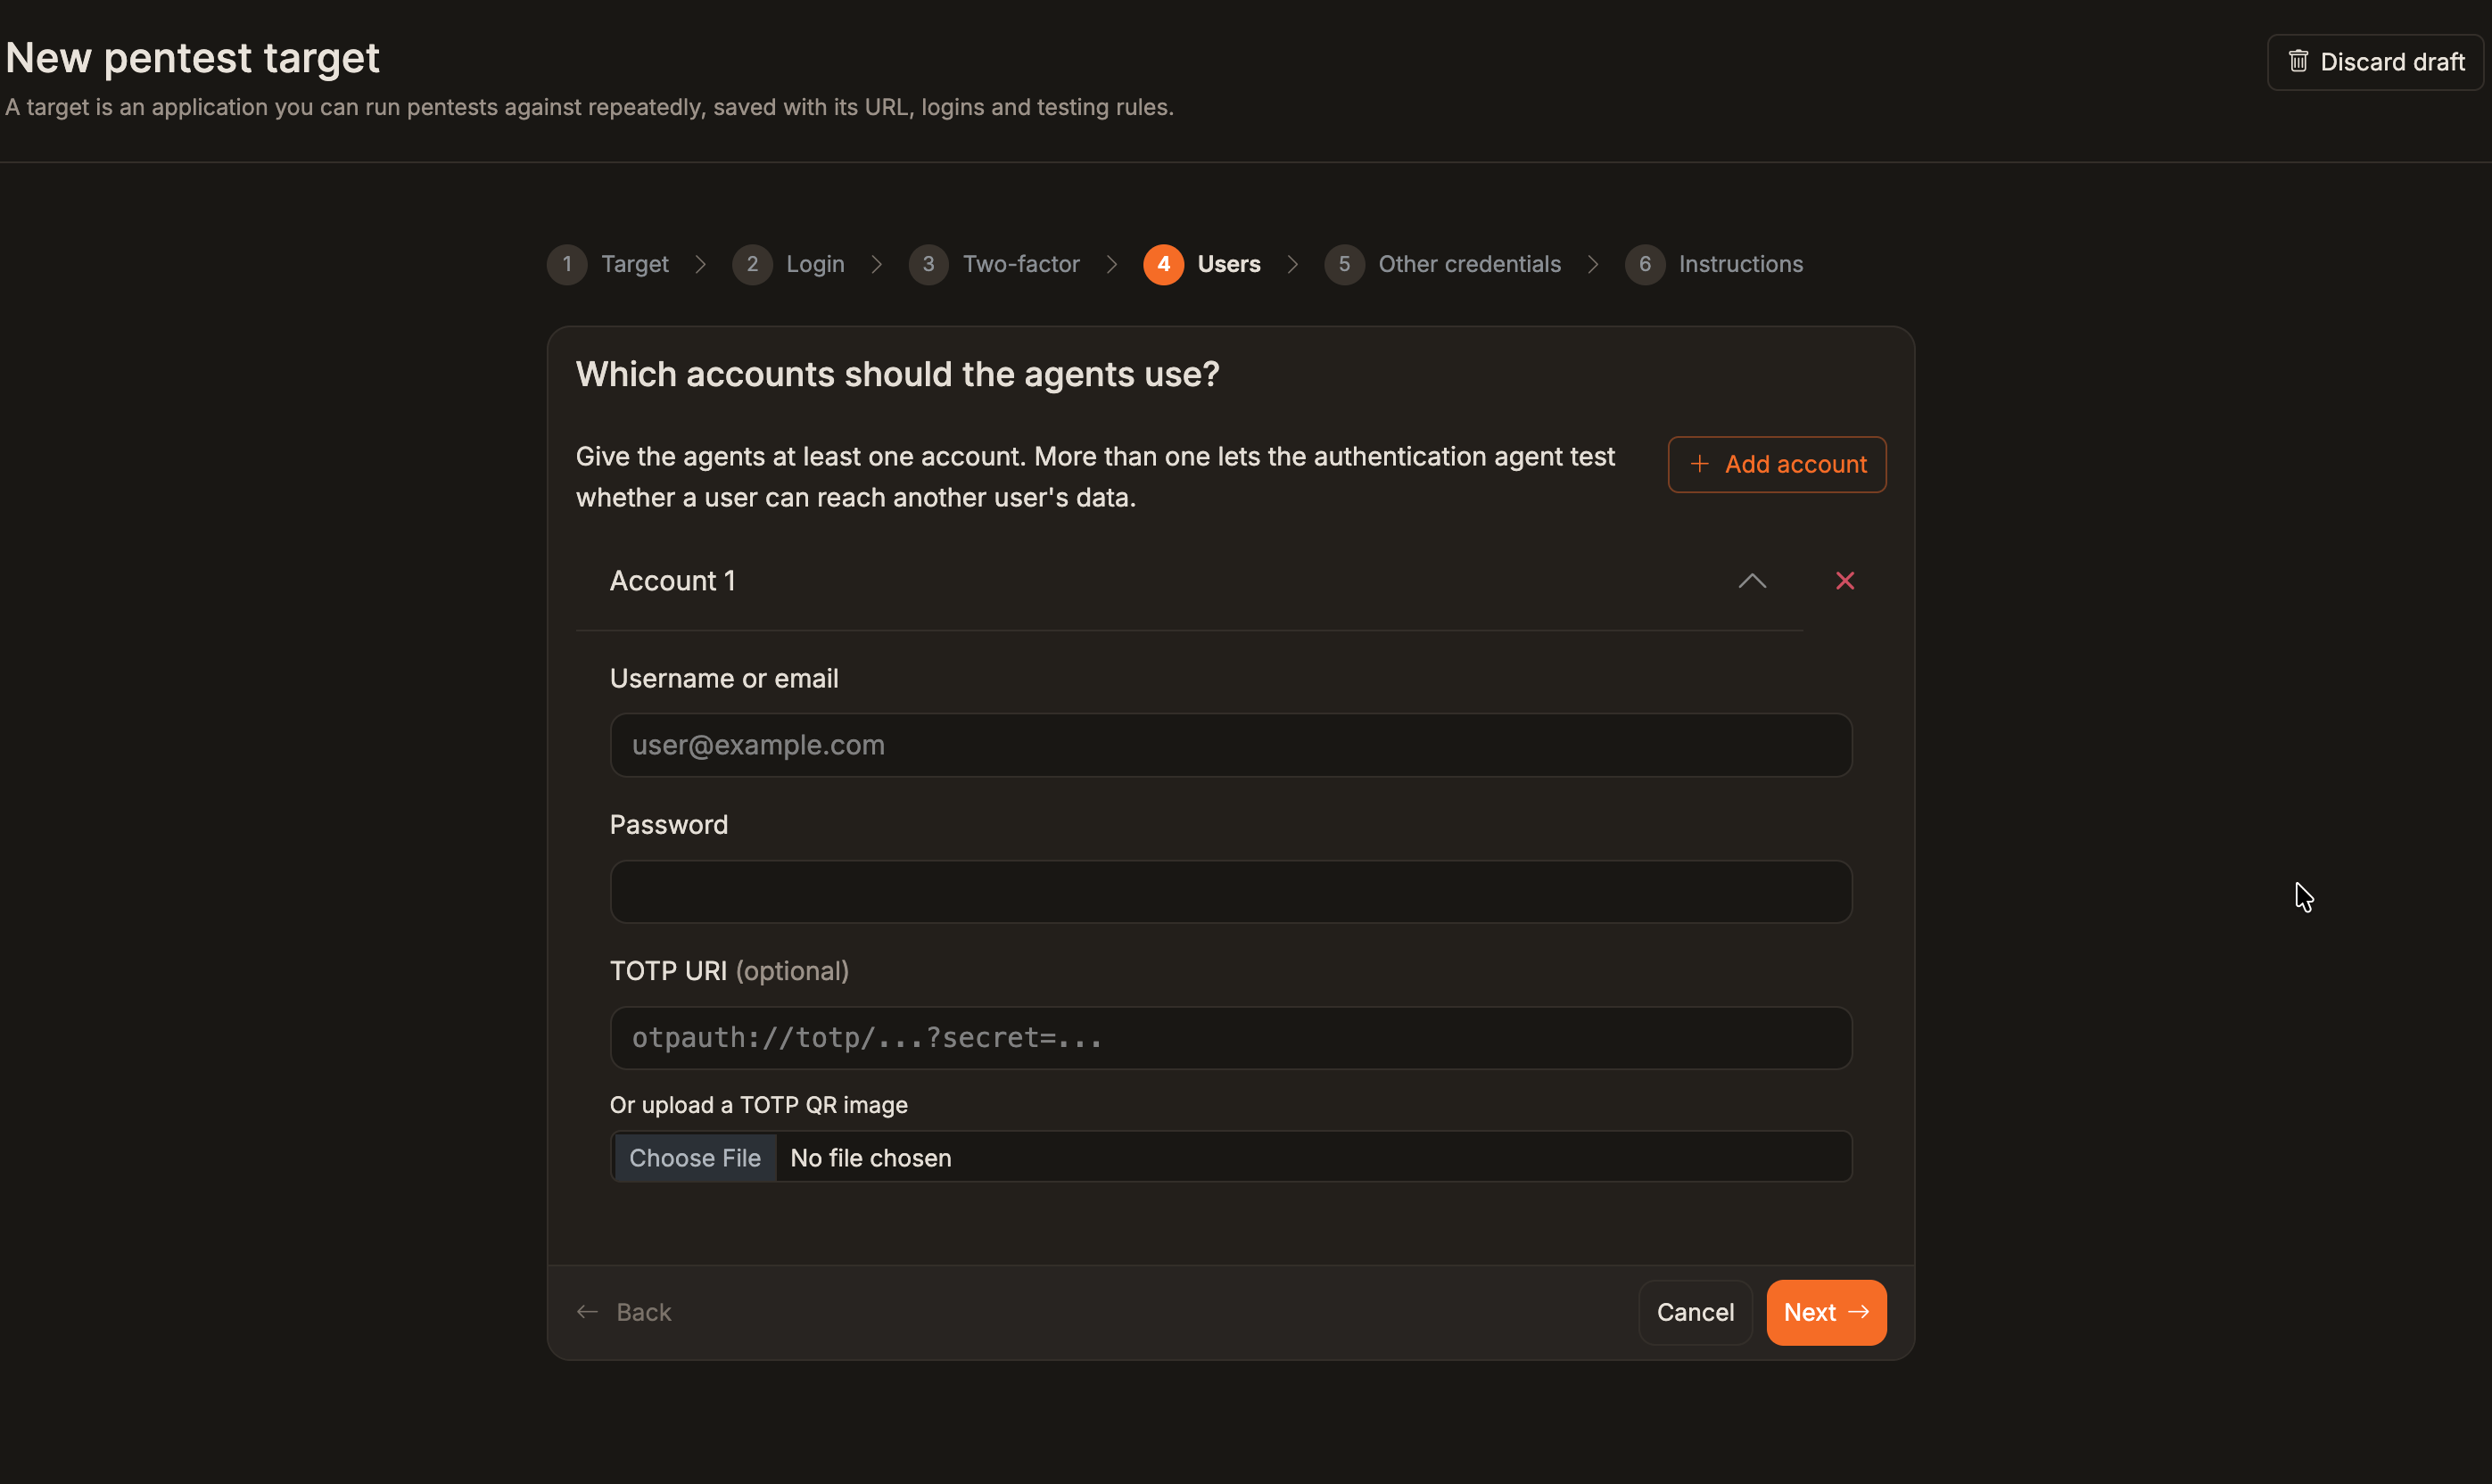
5
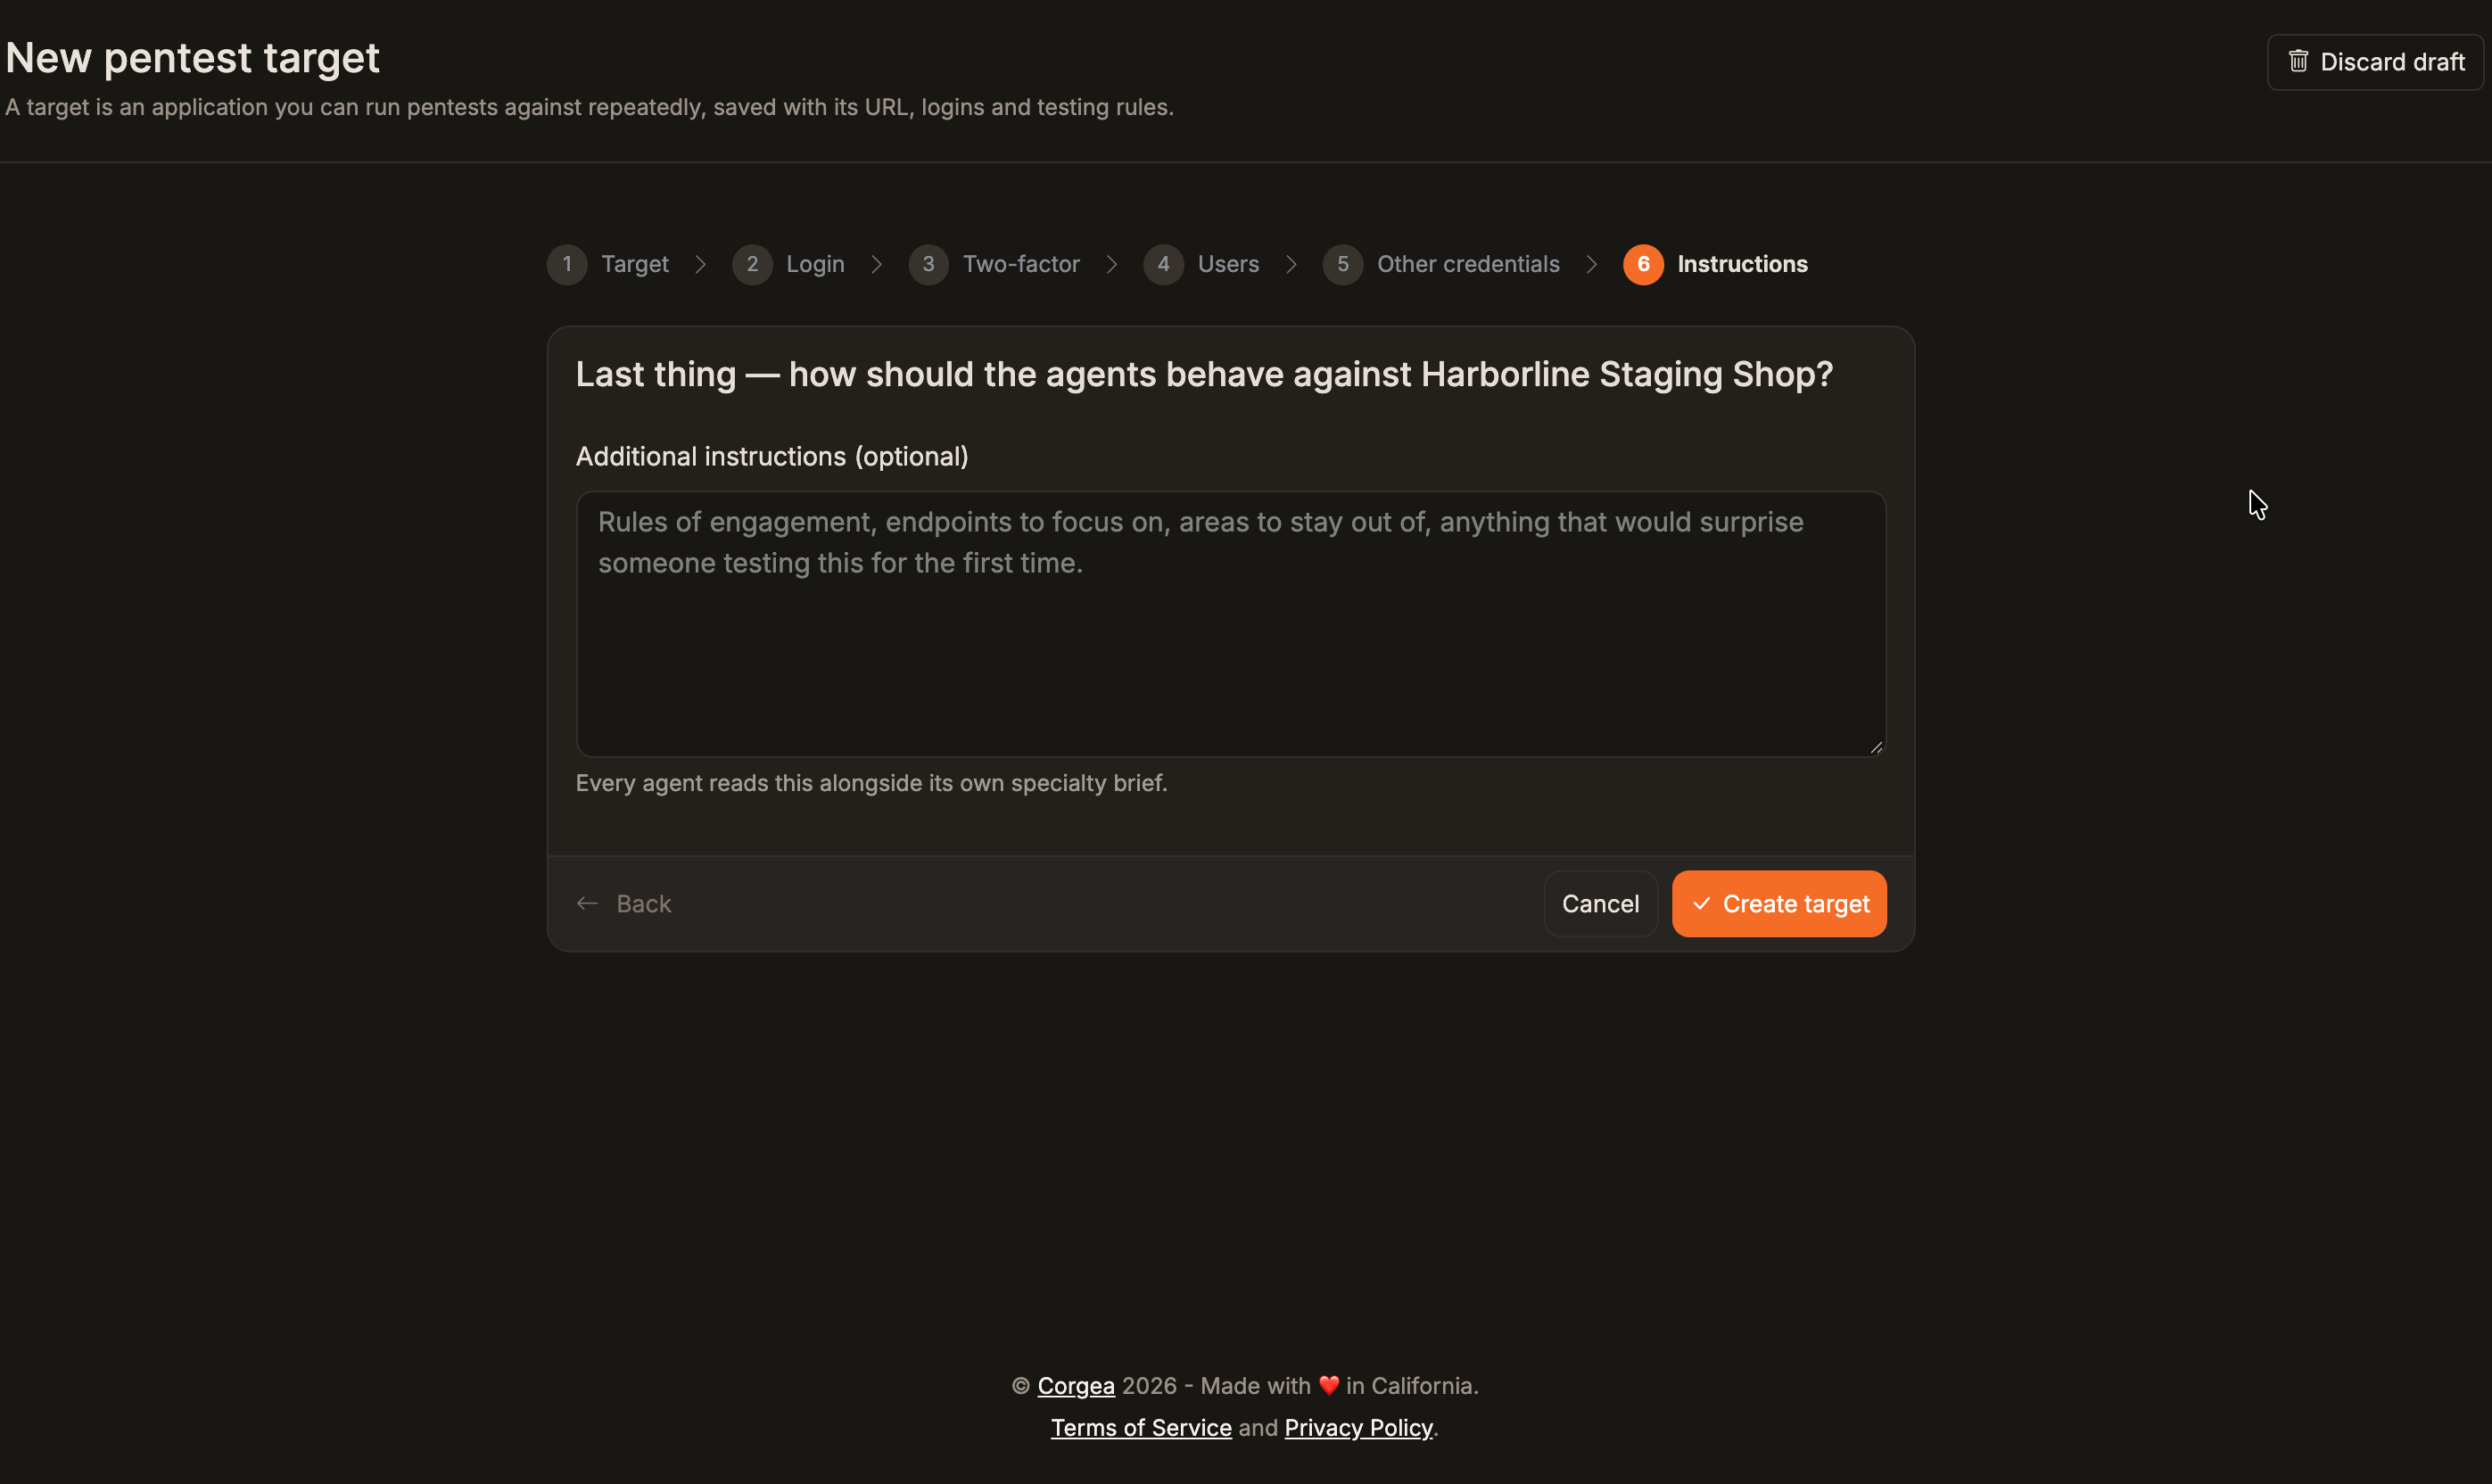
Add other credentials and instructions
Use Other credentials for API keys, required headers, or tenant IDs. Use Additional instructions for rules of engagement, scope exclusions, or endpoints to focus on, then click Create target.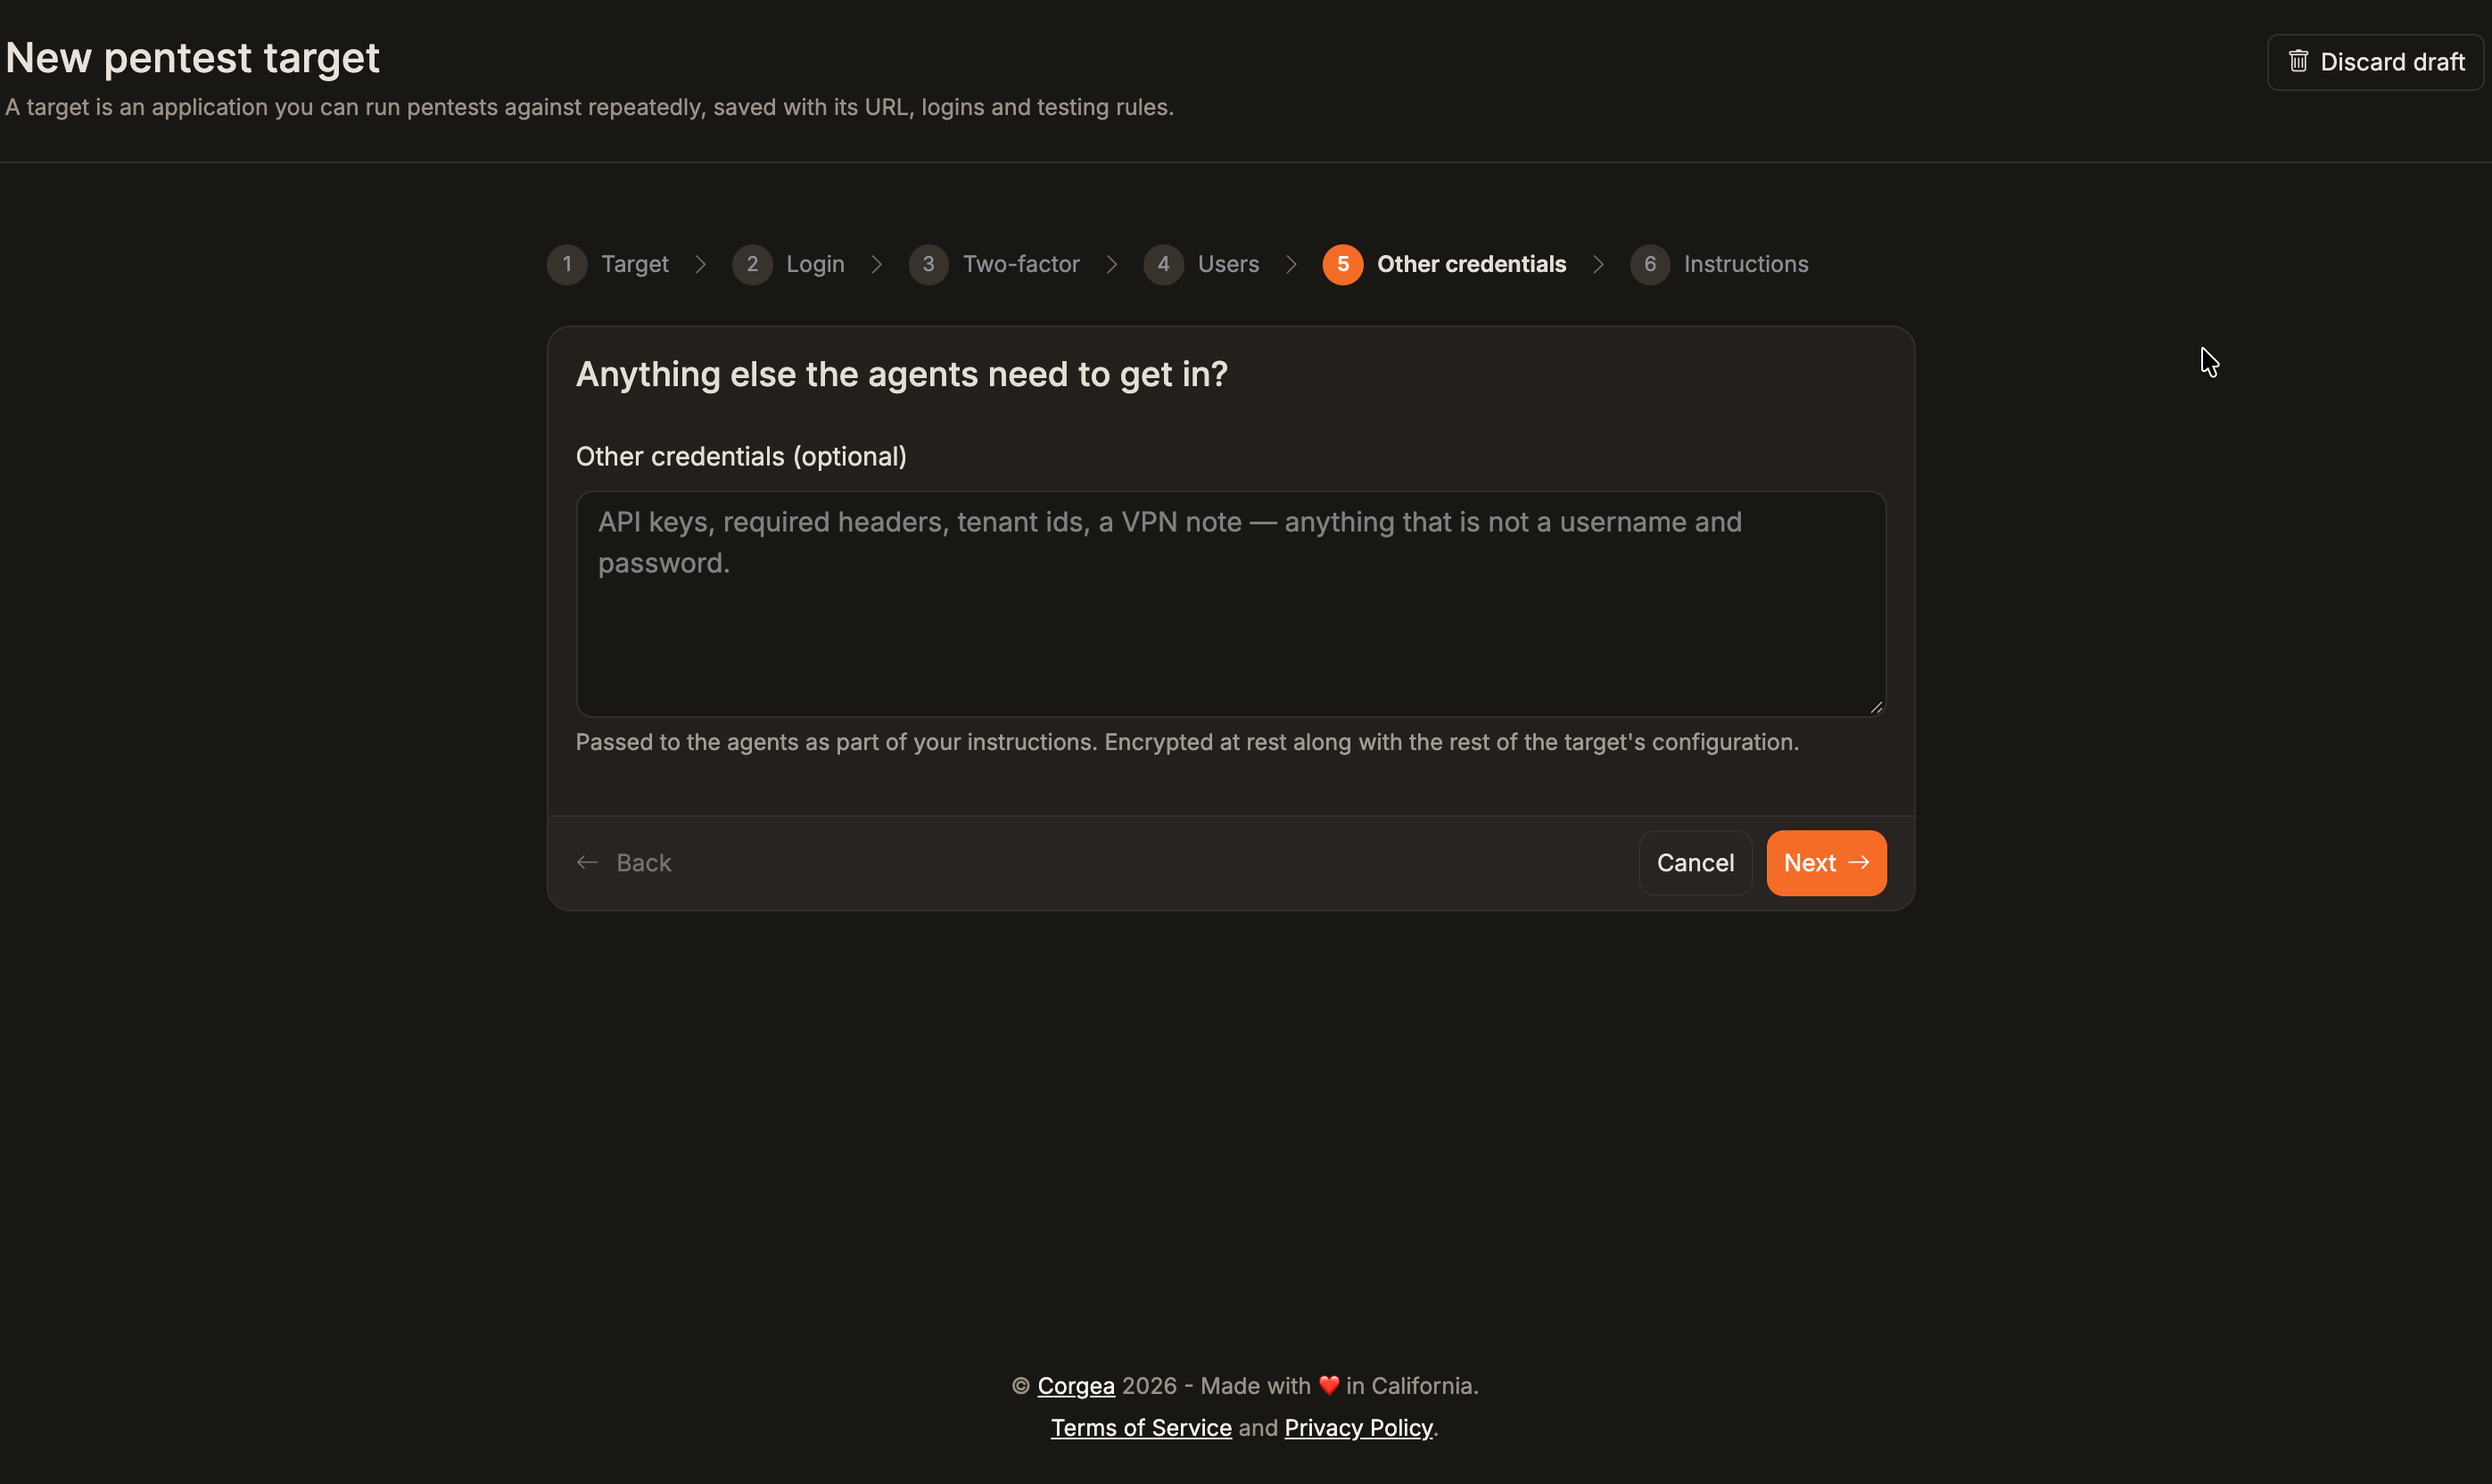
Credentials are encrypted at rest and are decrypted only while a run against that target is executing.
Emailed Login Codes
When this option is available, Corgea provides an email address for each test user. Enter a short role label using lowercase letters, digits, and hyphens, then click Provision. Invite that address into your application, use Check for mail to open the invitation and finish registration, then enter the password if your application set one and click Save user. Repeat for each user.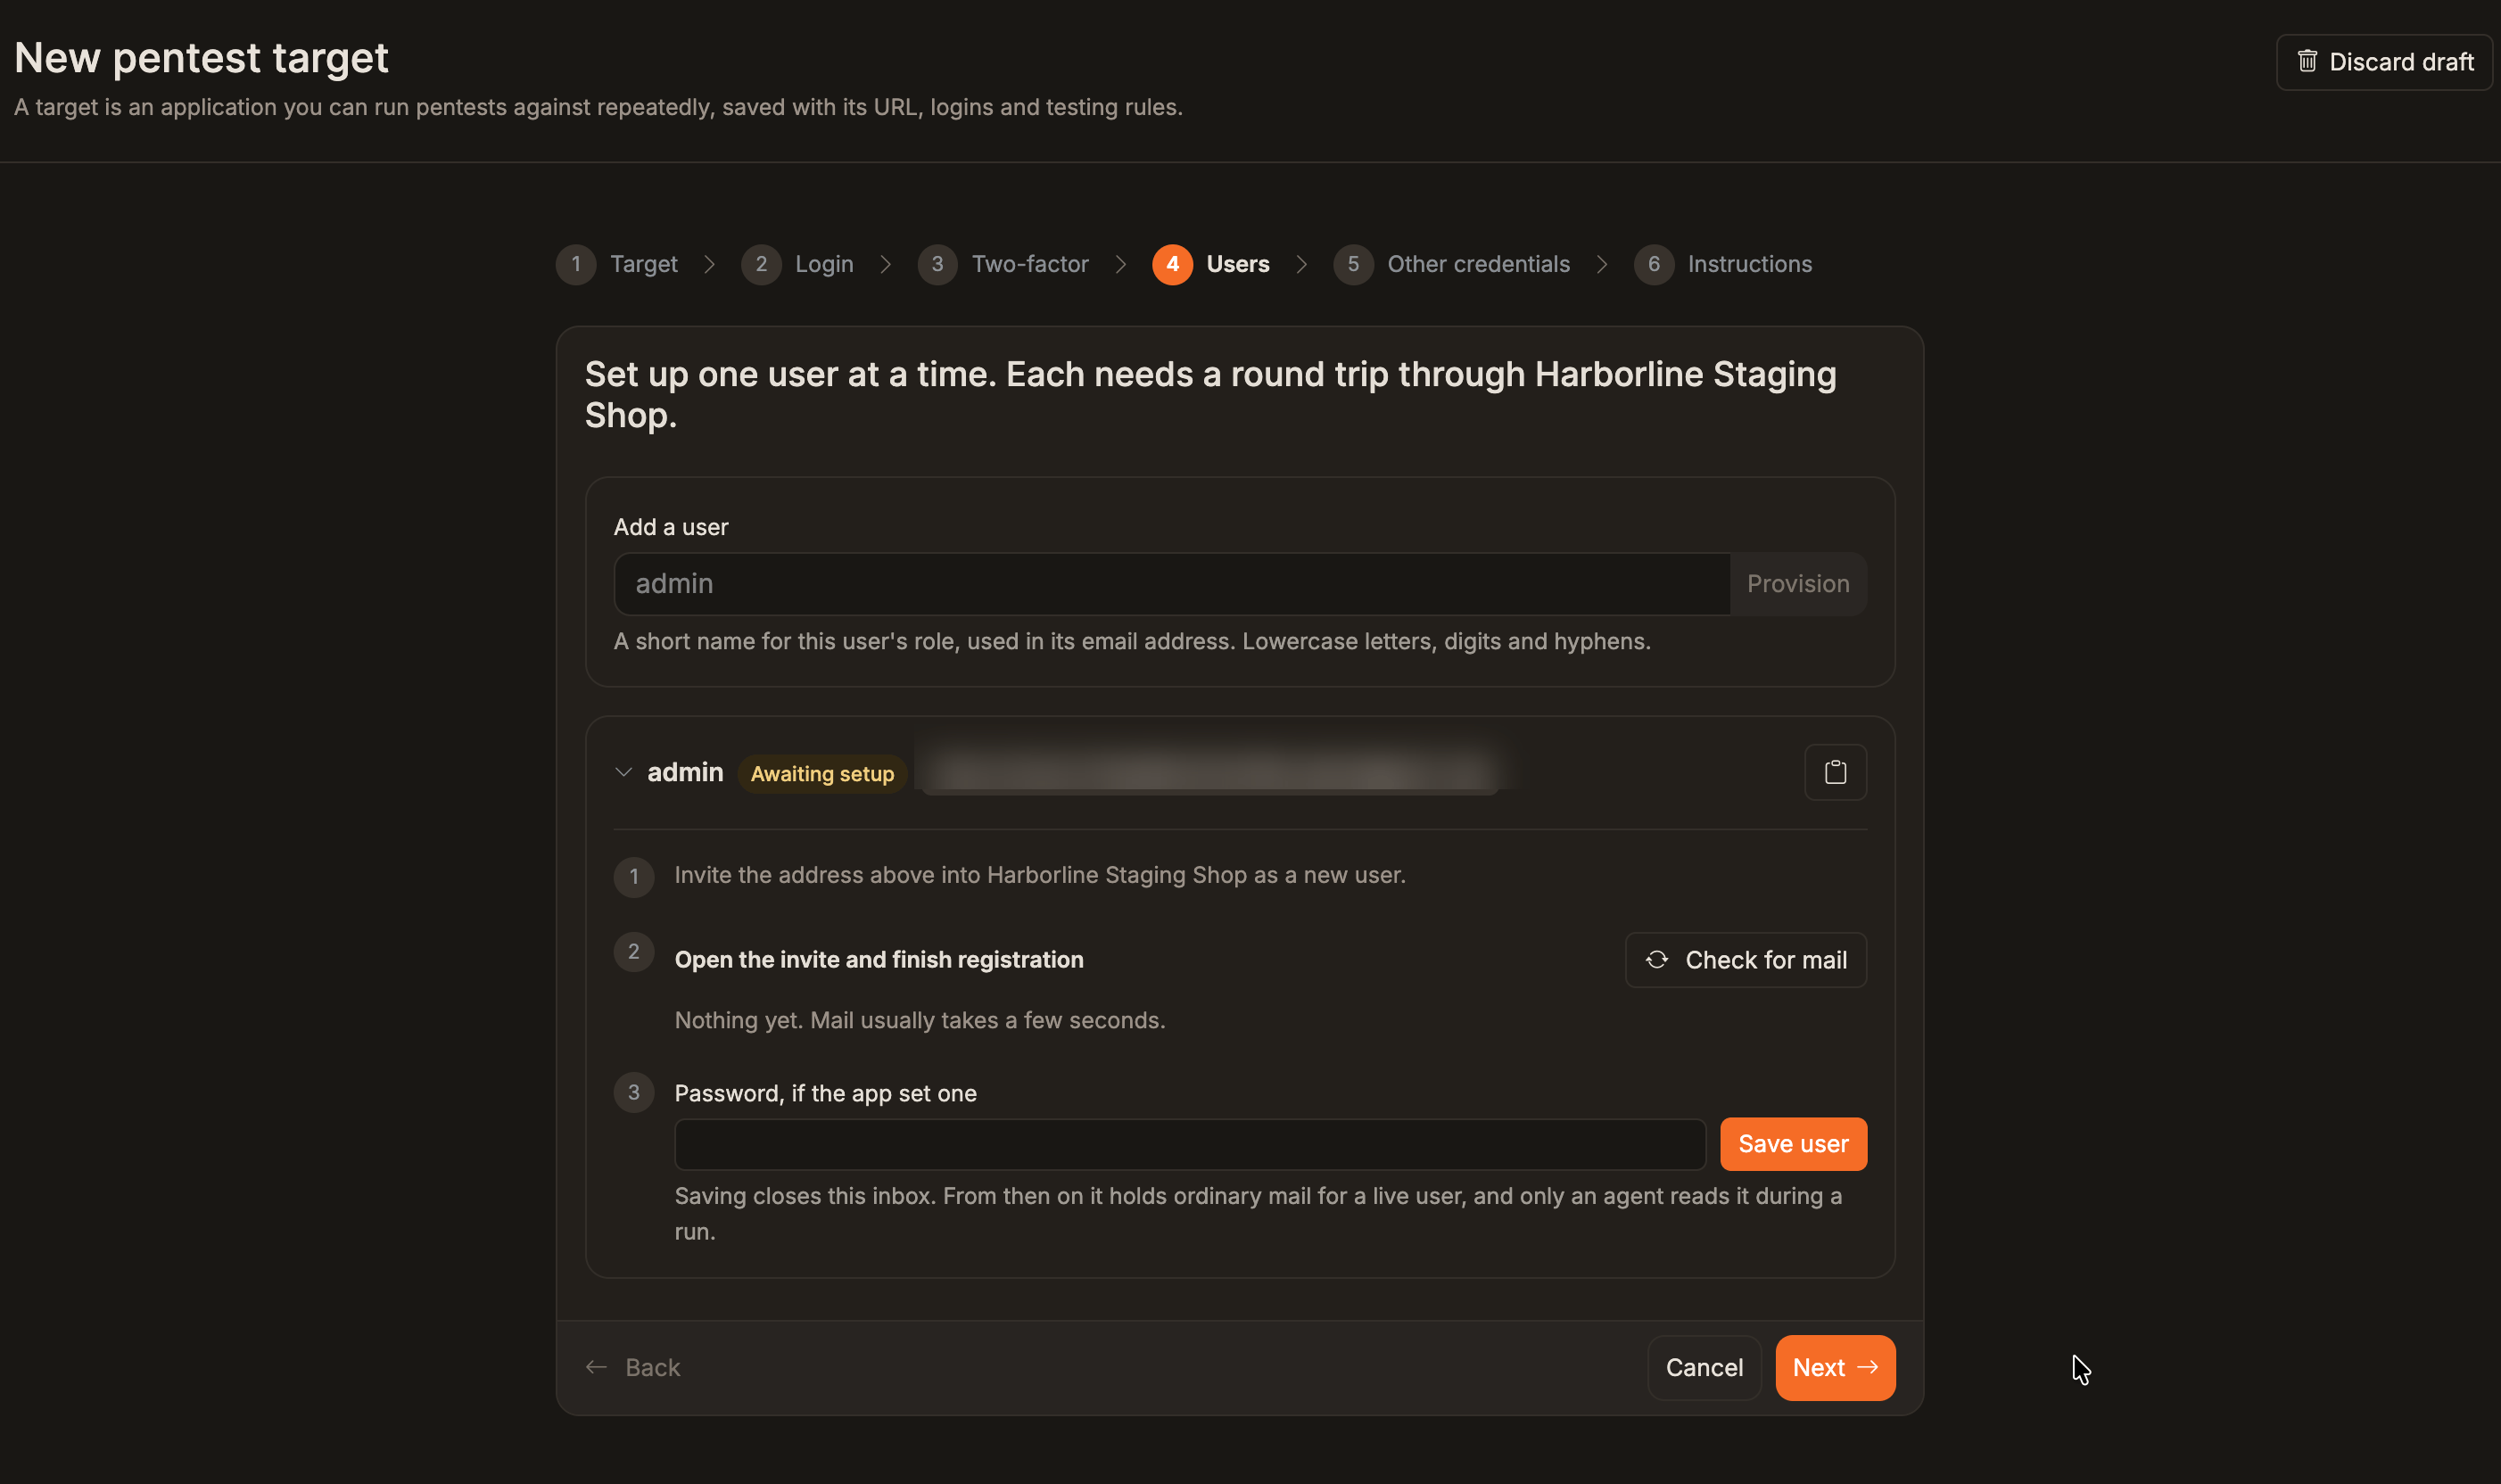
Editing and Archiving
Open a target’s actions menu to start a run, edit it, or archive it. Edits apply to future runs only. Every run captures the target configuration it started with, so historical runs and their findings always reflect the setup that produced them. Changing a URL or rotating credentials never rewrites what a past run reported. Choose Edit target to reopen the setup wizard. To remove stored accounts and test anonymously, choose No, test it anonymously at the login step. Archiving hides a target from the list while keeping all of its historical runs viewable.Starting a Run
From a target’s actions menu, choose Start new run.- Balanced
- Deep
A faster assessment covering authentication and authorization, business logic, and injection. Use this for routine testing on a regular cadence.
Watching a Run
Runs take a few hours depending on scan mode and the size of the application. You do not need to keep the page open — findings are saved as they are confirmed, and admins can be emailed when the run finishes. While a run is active, the run page updates on its own. Findings appear as agents validate them, so you can begin triaging critical issues before the run completes. Click Logs to watch the agents work.
Reviewing Findings
When a run finishes, the run page summarizes what was found.
- All findings — everything the run confirmed, with counts by severity
- Auth & AuthZ — broken access control, authentication, and session issues
- Business Logic — workflow and transaction integrity issues
- Injection — injection, traversal, and untrusted input issues
- Validated SAST — coming soon; will cross-reference confirmed SAST findings against runtime exploitability
Filtering and Grouping
The toolbar above the findings list gives you:- Status pills — Open, Fixed, Closed, and False Positive, each with a live count. More adds Accepted Risk, Duplicate, and All statuses.
- Search — matches on title, CWE, and endpoint
- Severity — filter to Critical, High, Medium, Low, or Info
- CWE / Endpoint toggle — group findings by weakness type, or by the endpoint they affect
Finding Details
Open any finding to see the full write-up across five tabs.Finding Details
The description, business impact, affected roles and users, and technical root-cause analysis. The sidebar carries the CWE identifier, severity, CVSS score, target, endpoint, and how many times the finding has been re-detected across runs.
Attack Chain
The exact sequence the agent used, as numbered steps. Each step names the request it sent and what the application returned, so an engineer can follow the path without guessing.
Exploit Script
A runnable script that reproduces the finding. Run it against your target to confirm the issue yourself, and again after fixing to confirm the fix holds.
Remediation
Concrete remediation steps for this specific finding, plus references to relevant standards and guidance.
History
A timeline for the finding that spans every run: when it was first detected, when it was re-detected, and every status change and comment, with who made each one. Corgea recognizes the same underlying issue across runs. If a finding reappears in a later pentest, it is linked to the original rather than filed as something new, so the history reflects one continuous story.Triaging Findings
Use Current Status on a finding to record a decision. You can set:
A status change applies to every detection of that same issue, so triaging once updates the whole history rather than just the row you opened. You can also add comments to record context for teammates.
Closed appears as a status but cannot be set by hand. Corgea applies it automatically when a revalidation run can no longer reproduce a finding.
Exporting a Report
Once a run completes, Export report offers two PDFs.Technical report
The complete assessment, including technical analysis, proof of concept, exploit code, and remediation guidance for every finding. For your engineering team.
Executive report
The same assessment and findings without the technical deep-dive, proof of concept, or remediation detail. For customers, auditors, and leadership.
- A confidentiality statement and table of contents
- An executive summary and findings dashboard
- Scope and methodology, including which agents ran and what each covered, plus an explicit out-of-scope statement
- Severity definitions and recommended action per tier
- A summary table of all findings
- Detailed findings grouped by severity
Revalidating After Fixes
Once you have shipped fixes, re-test them without spending a full pentest on the whole application. On a completed run, open the New run menu and choose Revalidate Findings. A revalidation run re-tests only the findings from the source run and reports:- Still open — findings it reproduced again
- Closed by this run — findings it could no longer reproduce, which are automatically set to Closed
1
Fix the findings
Work through the remediation steps, marking findings Fixed as you go.
2
Revalidate
From the completed run, choose New run then Revalidate Findings.
3
Confirm
Findings that can no longer be reproduced move to Closed. Anything still reproducible stays open with fresh evidence.
Notifications
Company admins can receive an AI Pentest Completed email when a run finishes, with the target, scan mode, total findings, and a severity breakdown. This is a per-admin email preference, so admins who would rather not receive it can turn it off without affecting anyone else. Corgea also fires a webhook on completion, which you can use to post results into Slack, open tickets, or gate a release pipeline. See Webhooks for setup and payload details. Revalidation runs do not send completion notifications.Frequently Asked Questions
How long does a pentest take?
How long does a pentest take?
A few hours, depending on scan mode and the size and complexity of your application. Deep runs take longer than Balanced. You do not need to watch the run — findings save as they are confirmed, and admins can be emailed when it finishes.
Can I test an application behind authentication?
Can I test an application behind authentication?
Yes. In the target setup wizard, choose authenticated testing and add one or more test users. You can use a password, an authenticator app (TOTP), or emailed login codes when that option is available. Runs also include unauthenticated testing, so you get both the external-attacker and logged-in-user perspectives.
Will a pentest damage my application or its data?
Will a pentest damage my application or its data?
Agents perform real attacks, which can create, modify, or delete data. Denial-of-service and volumetric load testing are explicitly out of scope, but you should still prefer staging or a dedicated test environment for routine runs.
Why was my target URL rejected?
Why was my target URL rejected?
Targets must use
http or https, must not embed credentials in the URL, and must not resolve to localhost, a private network range, or a cloud metadata address. Expose a reachable test instance instead.Why does a scan mode appear greyed out?
Why does a scan mode appear greyed out?
That mode is out of quota. Balanced and Deep are tracked separately, and remaining counts appear in the page header and the scan mode dropdown. Contact sales@corgea.com to extend.
My run failed. What now?
My run failed. What now?
The run’s status will say why. The most common causes are a target that became unreachable mid-run and credentials that stopped working. Confirm the target is up and the credentials are current, then start a new run.
The run finished with no findings. Is that a problem?
The run finished with no findings. Is that a problem?
Not necessarily. It means the agents could not validate any exploitable issues within scope. If you expected findings, check that credentials are correct so authenticated areas were reachable, and consider a Deep run for broader coverage.
How is this different from SAST?
How is this different from SAST?
SAST reasons about source code and finds issues before you deploy. A pentest attacks the running application and proves what is actually exploitable in your deployed configuration. They catch different things, and the findings from each are tracked separately in Corgea.
Related
BLAST
AI-native SAST for finding vulnerabilities in source code before deployment.
Webhooks
Receive pentest completion events in your own systems.
Reporting
Track security posture across your organization over time.
Policies
Define how issues are prioritized and handled.