> ## Documentation Index
> Fetch the complete documentation index at: https://docs.corgea.app/llms.txt
> Use this file to discover all available pages before exploring further.
# SSO
> Enable seamless and secure access to multiple applications with Single Sign-On (SSO) using the SAML protocol, enhancing user experience and security.
## Overview
### Functionality
The SSO by SAML feature allows users to authenticate and access multiple applications using a single set of credentials via the Security Assertion Markup Language (SAML) protocol. This feature streamlines the login process, enhances security, and reduces the need for multiple passwords.
### Target Audience
This feature is designed for organizations looking to implement Single Sign-On (SSO) for their users, providing a seamless and secure authentication experience across various applications.
## Key Features and Benefits
* **Centralized Authentication**: Log in once to access multiple applications without re-entering credentials.
* **Enhanced Security**: Reduces the risk of password fatigue and phishing attacks by minimizing the number of passwords users need to remember.
* **Improved User Experience**: Simplifies the login process, reducing the time and effort required to access different services.
## Access Instructions
To access the SSO by SAML feature, you must provide either a SAML metadata link or specific configuration details to the Corgea support team.
## SAML Configuration Instructions
### Setting Up SSO SAML in Your SSO Provider
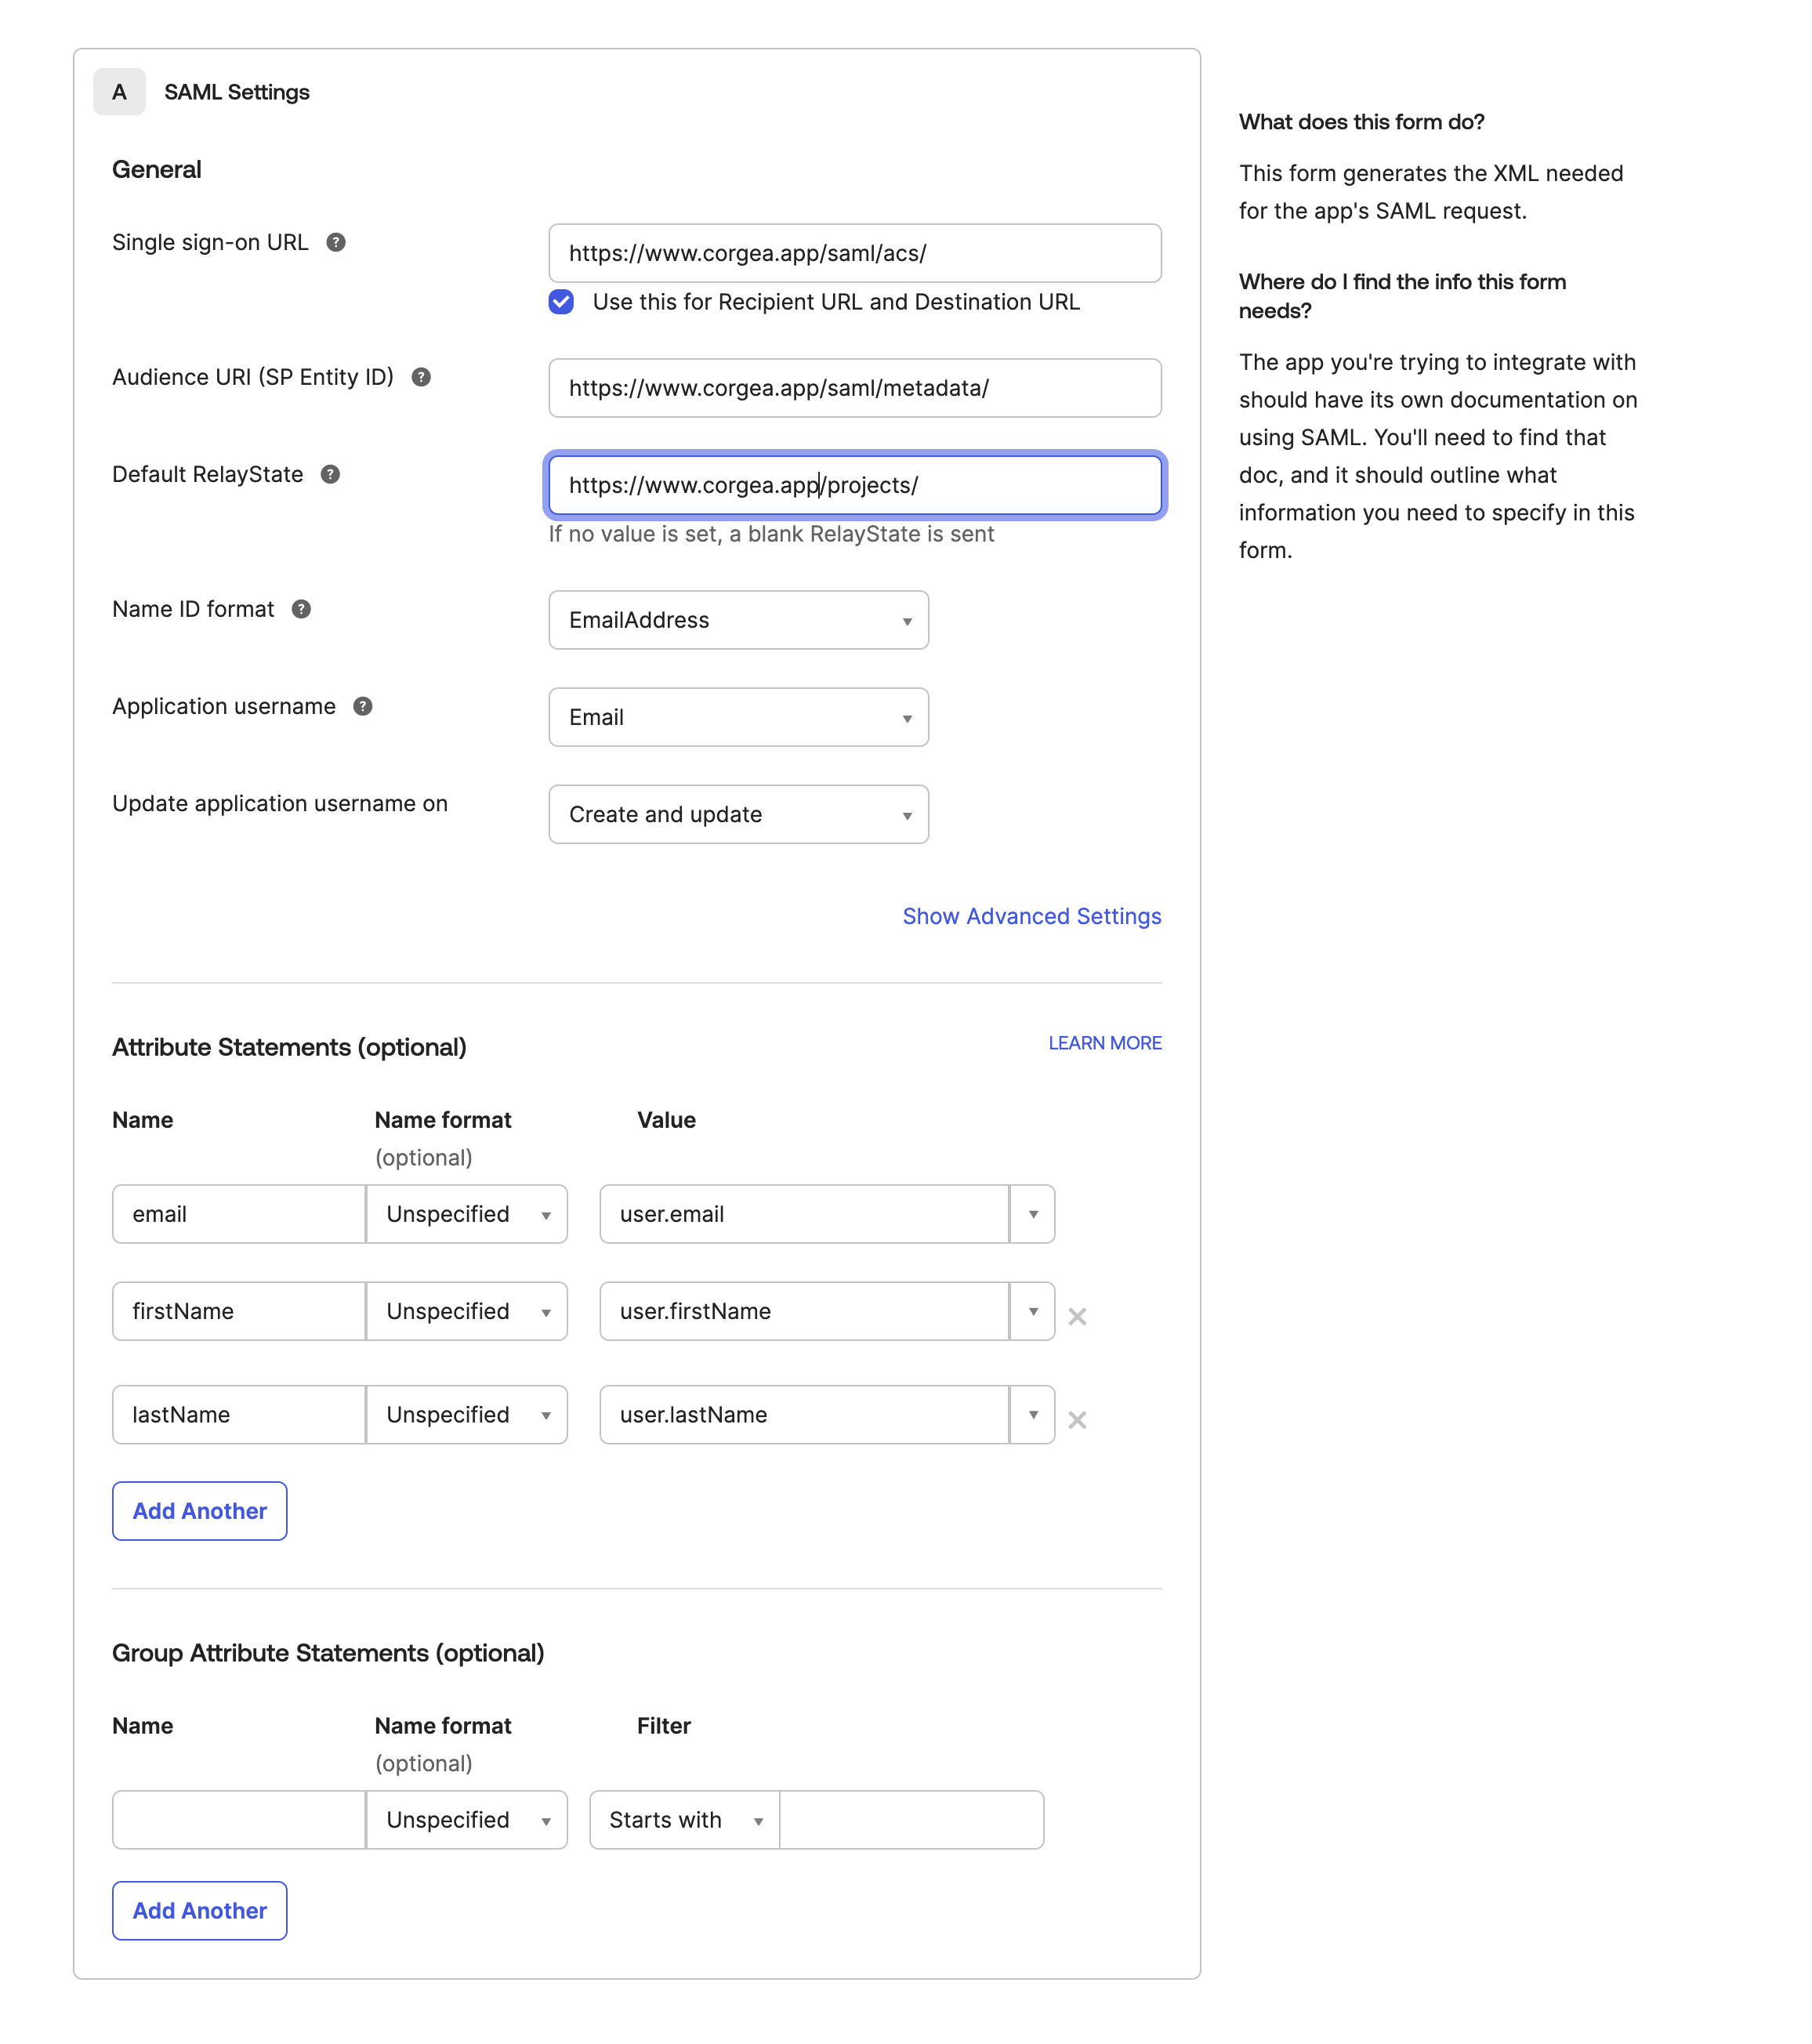
1. Access your SSO provider account and set up the SAML application using these parameters:
* **Single Sign-On URL**: [https://www.corgea.app/saml/acs/](https://www.corgea.app/saml/acs/)
* **Audience URI (SP Entity ID)**: [https://www.corgea.app/saml/metadata/](https://www.corgea.app/saml/metadata/)
* **Default RelayState**: [https://www.corgea.app/projects/](https://www.corgea.app/projects/)
* **Name ID Format**: EmailAddress
* **Application Username**: Email
* **Update Application Username On**: Create and update
Note: Replace `https://www.corgea.app` with `https://your_instance.corgea.app` if you are on private deployment.
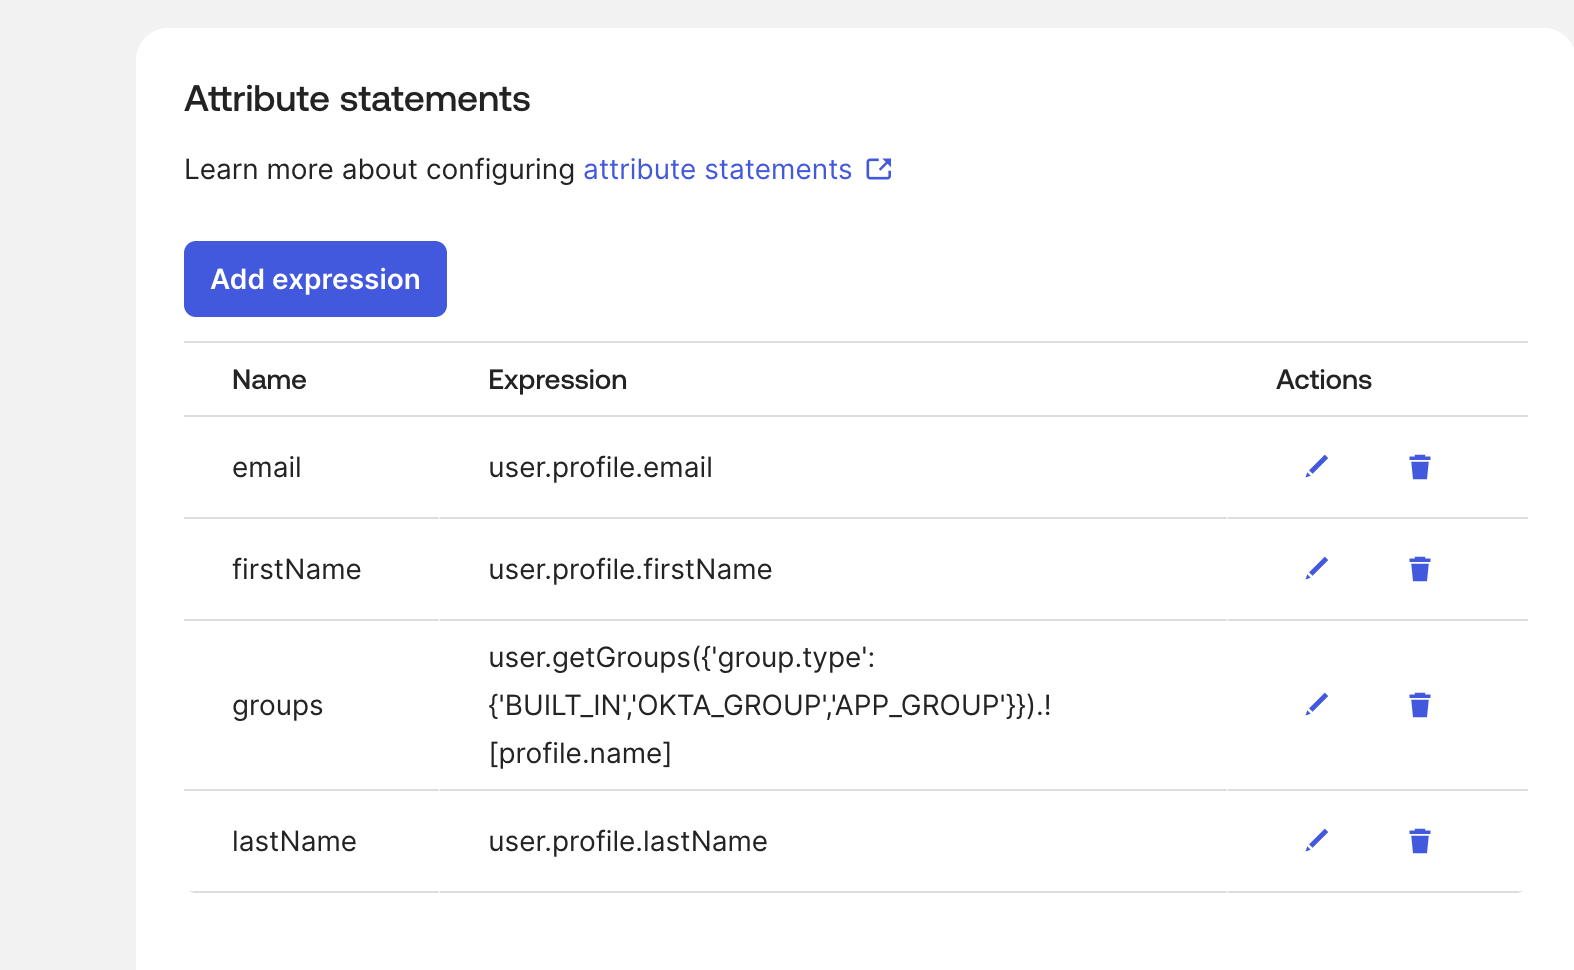
2. For the "Attribute Statement" section, use the following mappings:
**Required field:**
* email (user.profile.email)
**Optional fields:**
* firstName (user.profile.firstName)
* lastName (user.profile.lastName)
 **Optional: Group Export Configuration**
To export user groups into Corgea, configure the groups attribute as:
```
user.getGroups({'group.type': {'BUILT_IN','OKTA_GROUP','APP_GROUP'}}).[profile.name]
```
This exports the group profile name for each group. For additional group permission mapping, contact the Corgea team.
**Legacy Configuration Format**
If you're using the legacy configuration format, the mapping looks like this:
* **Name** -> **Value**
* email -> user.email
* firstName -> user.firstName
* lastName -> user.lastName
**Optional: Group Export Configuration**
To export user groups into Corgea, configure the groups attribute as:
```
user.getGroups({'group.type': {'BUILT_IN','OKTA_GROUP','APP_GROUP'}}).[profile.name]
```
This exports the group profile name for each group. For additional group permission mapping, contact the Corgea team.
**Legacy Configuration Format**
If you're using the legacy configuration format, the mapping looks like this:
* **Name** -> **Value**
* email -> user.email
* firstName -> user.firstName
* lastName -> user.lastName
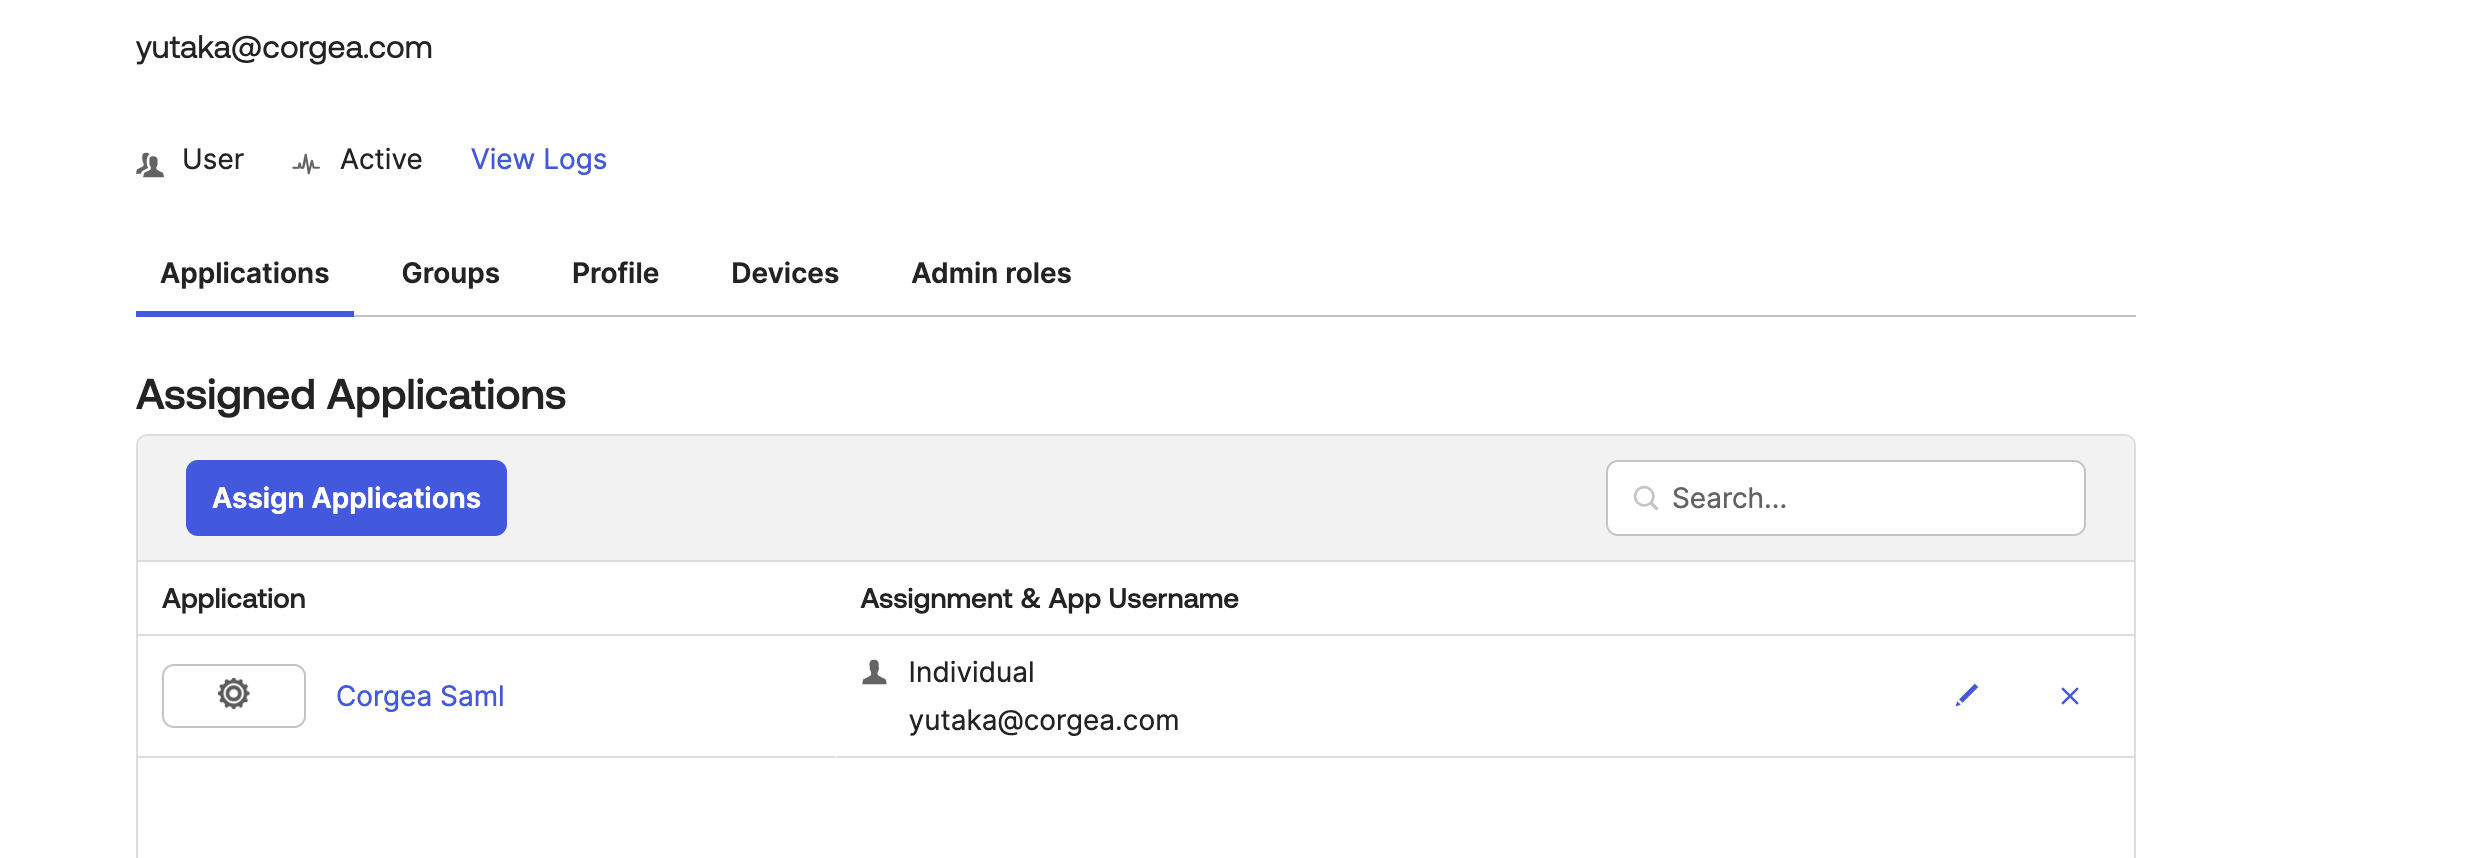
 After completing the SSO configuration, ensure users are assigned to the SAML application in your SSO provider and have the appropriate role permissions set in Corgea.
 Upon completing the setup, a new SAML metadata link will be provided.
### Integrating SAML with Corgea
Log into your Corgea account and head to the "Integrations" section.
Select the "Add" option within the "SAML SSO" area.
Upon completing the setup, a new SAML metadata link will be provided.
### Integrating SAML with Corgea
Log into your Corgea account and head to the "Integrations" section.
Select the "Add" option within the "SAML SSO" area.
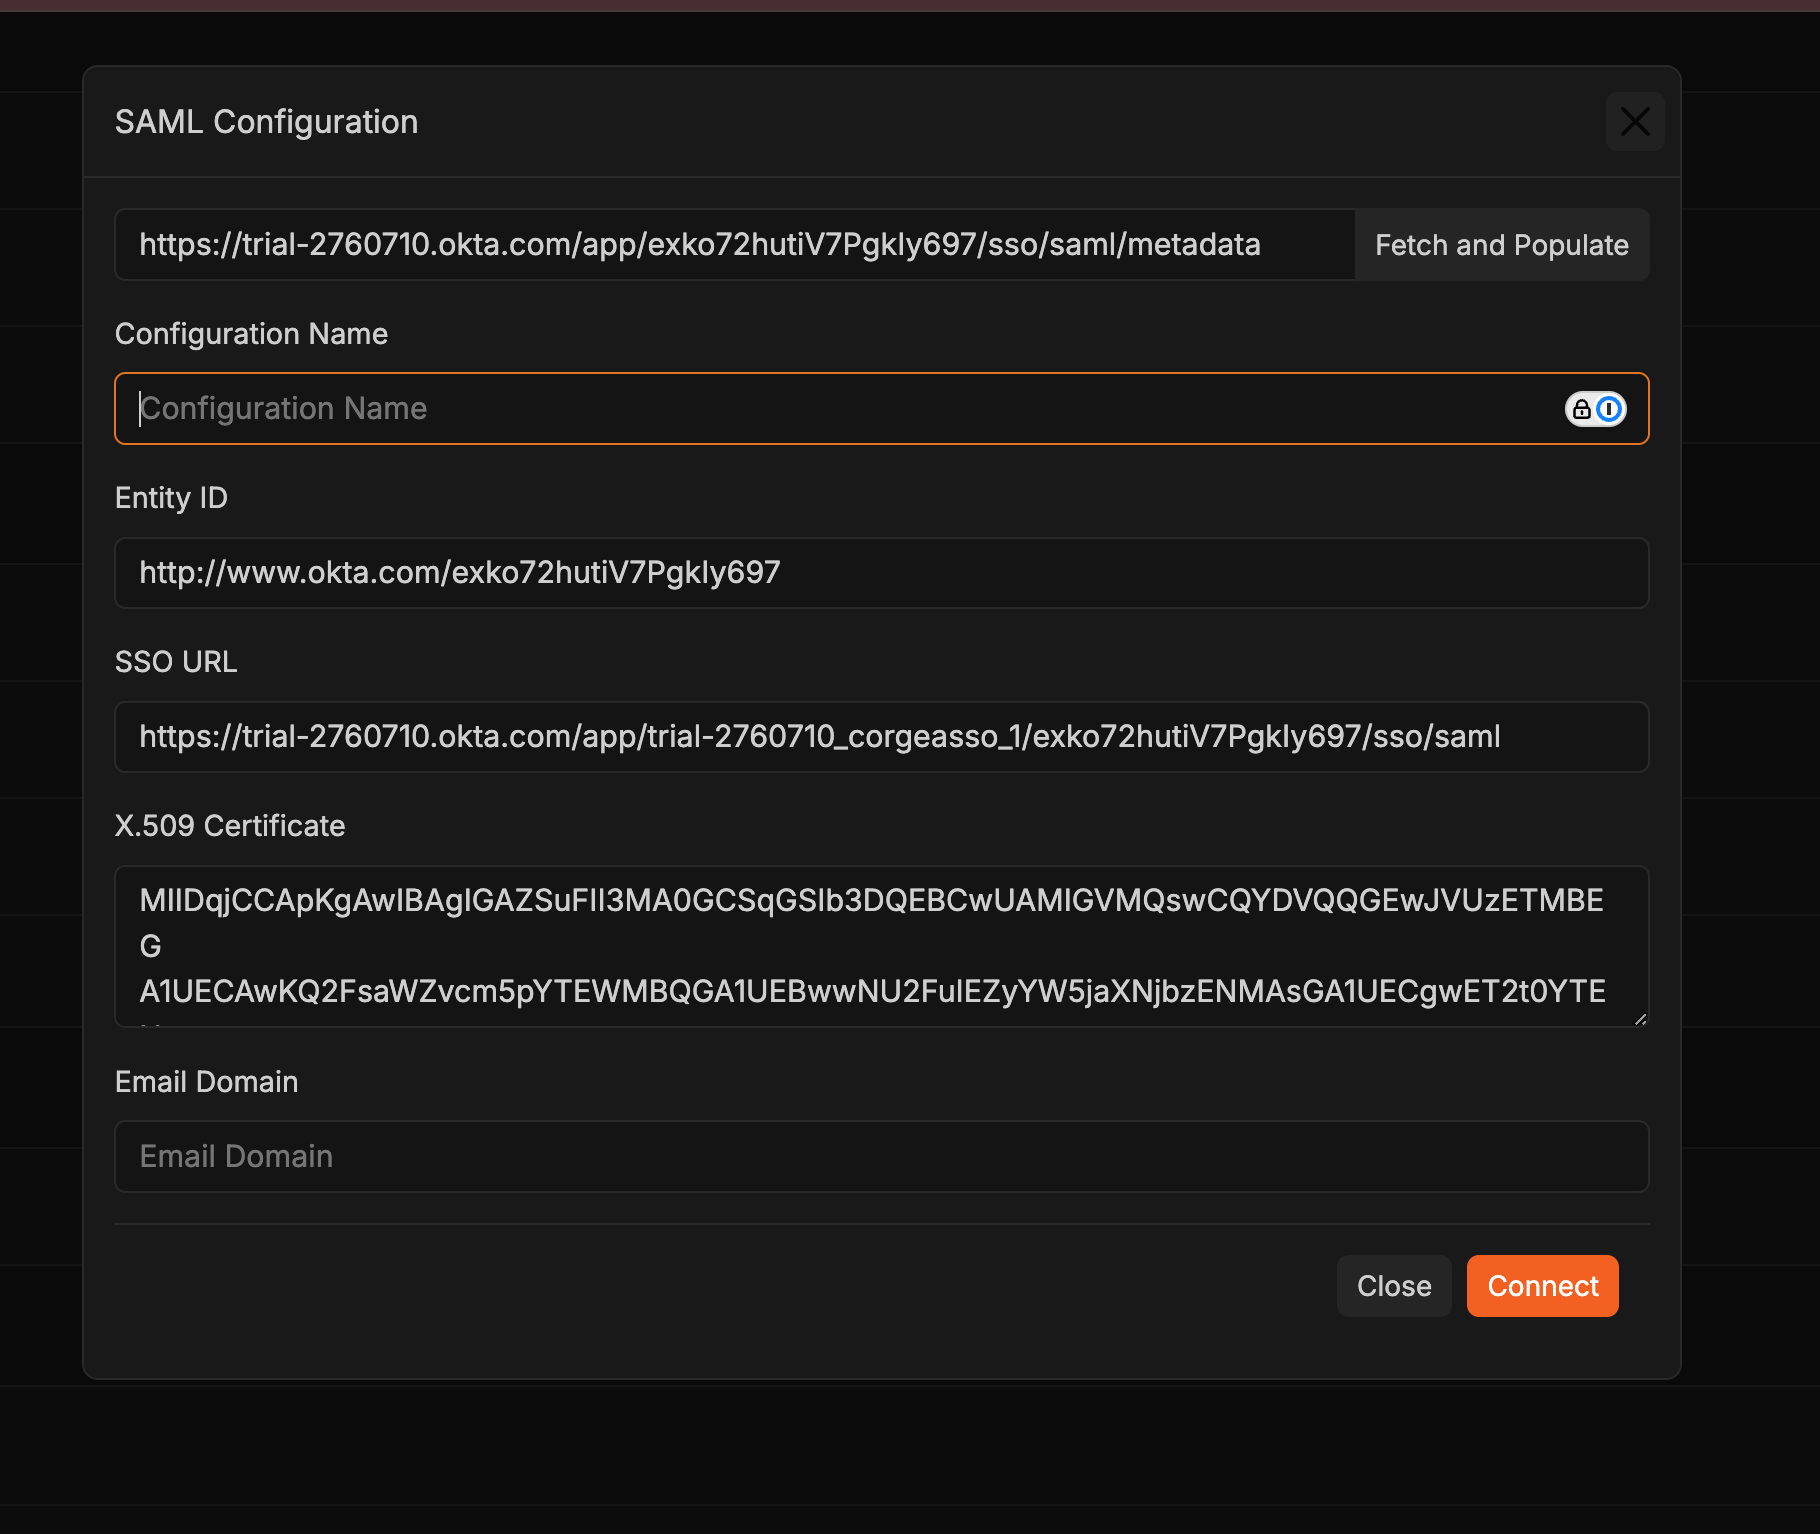 * Input the SAML metadata URL in the **"Metadata URL"** field.
* Press the **"Fetch and Populate"** button to auto-fill fields such as Entity ID, SSO URL, and X.509 Certificate using the metadata.
* **Configuration Name**: Assign a name to your SAML configuration.
* **Email Domain**: Define the email domain for SSO setup.
**Manual Entry (if necessary)**:
* Should manual input be needed, ensure you have the following details:
* **Entity ID**: The SAML entity's unique identifier.
* **X509 Certificate**: The certificate for signing SAML assertions.
* **Single Sign-On Service Location**: The URL for SAML IdP authentication responses.
* Check the accuracy of the auto-filled fields.
* Hit the "Connect" button to finalize and save your SAML configuration.
### Login by SSO.
* Once SAML configuration is properly configured, you should be now able to login through your SSO service.
* **User Login**: Authenticate through the SAML IdP and get redirected back to the application with a SAML assertion. After entering your email address on the initial login page, the "Login by SAML" option will appear on the step 2 page if the setup is correct. This option is triggered by the email domain.
* Input the SAML metadata URL in the **"Metadata URL"** field.
* Press the **"Fetch and Populate"** button to auto-fill fields such as Entity ID, SSO URL, and X.509 Certificate using the metadata.
* **Configuration Name**: Assign a name to your SAML configuration.
* **Email Domain**: Define the email domain for SSO setup.
**Manual Entry (if necessary)**:
* Should manual input be needed, ensure you have the following details:
* **Entity ID**: The SAML entity's unique identifier.
* **X509 Certificate**: The certificate for signing SAML assertions.
* **Single Sign-On Service Location**: The URL for SAML IdP authentication responses.
* Check the accuracy of the auto-filled fields.
* Hit the "Connect" button to finalize and save your SAML configuration.
### Login by SSO.
* Once SAML configuration is properly configured, you should be now able to login through your SSO service.
* **User Login**: Authenticate through the SAML IdP and get redirected back to the application with a SAML assertion. After entering your email address on the initial login page, the "Login by SAML" option will appear on the step 2 page if the setup is correct. This option is triggered by the email domain.
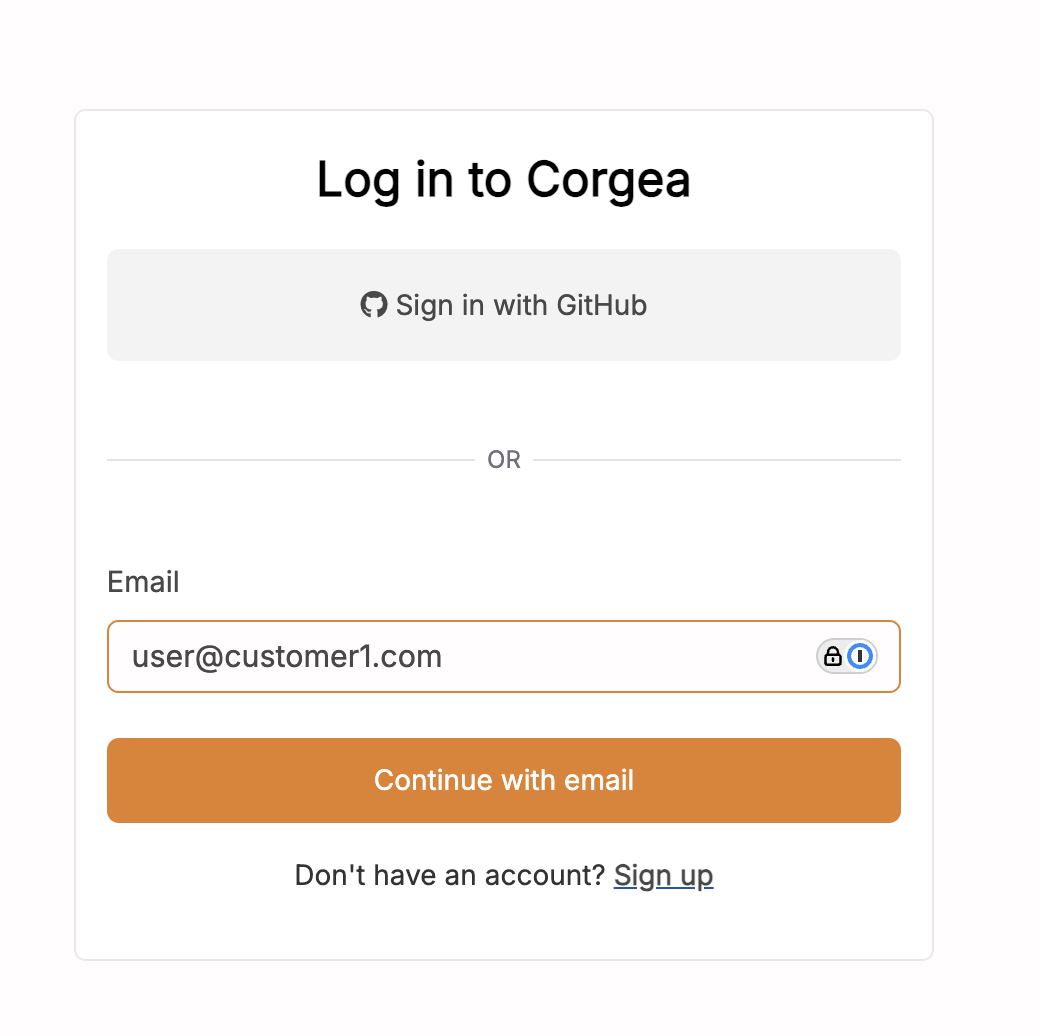 Enter your email address on the initial login page. If your email domain is configured for SSO, the "Login by SAML" option will appear on the next page.
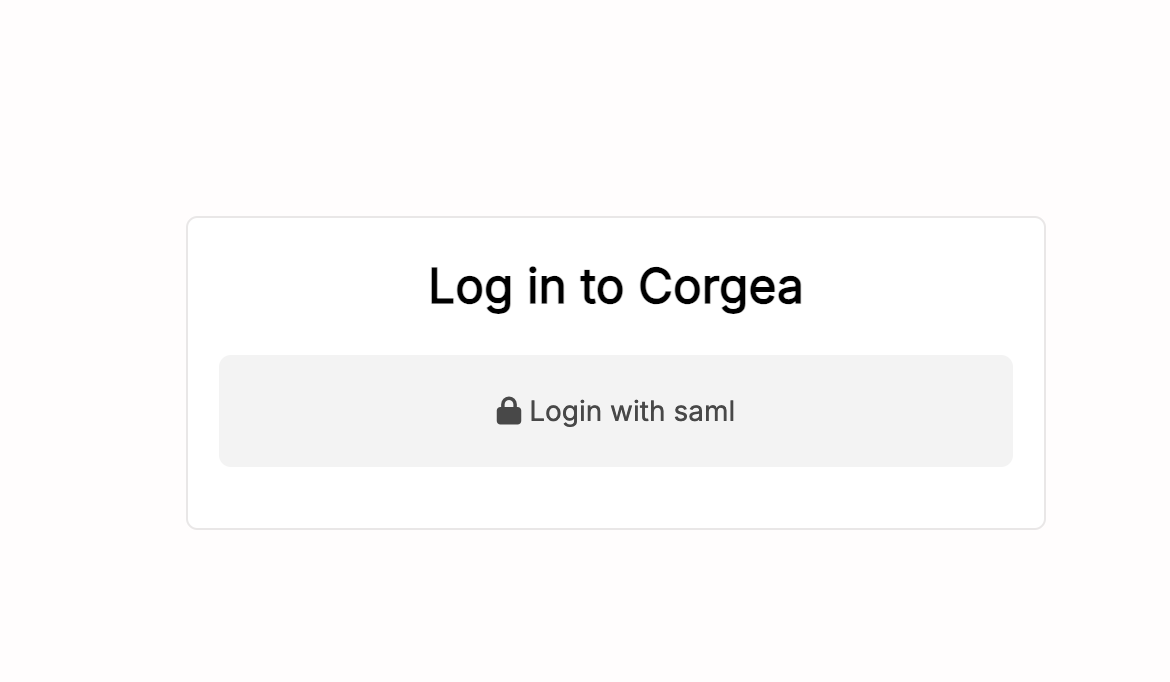 Click on the "Login by SAML" button to proceed with authentication through your SAML Identity Provider (IdP).
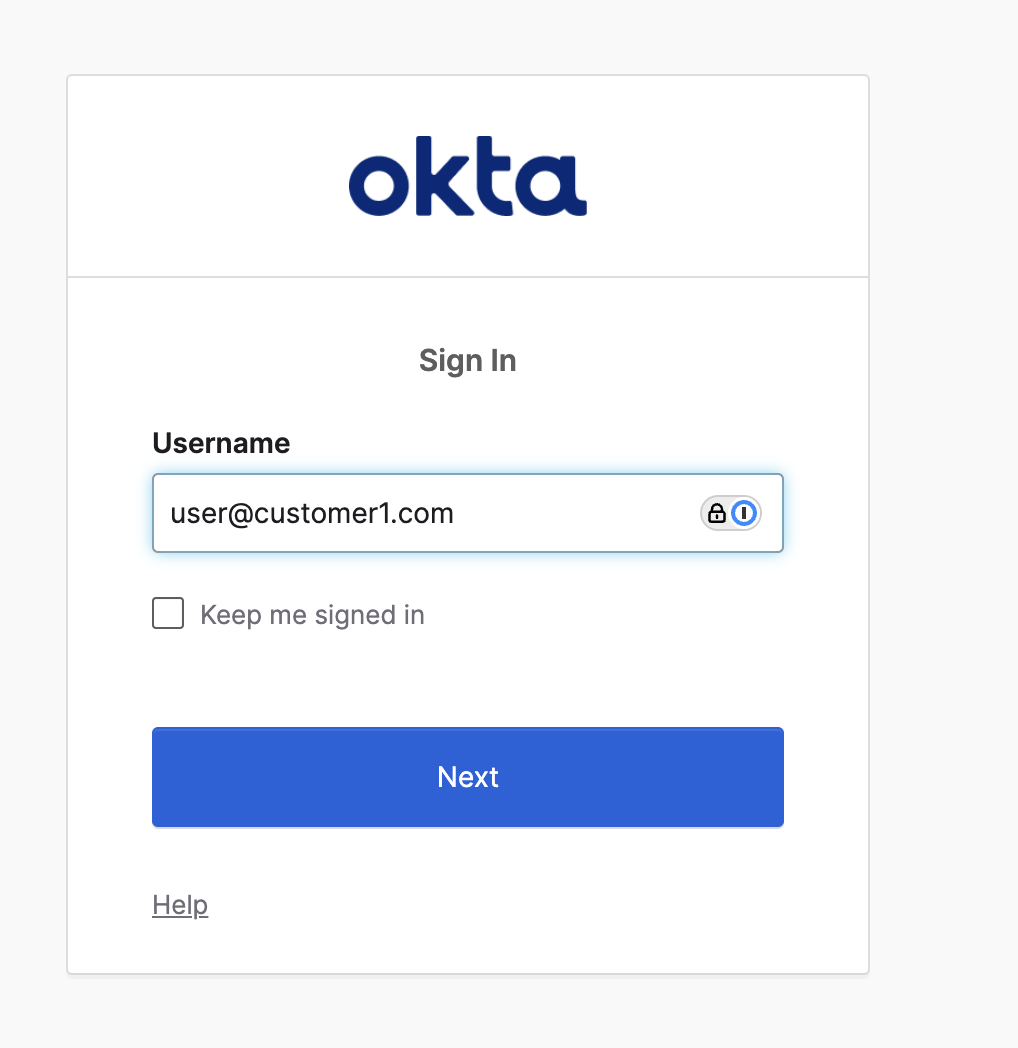 You will be redirected to your SAML IdP for authentication. Enter your credentials as required by your IdP.
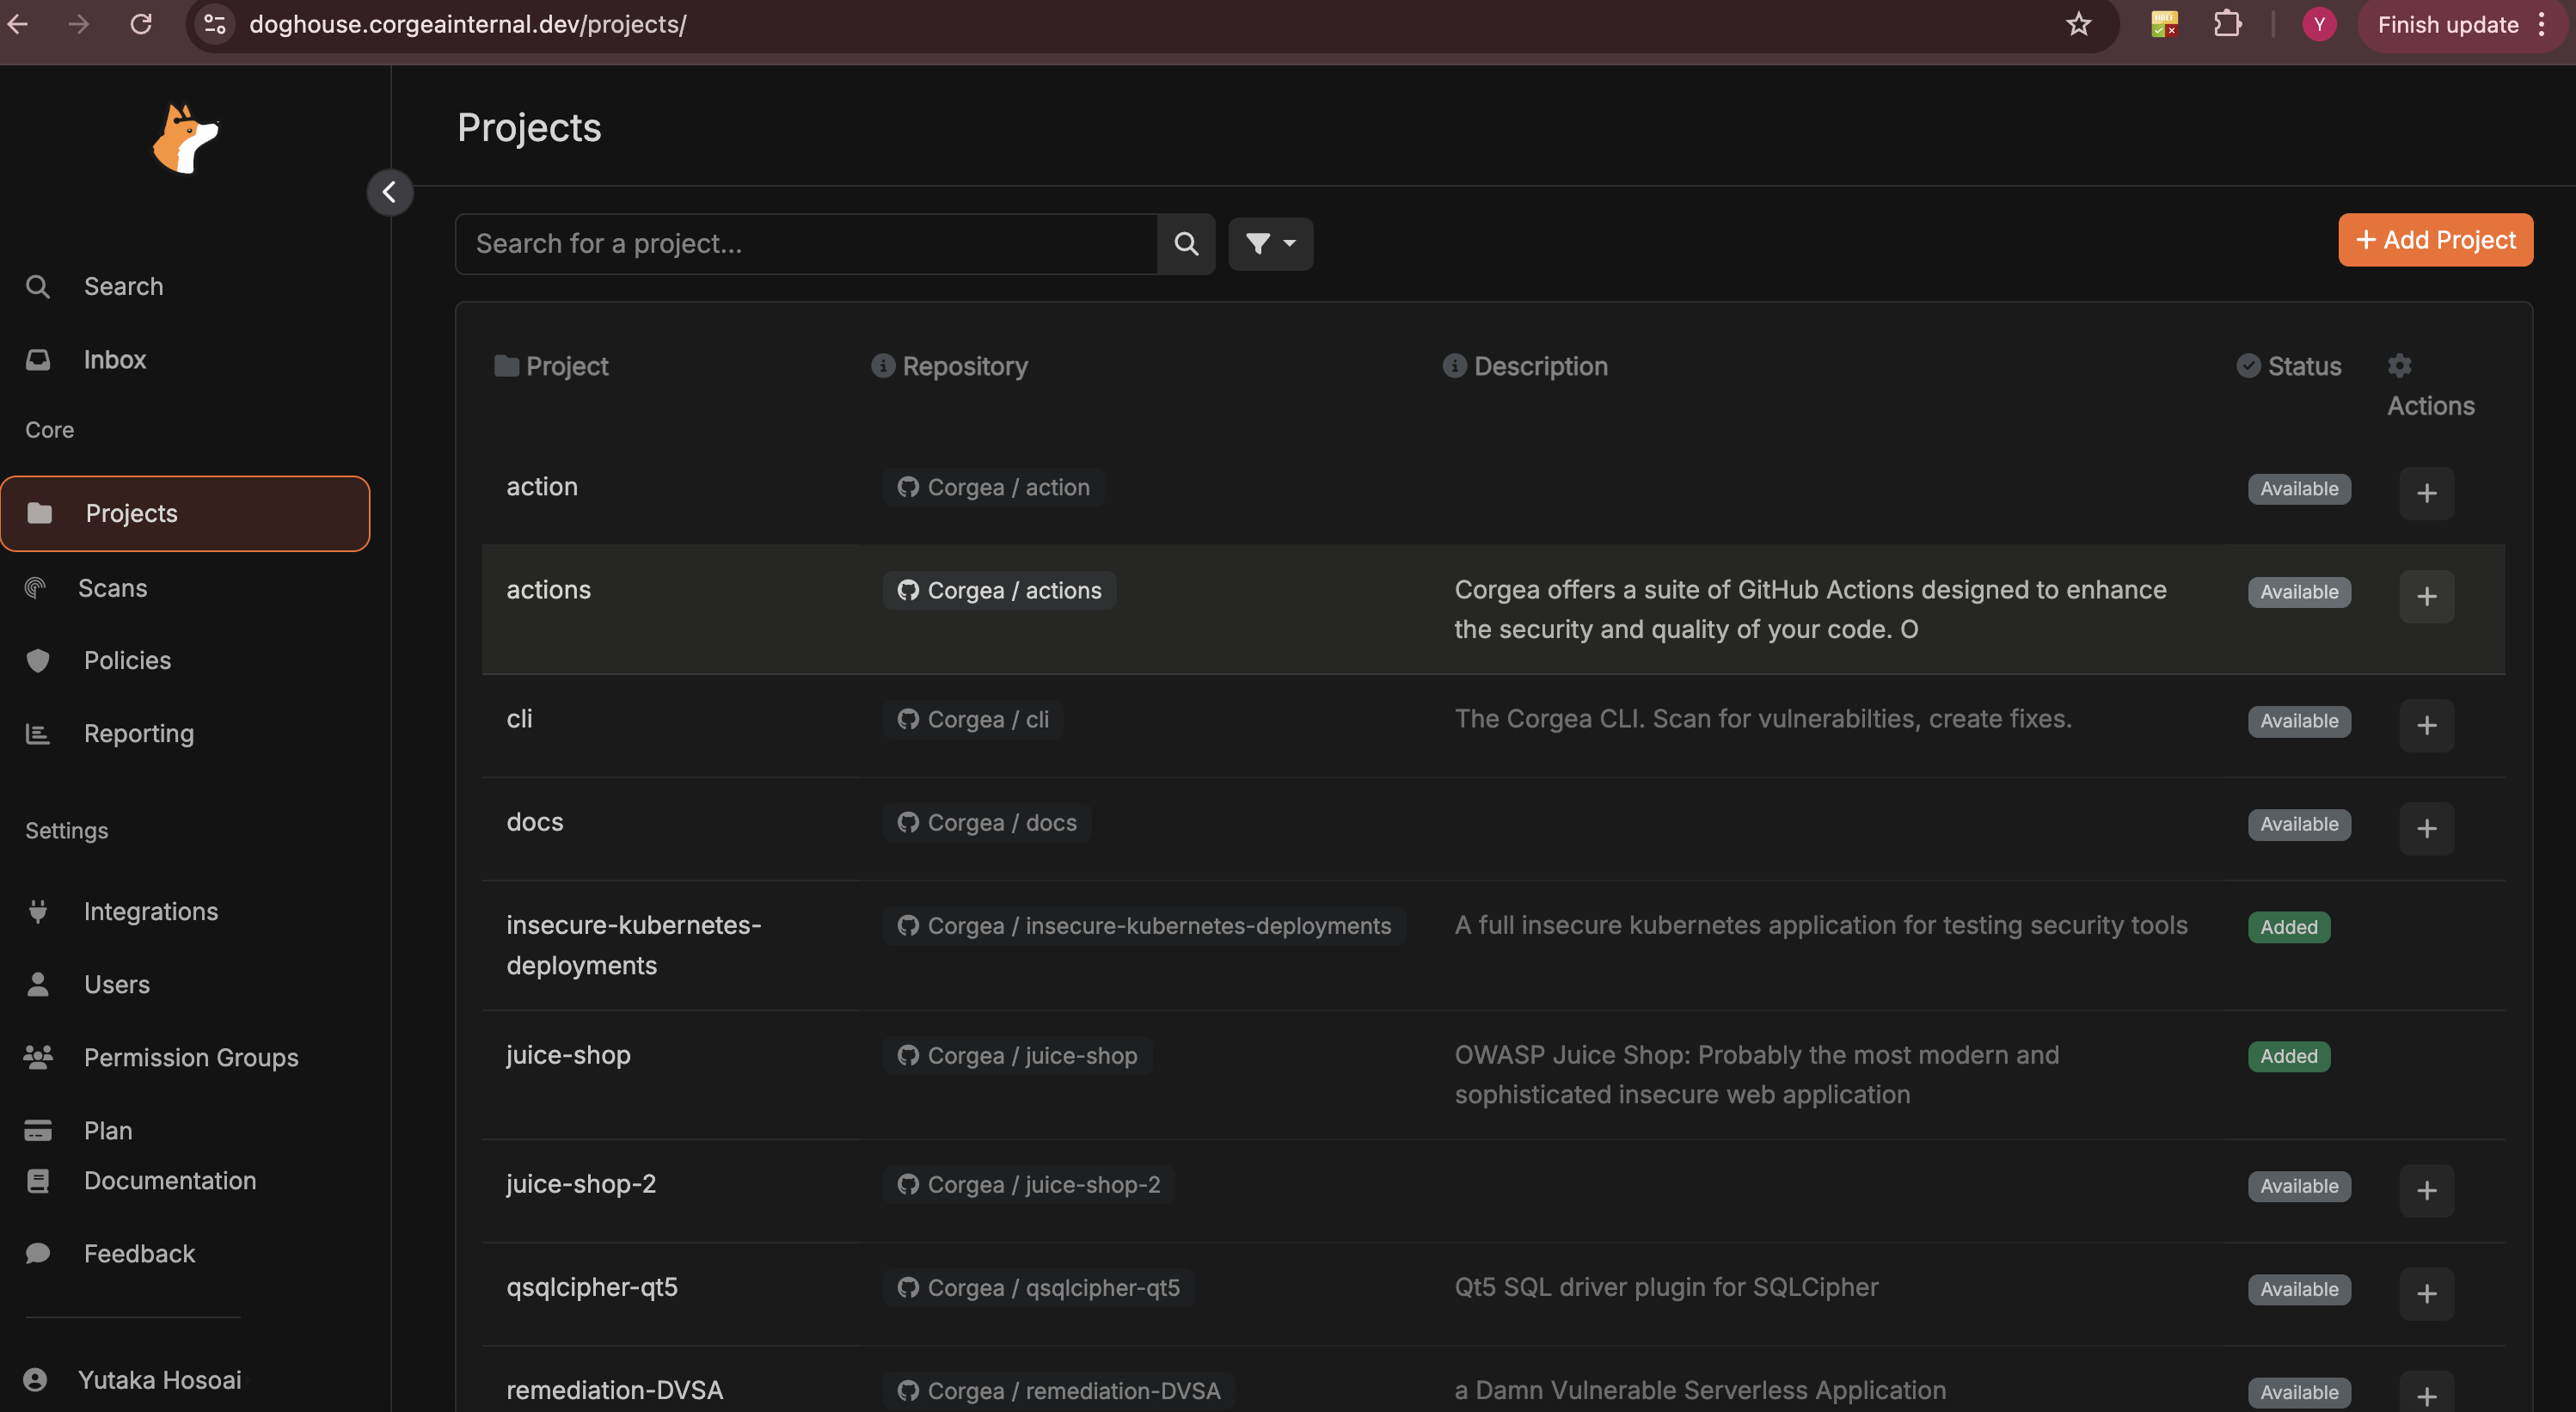 After successful authentication, you will be redirected back to the application with a SAML assertion, granting you access.
### Step-by-Step Guide to Configuring SSO SAML for Microsoft Entra
Begin by logging into your Azure portal. Once logged in, navigate to the "Azure Active Directory" section.
After successful authentication, you will be redirected back to the application with a SAML assertion, granting you access.
### Step-by-Step Guide to Configuring SSO SAML for Microsoft Entra
Begin by logging into your Azure portal. Once logged in, navigate to the "Azure Active Directory" section.
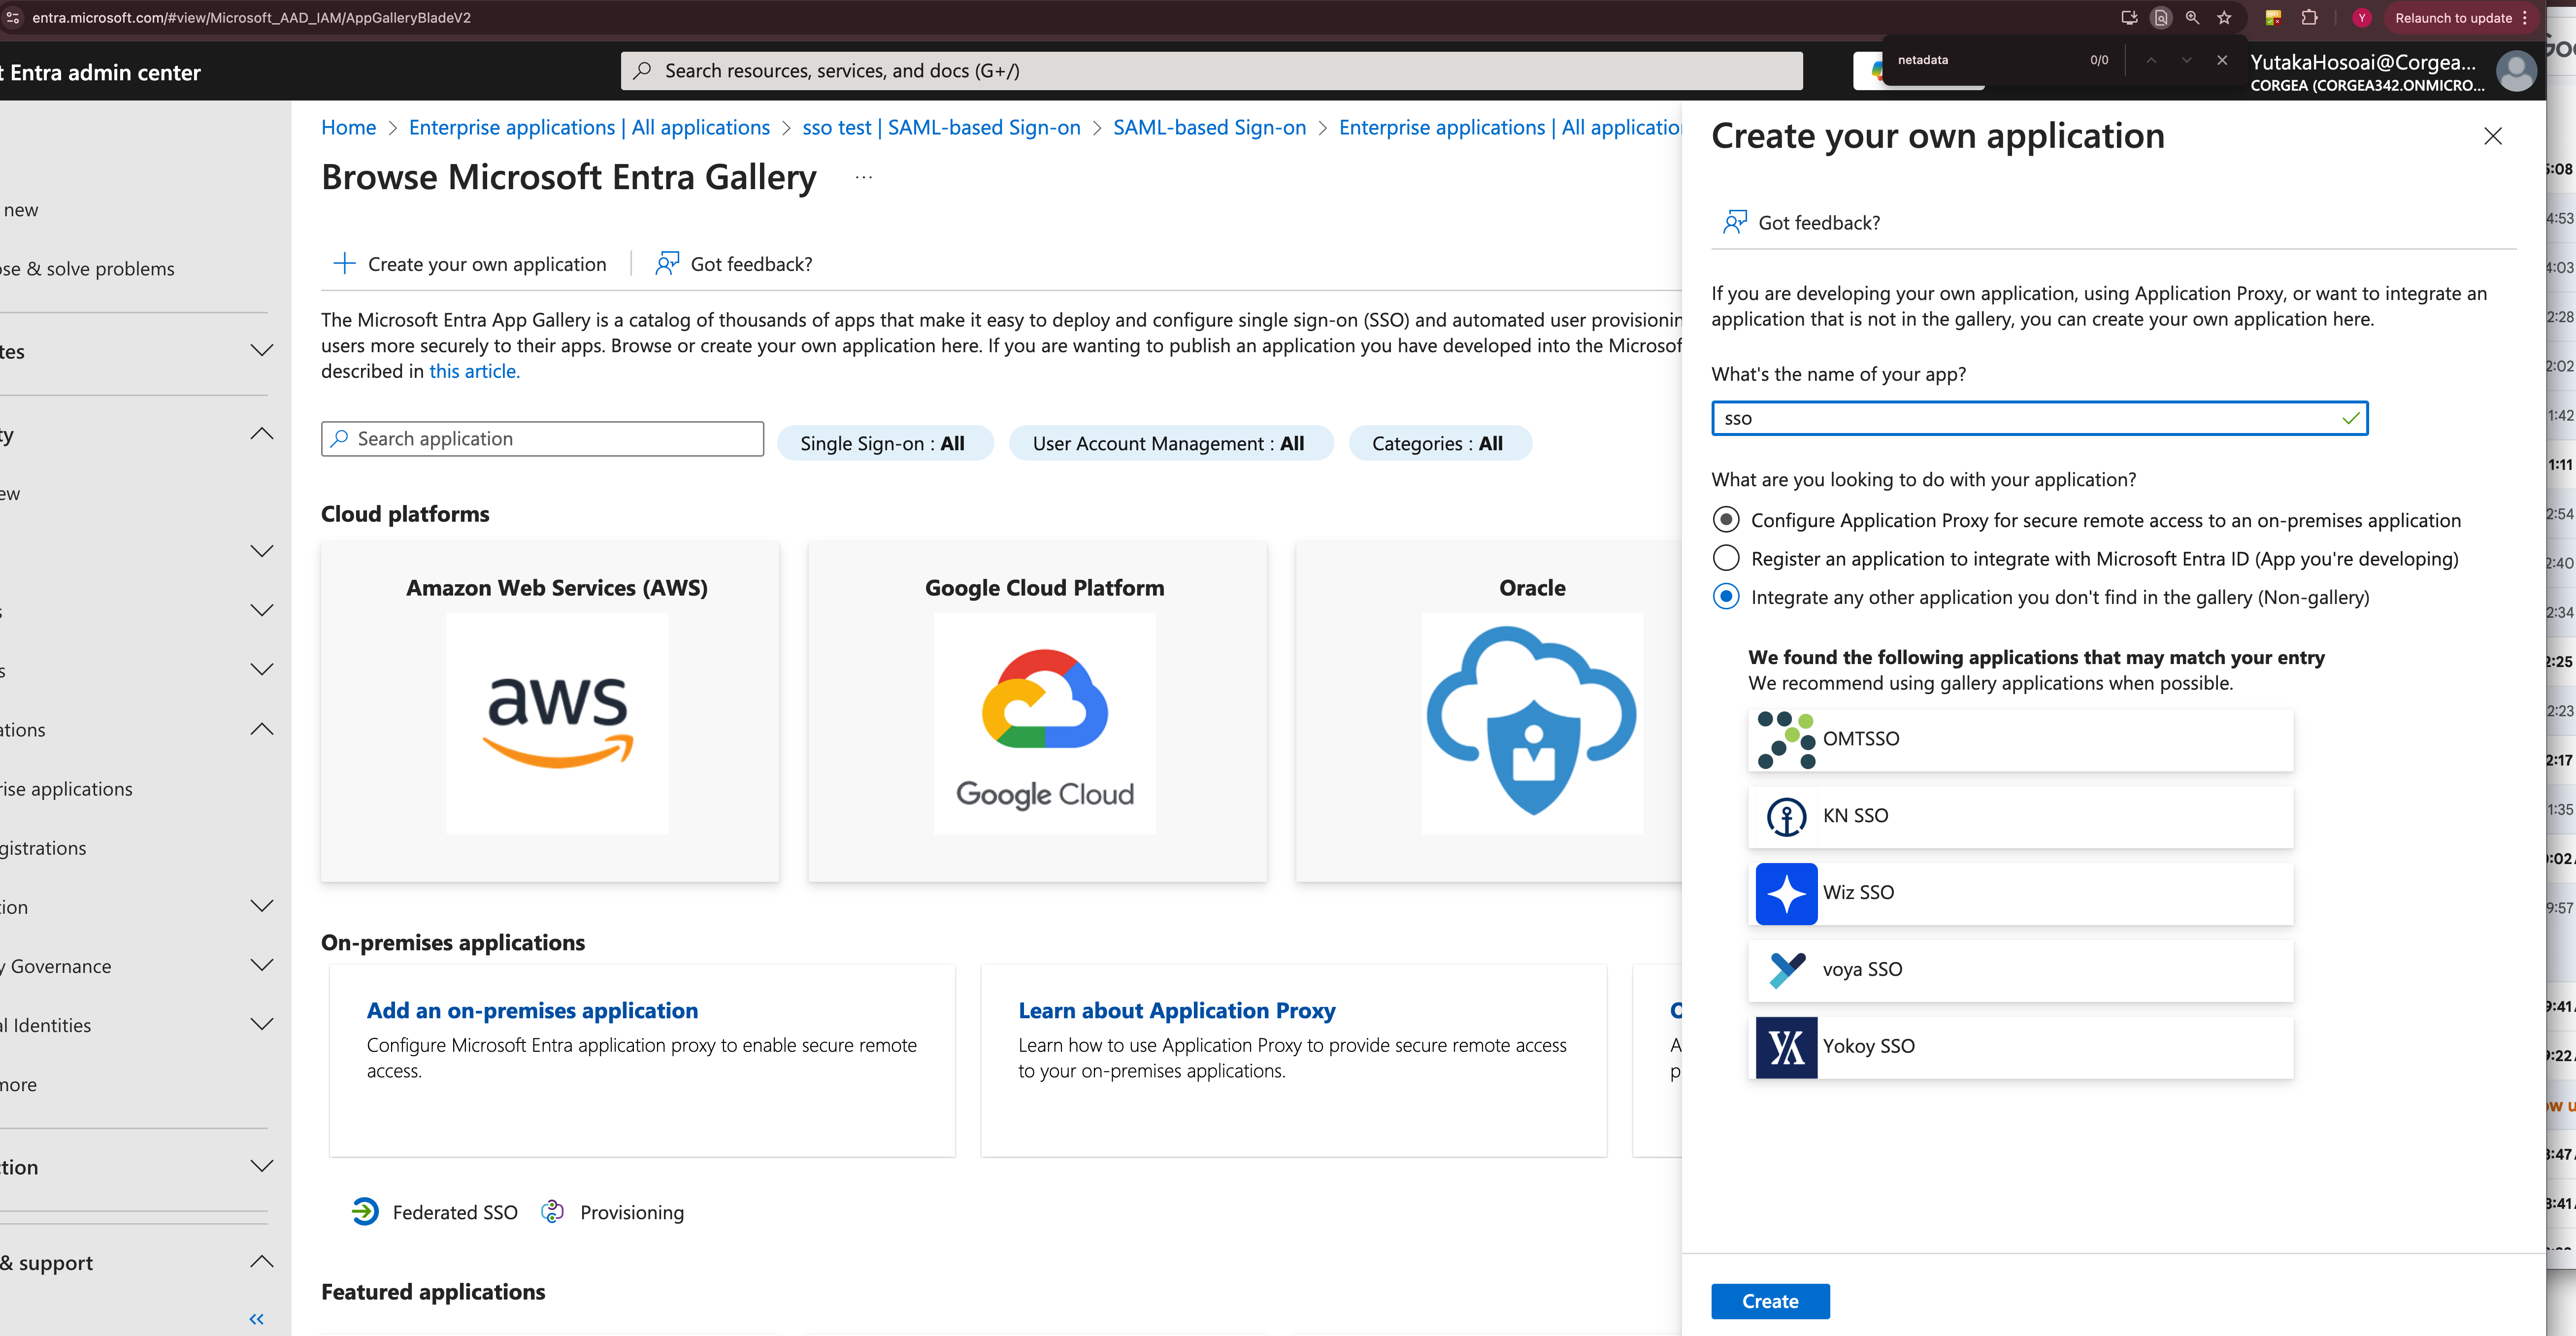 * Go to "Enterprise applications" and select "New application".
* Opt for "Create your own application" and provide a name for your new application.
* Go to "Enterprise applications" and select "New application".
* Opt for "Create your own application" and provide a name for your new application.
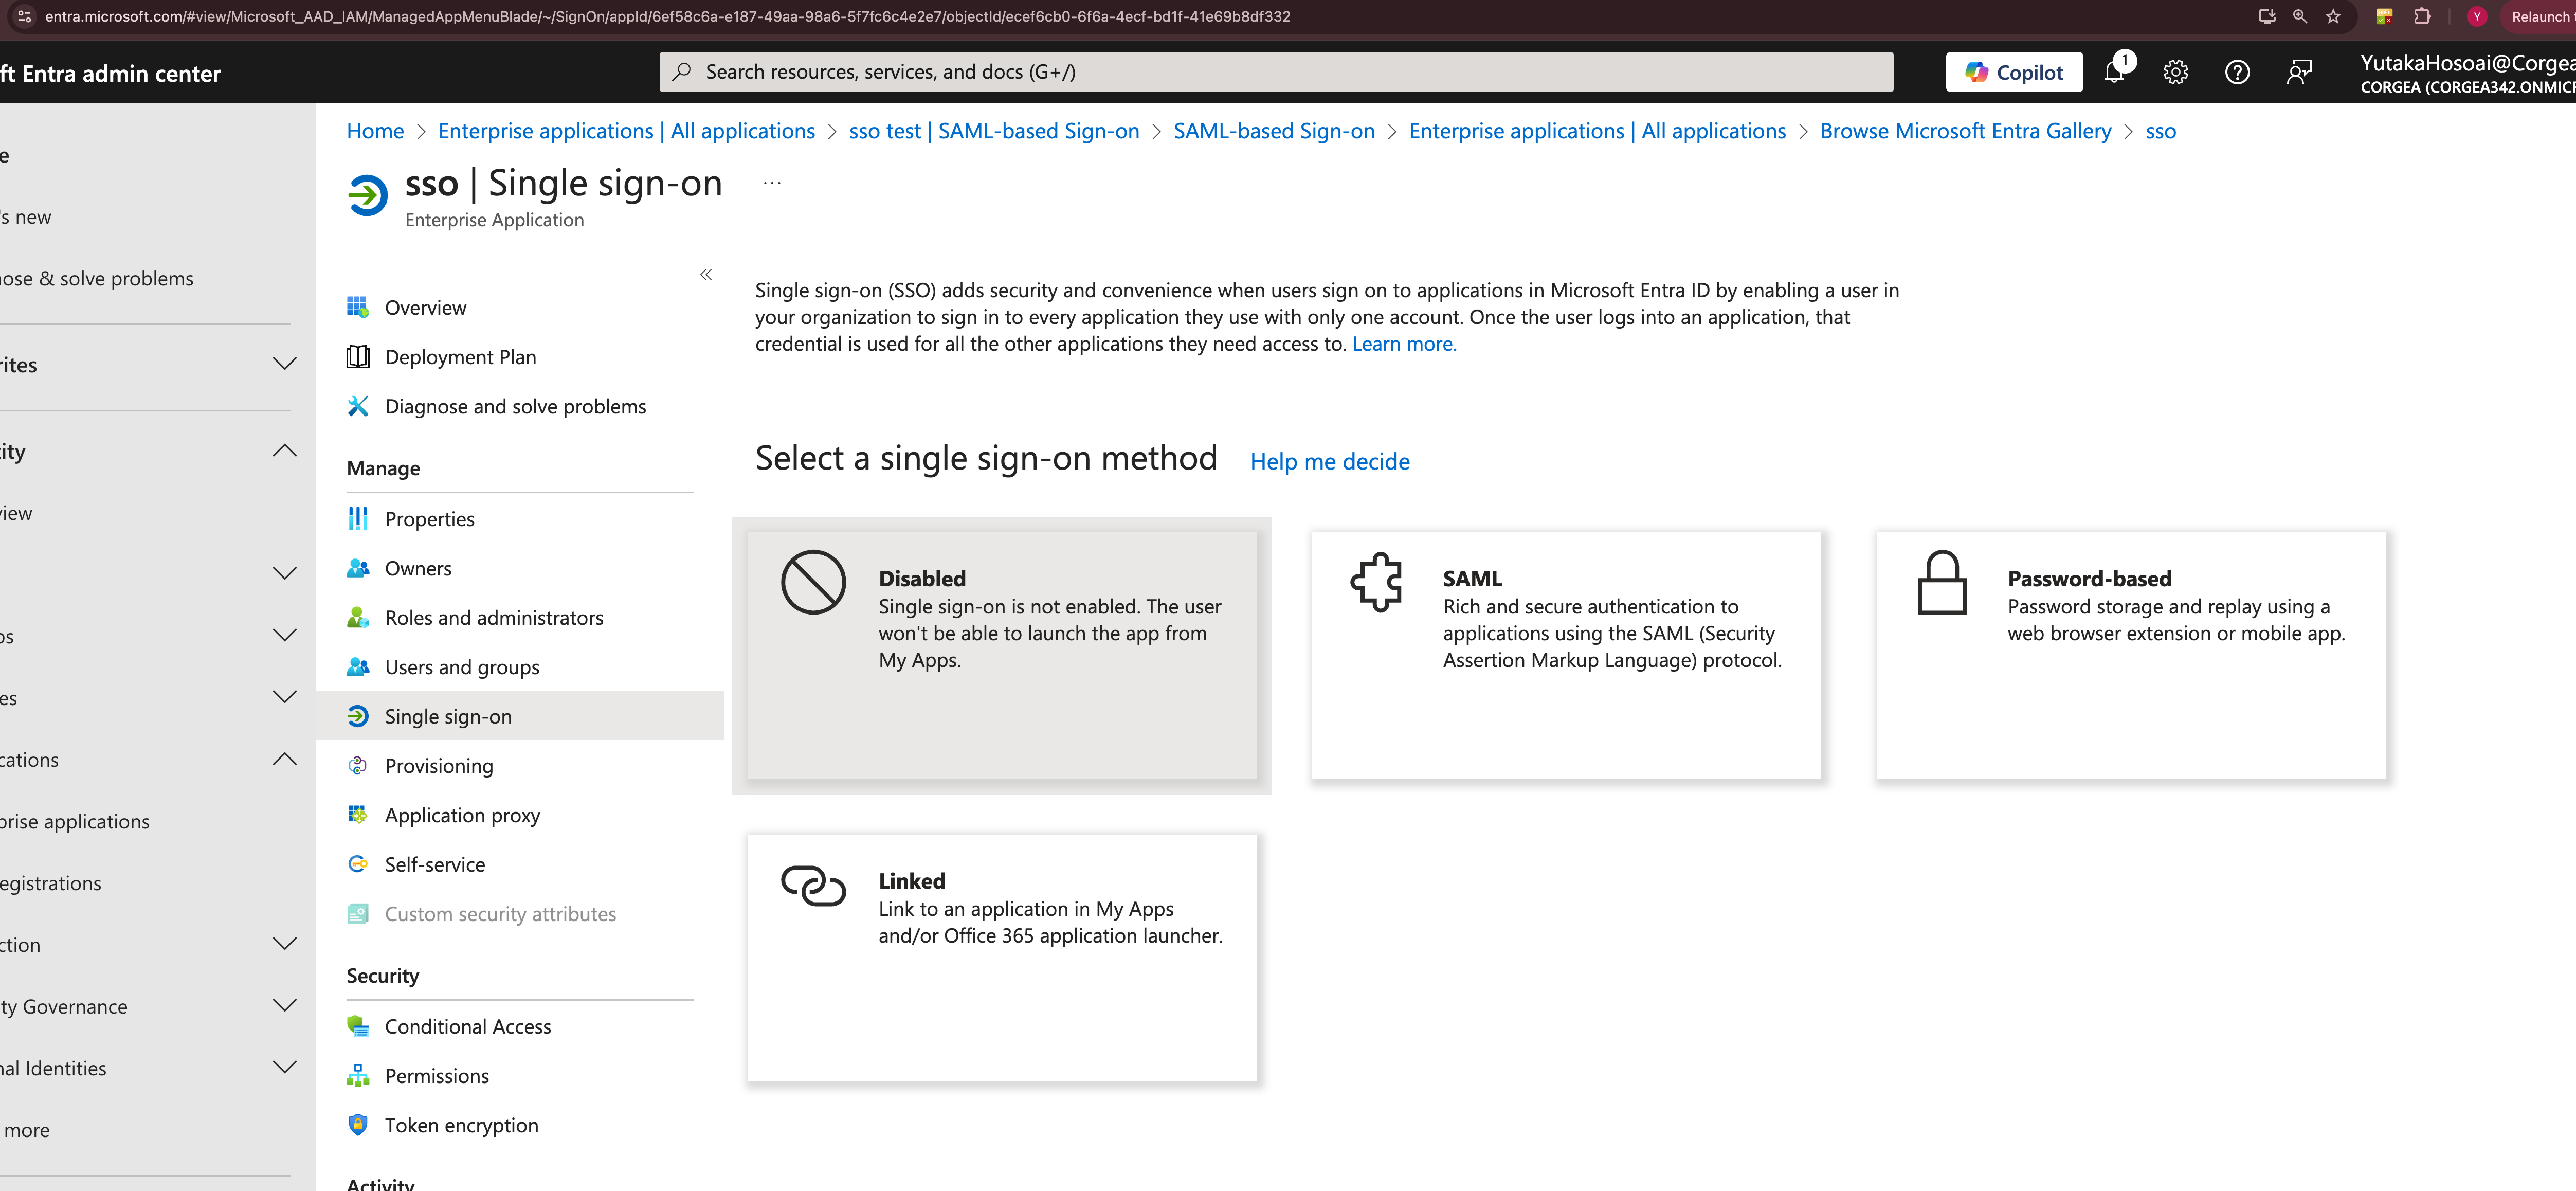 * Within the application settings, choose "Single sign-on" and select "SAML".
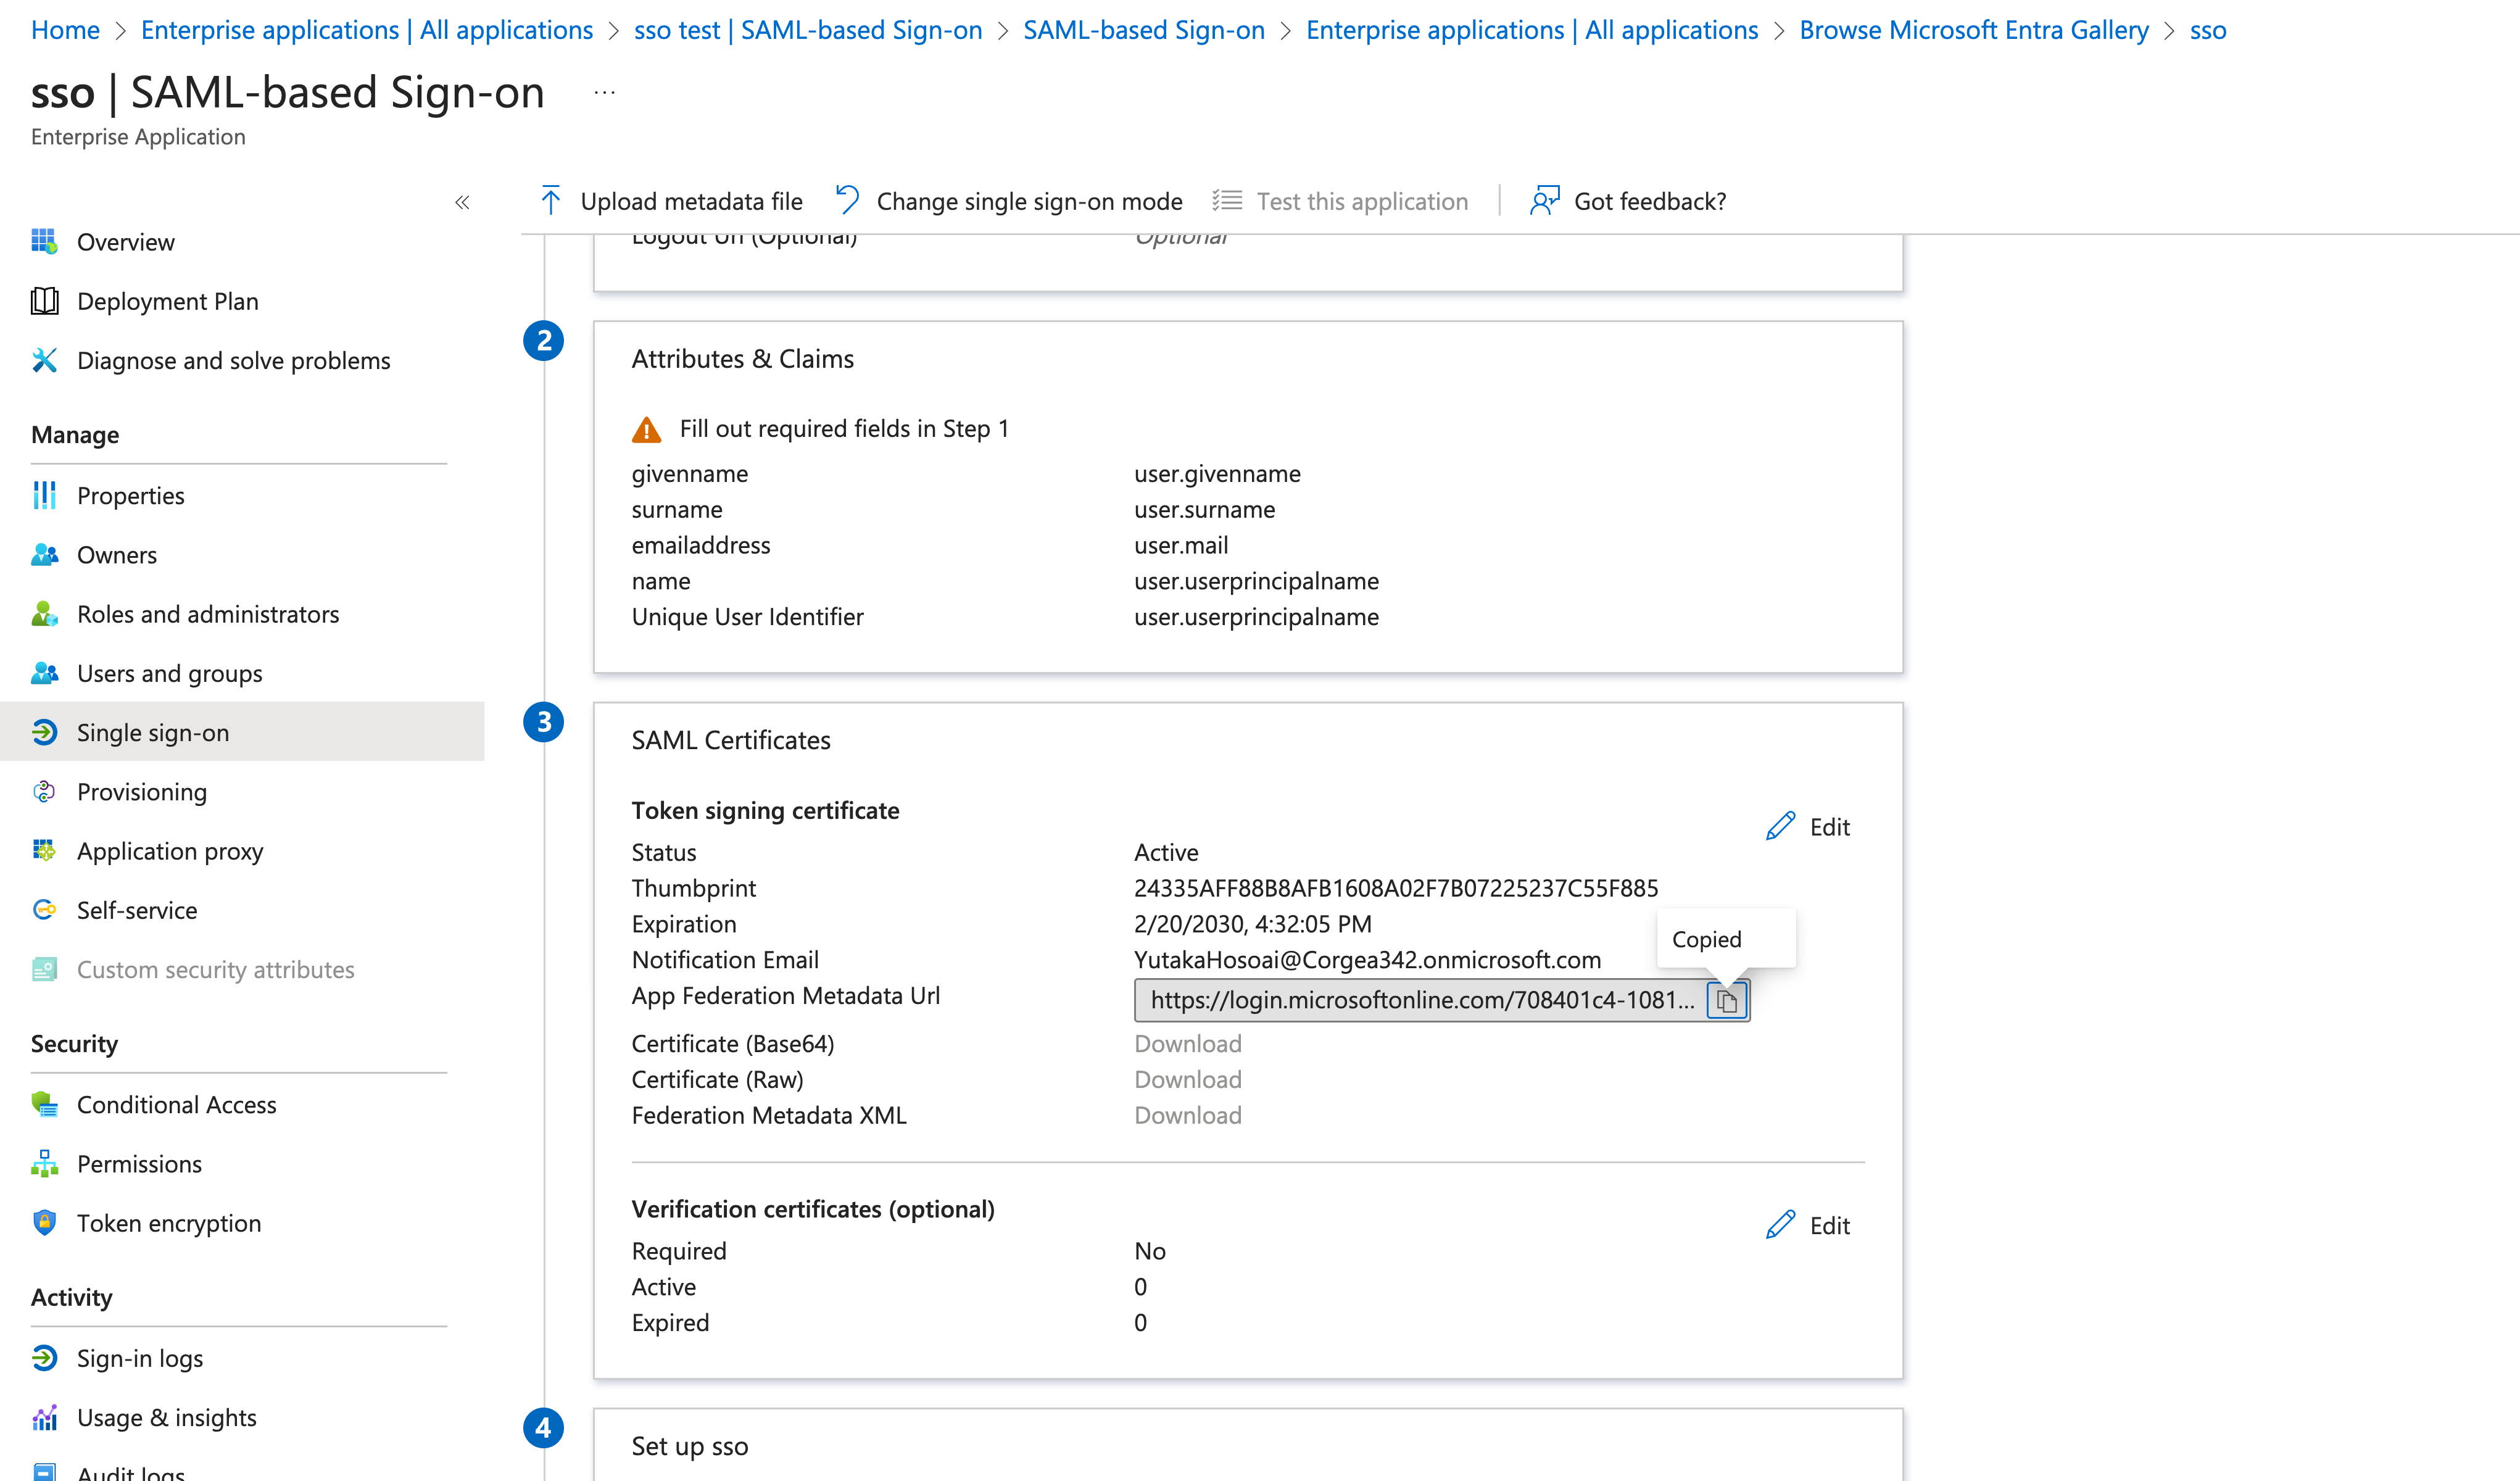 * Copy the Federation Metadata XML URL for later use.
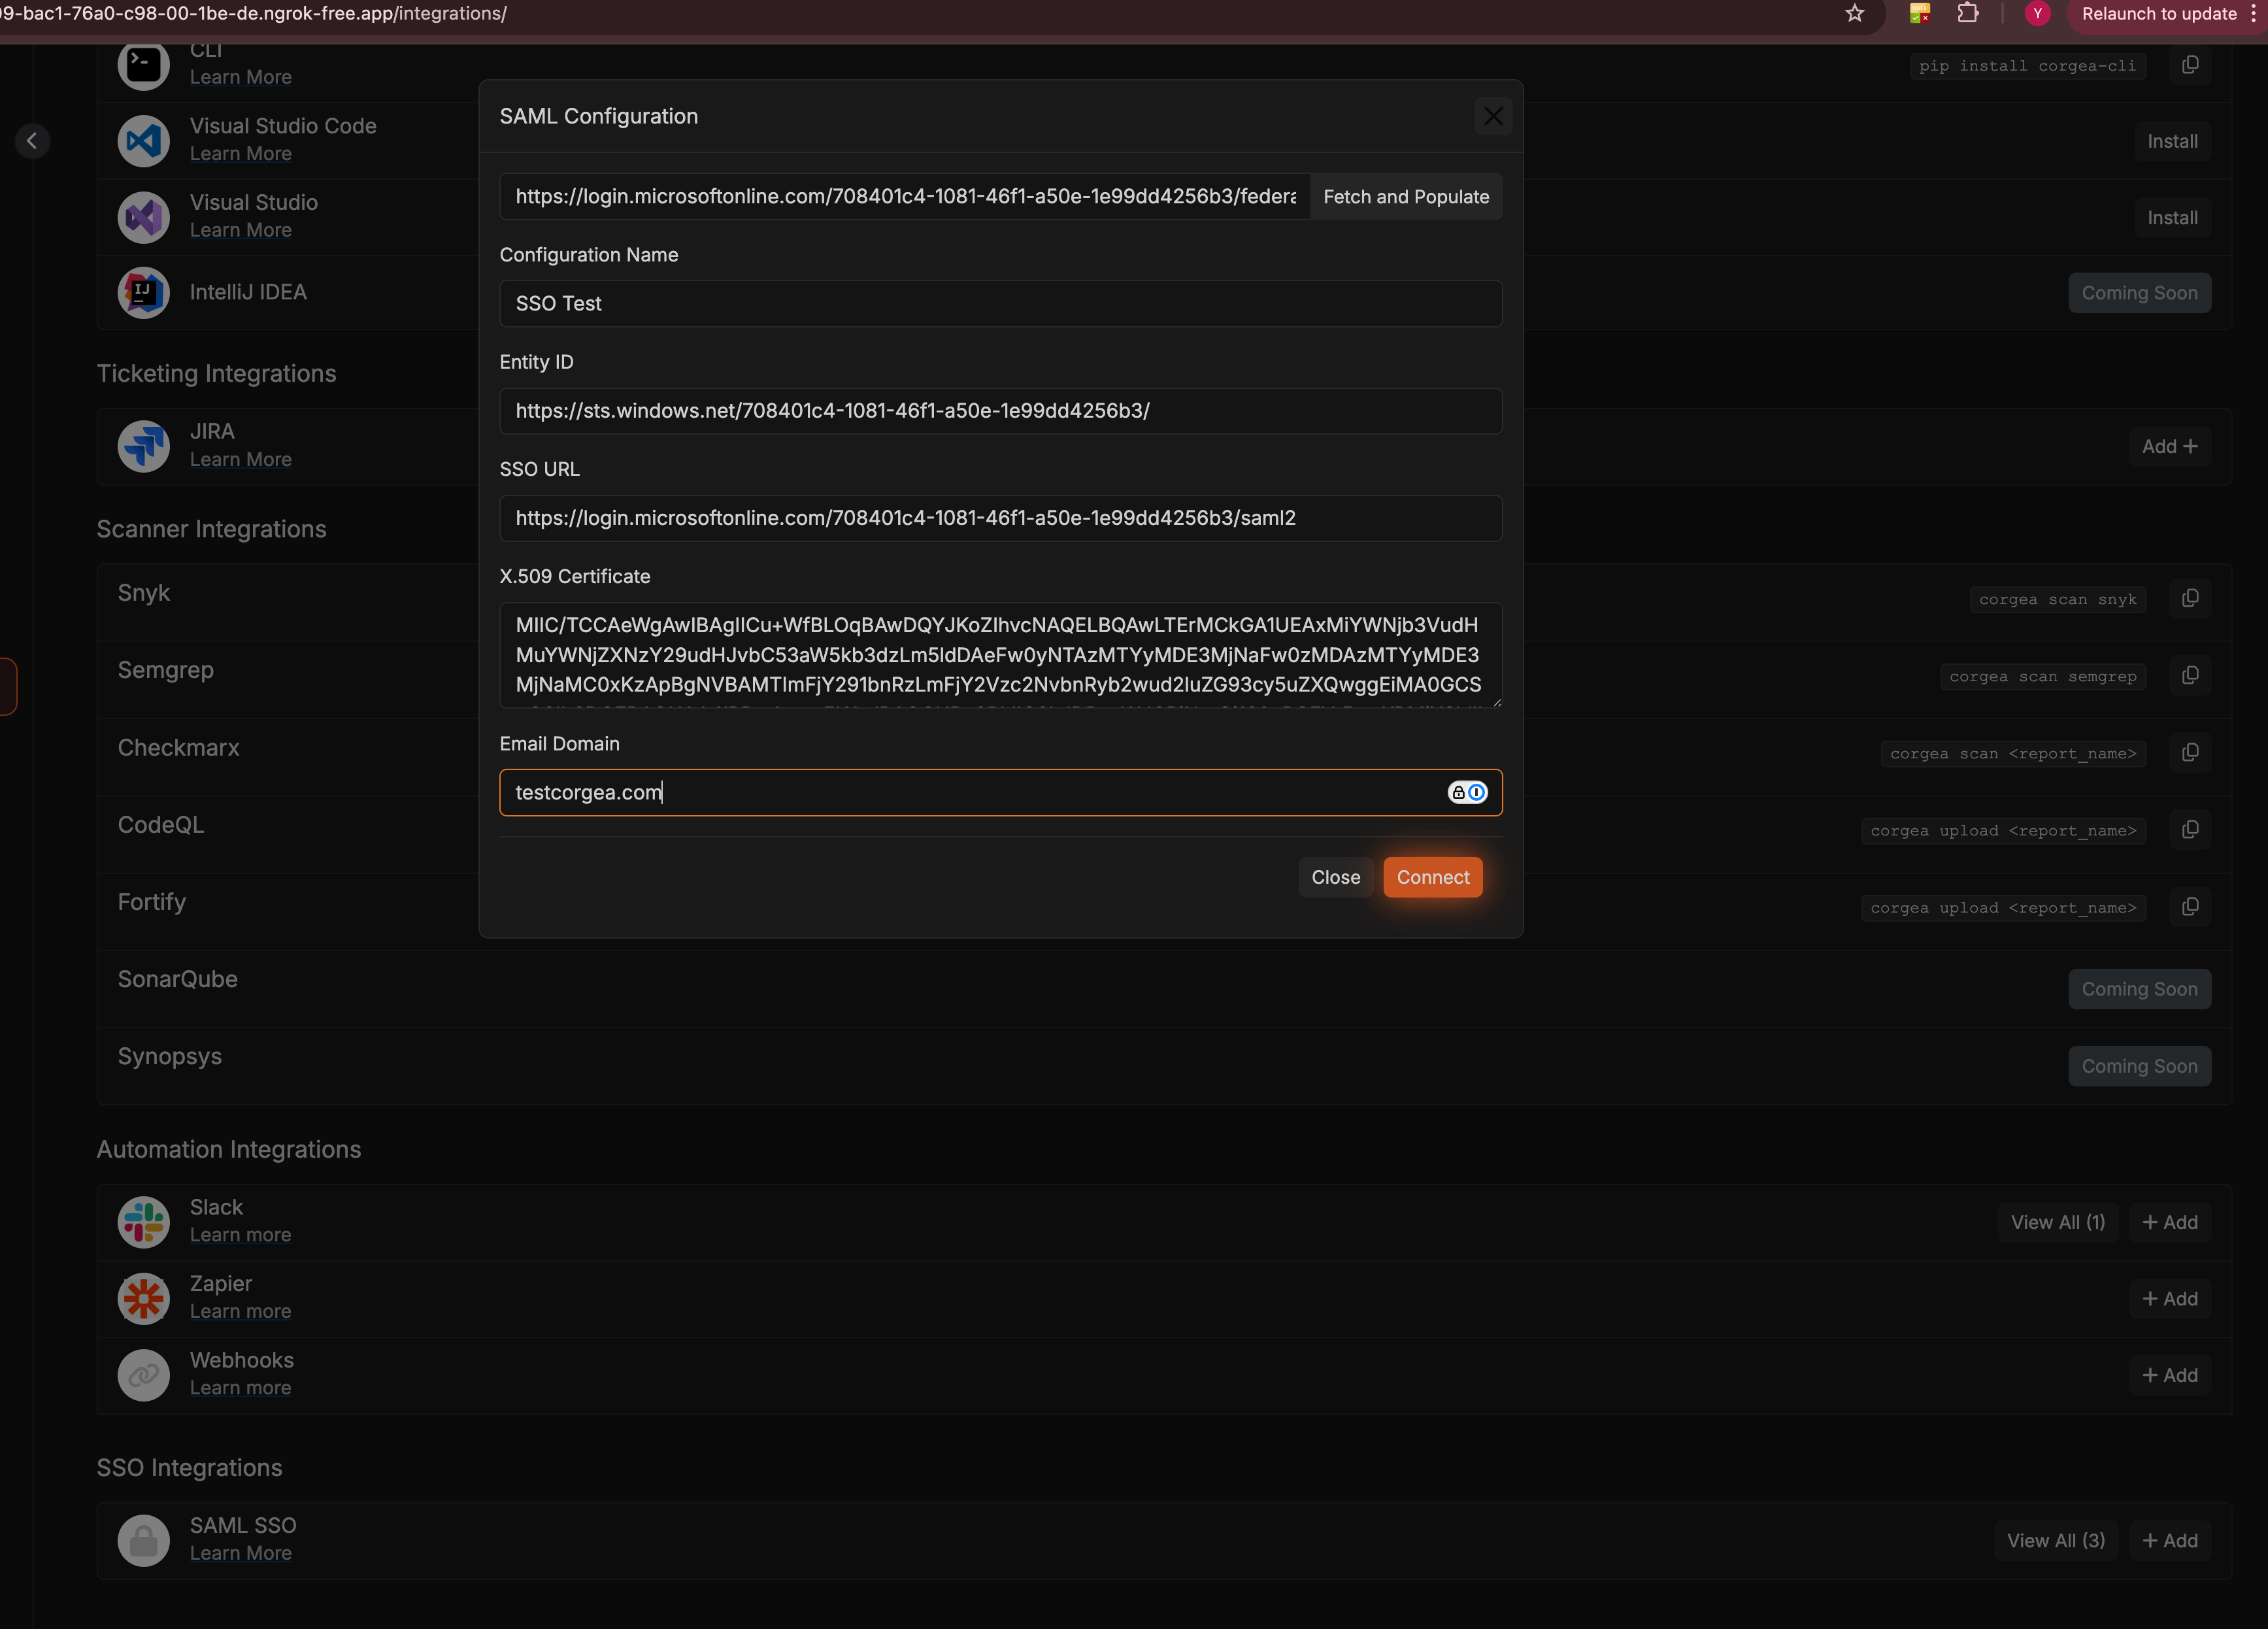 * Log into your Corgea account and proceed to the "Integrations" section.
* Click on "+ Add" button in SAML SSO section.
* Enter the copied SAML metadata URL into the "Metadata URL" field and click "Fetch and Populate".
* Check the auto-filled fields for accuracy.
* Click the "Connect" button to save your SAML configuration.
* Log into your Corgea account and proceed to the "Integrations" section.
* Click on "+ Add" button in SAML SSO section.
* Enter the copied SAML metadata URL into the "Metadata URL" field and click "Fetch and Populate".
* Check the auto-filled fields for accuracy.
* Click the "Connect" button to save your SAML configuration.
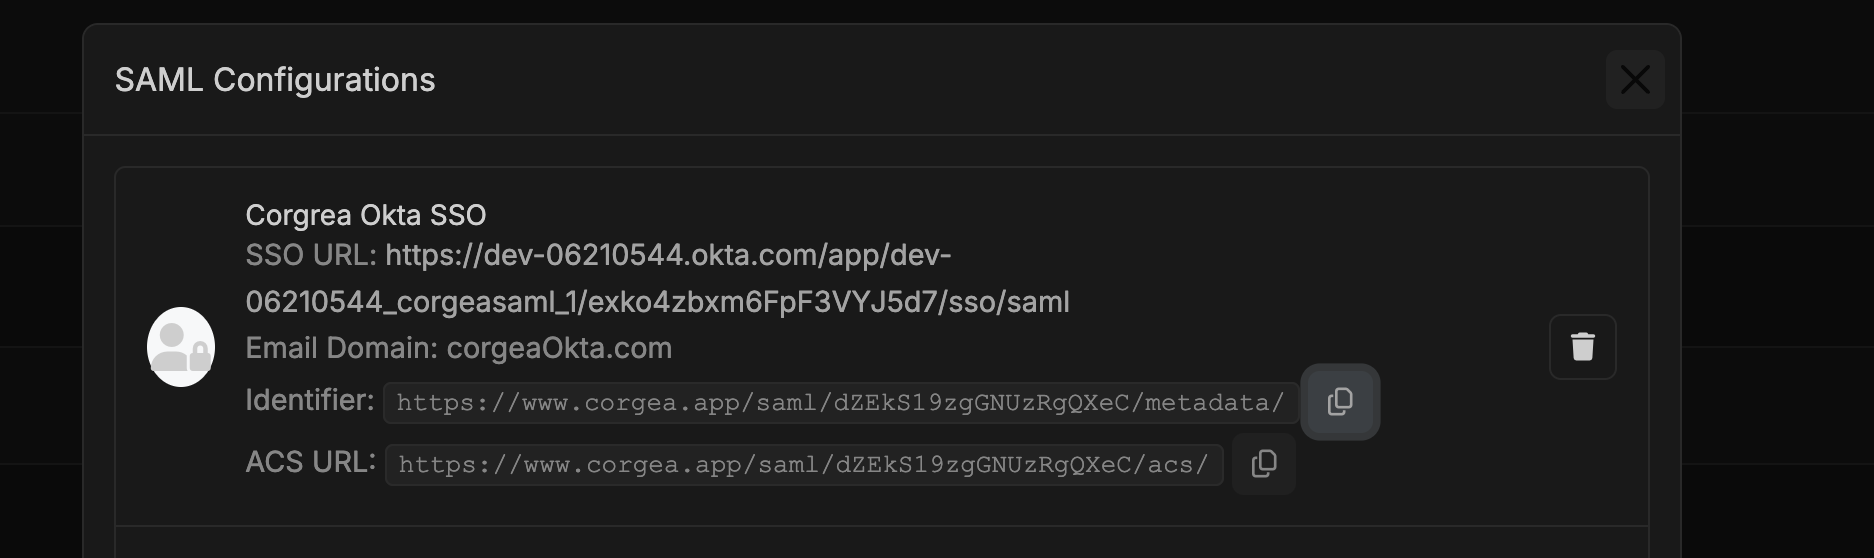 * After saving the SAML integration, view the updated identifier and ACS URL by clicking "View All" in the SAML SSO section.
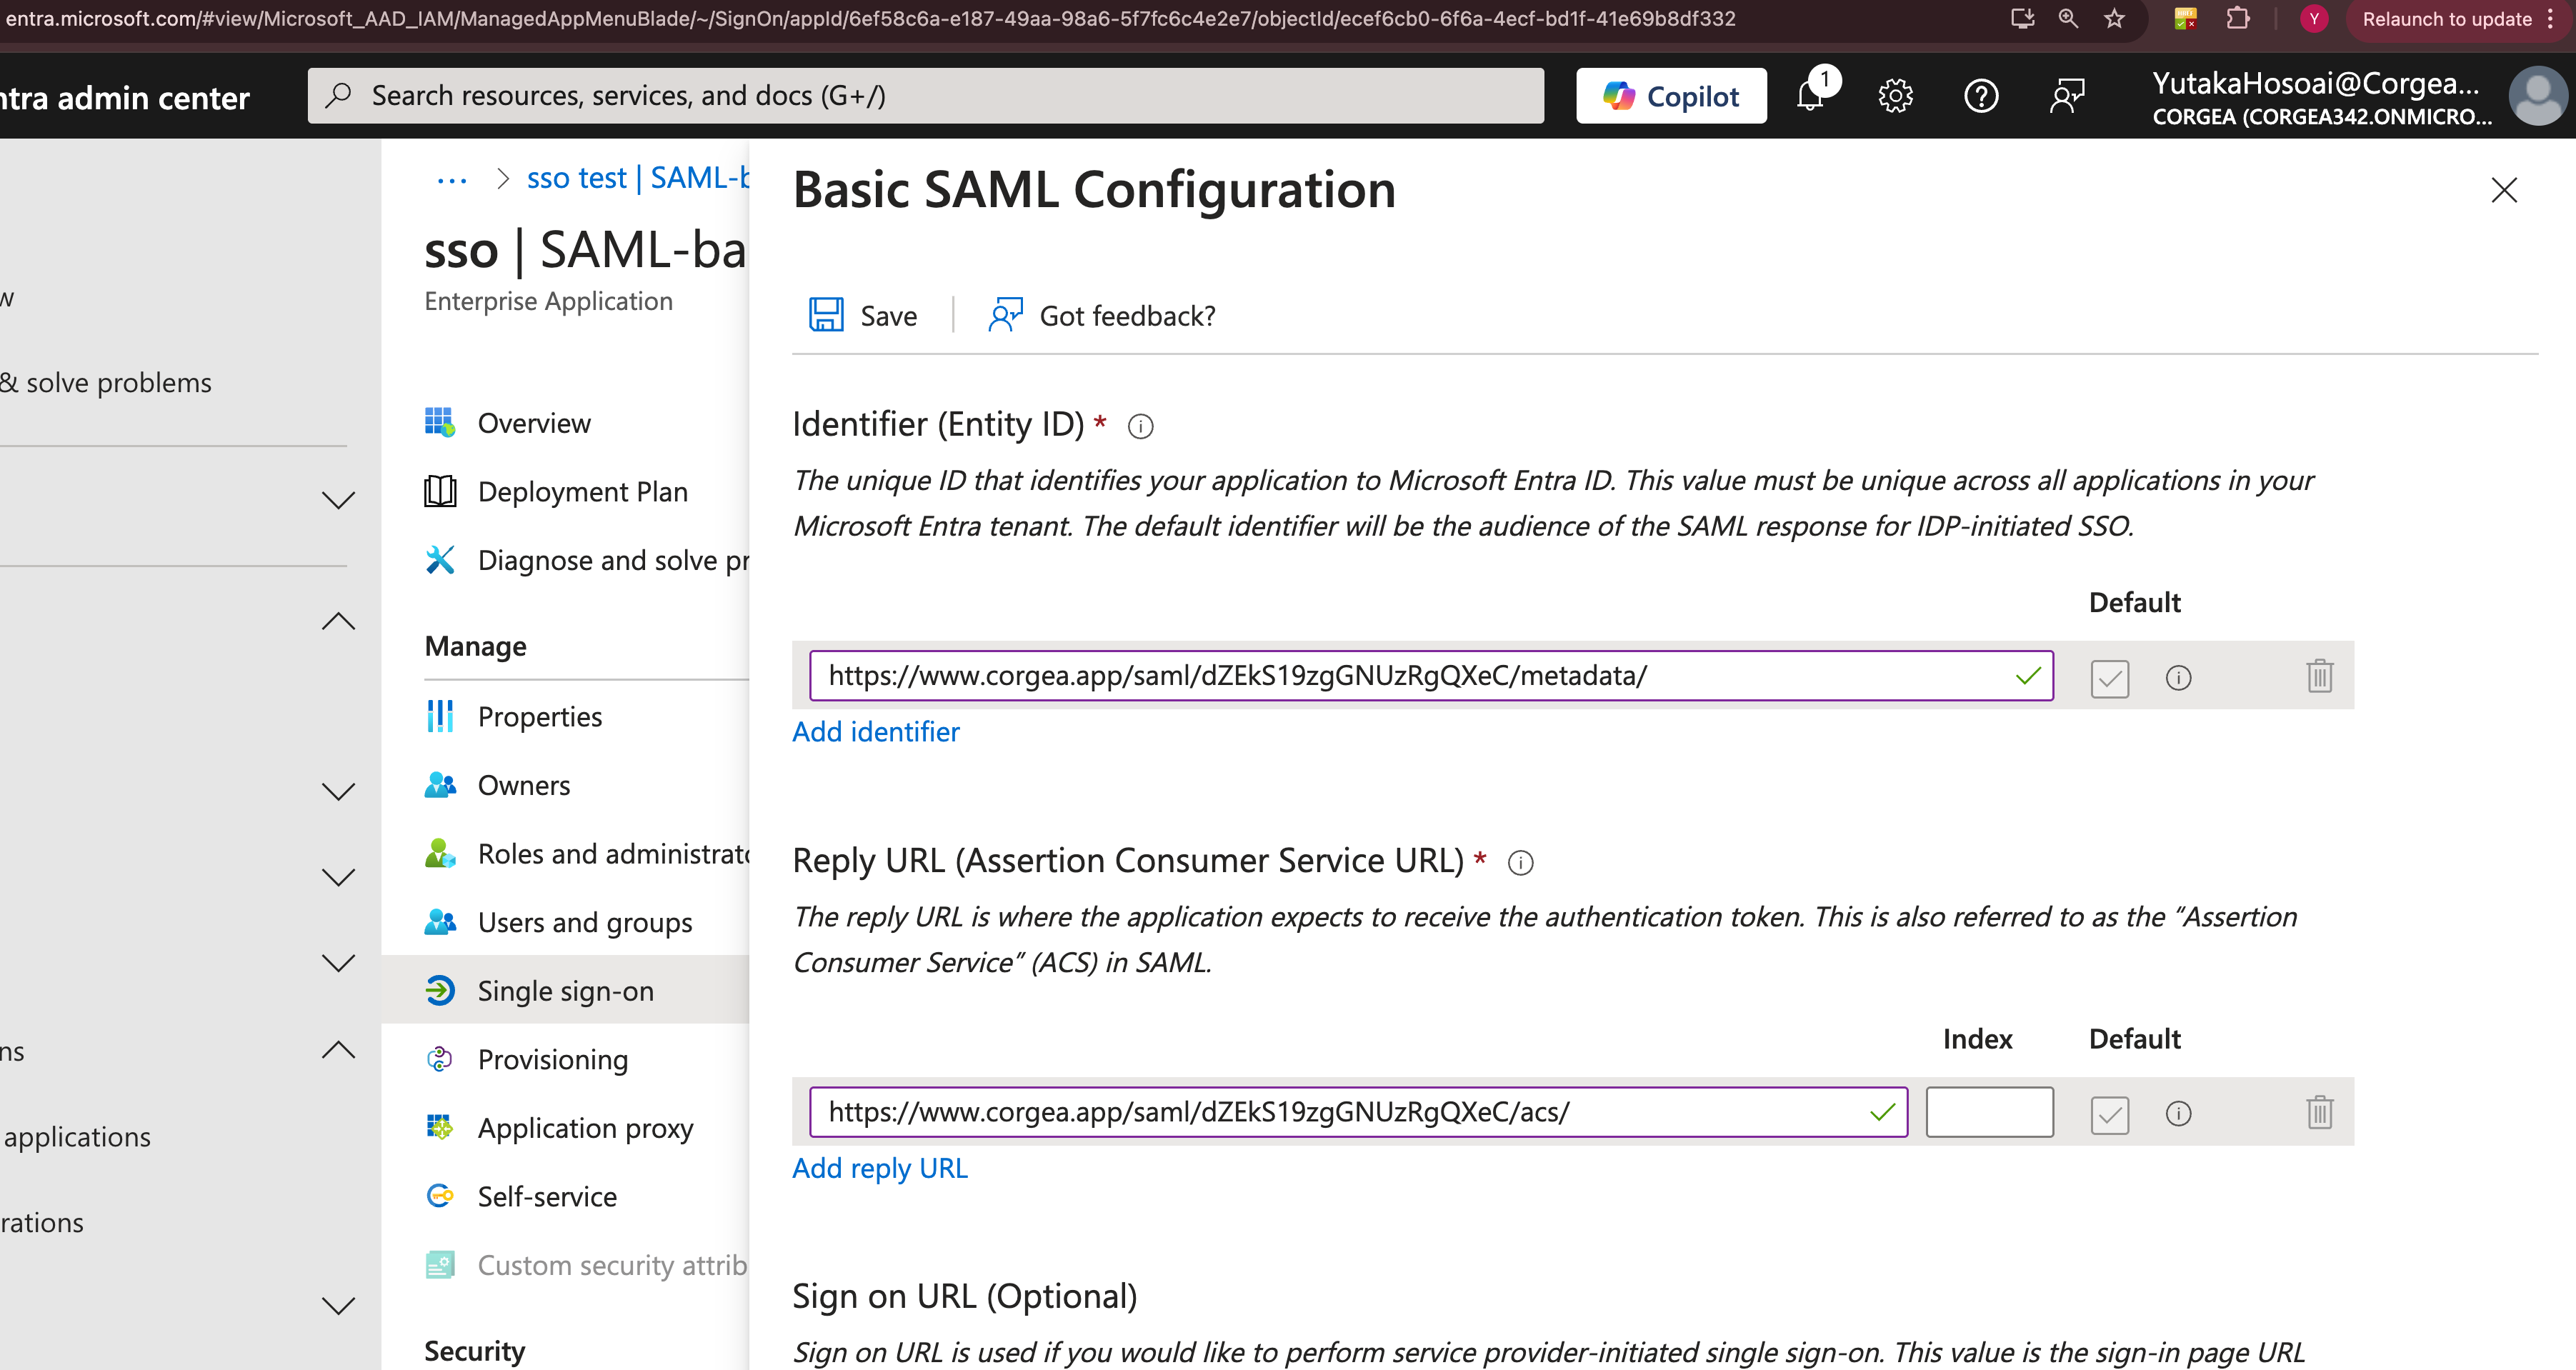 * Enter the copied SSO fields into the corresponding fields on your SAML Basic configuration page in Entra.
* Double-check all entries for accuracy to ensure a successful SSO connection, then click the "Save" button at the top.
Now you should be able to login with configured domain through login page. [Login by SSO](/sso#login-by-sso)
### Prerequisites or Dependencies
* A configured SAML Identity Provider (IdP).
## Best Practices
* **Regularly Update Certificates**: Ensure that your x509 certificates are up-to-date to maintain secure connections.
* **Test Configurations**: Before rolling out SSO to all users, test the configuration with a small group to ensure everything works as expected.
## Troubleshooting
* **Missing Referer Header**: If you receive a "Missing Referer header" error, check that the HTTP\_ORIGIN is correctly configured in the request headers.
* **No SAML Configuration Found**: If the configuration is missing, ensure that the correct referer URL or email domain is being utilized.
* **Permission Update**: If a user cannot access the SAML application, verify that their permissions are correctly configured and updated.
## Domain Ownership Conflicts
If you see a message that another workspace has already verified ownership of your domain, Corgea is preventing two different workspaces from claiming the same company domain at the same time.
This most commonly happens when:
* your team already has an existing Corgea workspace tied to the same email domain
* another admin in your organization enabled domain-based user join first
* SSO or domain-based workspace join was configured in a different workspace before the current one
We enforce this because a verified company domain is used to route users into the correct workspace and to protect against users being automatically sent to the wrong place.
### What to do next
1. Confirm whether your organization already has an existing Corgea workspace for this domain.
2. If the existing workspace is the correct one, continue managing users and SSO there instead of creating a second workspace for the same domain.
3. If the domain needs to move to a different workspace, contact Corgea support ([support@corgea.com](mailto:support@corgea.com)) so we can help verify the correct ownership and update the configuration safely.
## Additional Resources
* [SAML Protocol Overview](https://en.wikipedia.org/wiki/SAML_2.0)
* [Troubleshooting SAML Issues](https://www.samltool.com/troubleshoot.php)
* [Add an Okta SAML application](https://help.okta.com/oag/en-us/content/topics/access-gateway/add-app-saml-pass-thru-add-okta.htm)
# SCIM as an Optional Feature
## Overview
### Functionality
SCIM (System for Cross-domain Identity Management) is an open standard designed to manage user identities in cloud-based applications and services. It automates the exchange of user identity information between identity domains or IT systems, making it easier to manage user accounts across multiple platforms.
### Target Audience
This feature is ideal for organizations that need to manage user identities across various applications efficiently.
## Key Features and Benefits
* **Automated User Provisioning**: Automatically create, update, and deactivate user accounts in connected applications, reducing manual effort and errors.
* **Consistent User Data**: Ensures that user information is consistent across all integrated applications, improving data accuracy and compliance.
* **Scalability**: Easily manage a large number of users across multiple platforms, making it suitable for growing organizations.
* **Security**: Enhances security by ensuring that user access is promptly updated or revoked as needed.
## Why Customers Want SCIM
* **Efficiency**: Automates repetitive tasks, freeing up IT resources for more strategic initiatives.
* **Accuracy**: Reduces the risk of human error in user management, ensuring that user data is always up-to-date.
* **Compliance**: Helps maintain compliance with data protection regulations by ensuring that user data is consistently managed and protected.
* **Integration**: Seamlessly integrates with existing SSO solutions, providing a comprehensive identity management system.
## SSO SCIM Provider Configuration
To enable SCIM functionality, you need to configure the SCIM application in your SSO provider with the following settings:
* Ensure SCIM is enabled.
* Set up the Application SCIM Integration with:
* SCIM connector base URL: [https://www.corgea.app/scim/v2/](https://www.corgea.app/scim/v2/)
* Unique user identifier field: email
* Supported provisioning actions:
* Push New Users
* Push Profile Updates
* Authentication Mode: HTTP Header
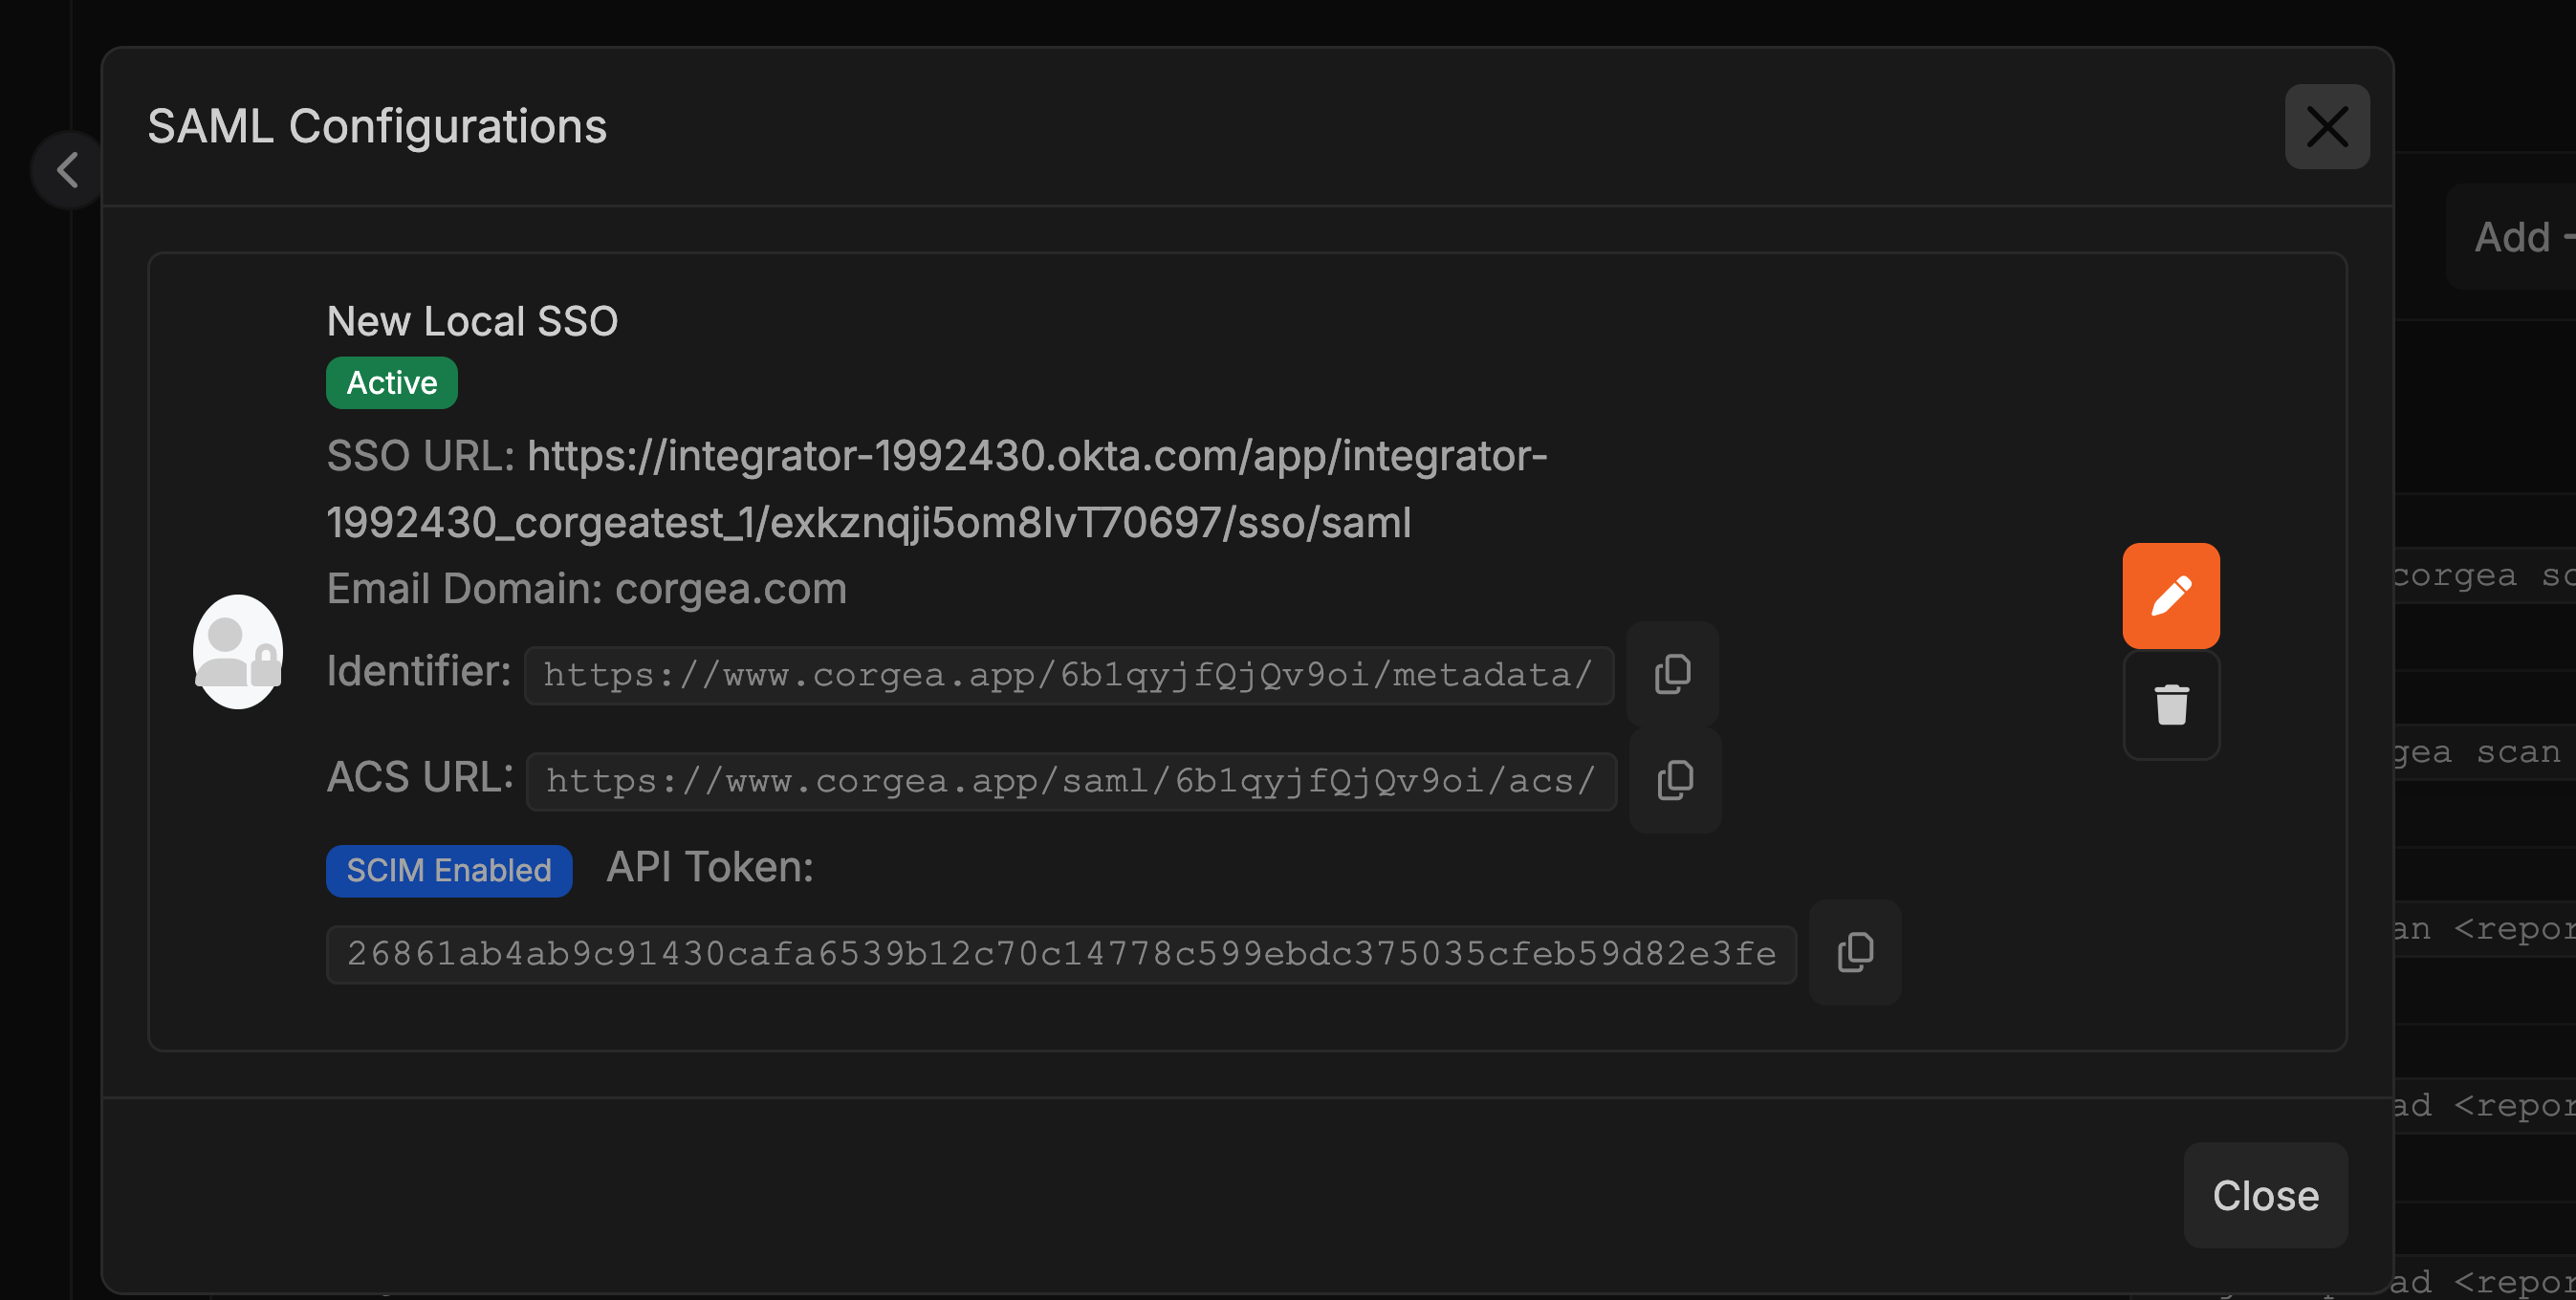
The SCIM token can be found in the SSO Configuration modal:
* Enter the copied SSO fields into the corresponding fields on your SAML Basic configuration page in Entra.
* Double-check all entries for accuracy to ensure a successful SSO connection, then click the "Save" button at the top.
Now you should be able to login with configured domain through login page. [Login by SSO](/sso#login-by-sso)
### Prerequisites or Dependencies
* A configured SAML Identity Provider (IdP).
## Best Practices
* **Regularly Update Certificates**: Ensure that your x509 certificates are up-to-date to maintain secure connections.
* **Test Configurations**: Before rolling out SSO to all users, test the configuration with a small group to ensure everything works as expected.
## Troubleshooting
* **Missing Referer Header**: If you receive a "Missing Referer header" error, check that the HTTP\_ORIGIN is correctly configured in the request headers.
* **No SAML Configuration Found**: If the configuration is missing, ensure that the correct referer URL or email domain is being utilized.
* **Permission Update**: If a user cannot access the SAML application, verify that their permissions are correctly configured and updated.
## Domain Ownership Conflicts
If you see a message that another workspace has already verified ownership of your domain, Corgea is preventing two different workspaces from claiming the same company domain at the same time.
This most commonly happens when:
* your team already has an existing Corgea workspace tied to the same email domain
* another admin in your organization enabled domain-based user join first
* SSO or domain-based workspace join was configured in a different workspace before the current one
We enforce this because a verified company domain is used to route users into the correct workspace and to protect against users being automatically sent to the wrong place.
### What to do next
1. Confirm whether your organization already has an existing Corgea workspace for this domain.
2. If the existing workspace is the correct one, continue managing users and SSO there instead of creating a second workspace for the same domain.
3. If the domain needs to move to a different workspace, contact Corgea support ([support@corgea.com](mailto:support@corgea.com)) so we can help verify the correct ownership and update the configuration safely.
## Additional Resources
* [SAML Protocol Overview](https://en.wikipedia.org/wiki/SAML_2.0)
* [Troubleshooting SAML Issues](https://www.samltool.com/troubleshoot.php)
* [Add an Okta SAML application](https://help.okta.com/oag/en-us/content/topics/access-gateway/add-app-saml-pass-thru-add-okta.htm)
# SCIM as an Optional Feature
## Overview
### Functionality
SCIM (System for Cross-domain Identity Management) is an open standard designed to manage user identities in cloud-based applications and services. It automates the exchange of user identity information between identity domains or IT systems, making it easier to manage user accounts across multiple platforms.
### Target Audience
This feature is ideal for organizations that need to manage user identities across various applications efficiently.
## Key Features and Benefits
* **Automated User Provisioning**: Automatically create, update, and deactivate user accounts in connected applications, reducing manual effort and errors.
* **Consistent User Data**: Ensures that user information is consistent across all integrated applications, improving data accuracy and compliance.
* **Scalability**: Easily manage a large number of users across multiple platforms, making it suitable for growing organizations.
* **Security**: Enhances security by ensuring that user access is promptly updated or revoked as needed.
## Why Customers Want SCIM
* **Efficiency**: Automates repetitive tasks, freeing up IT resources for more strategic initiatives.
* **Accuracy**: Reduces the risk of human error in user management, ensuring that user data is always up-to-date.
* **Compliance**: Helps maintain compliance with data protection regulations by ensuring that user data is consistently managed and protected.
* **Integration**: Seamlessly integrates with existing SSO solutions, providing a comprehensive identity management system.
## SSO SCIM Provider Configuration
To enable SCIM functionality, you need to configure the SCIM application in your SSO provider with the following settings:
* Ensure SCIM is enabled.
* Set up the Application SCIM Integration with:
* SCIM connector base URL: [https://www.corgea.app/scim/v2/](https://www.corgea.app/scim/v2/)
* Unique user identifier field: email
* Supported provisioning actions:
* Push New Users
* Push Profile Updates
* Authentication Mode: HTTP Header
The SCIM token can be found in the SSO Configuration modal:
 By enabling SCIM, organizations can significantly enhance their identity management processes, leading to improved operational efficiency and security.