> ## Documentation Index
> Fetch the complete documentation index at: https://docs.corgea.app/llms.txt
> Use this file to discover all available pages before exploring further.
# JWT Auth
> Authenticate API requests using JWT Bearer tokens issued by your identity provider (Entra ID, Okta, etc.) for system-to-system integrations.
## Overview
JWT Token authentication lets you call the Corgea API using Bearer tokens issued directly by your identity provider (IdP) — such as Microsoft Entra ID or Okta — instead of a user-specific Corgea API token.
This is the recommended approach for **system-to-system integrations** (CI/CD pipelines, automated scanners, internal tooling) where you want:
* Tokens tied to a service principal or app registration rather than a specific user account
* Token lifetime and scope controlled by your IdP
* Centralized revocation through your IdP without touching Corgea
A Corgea API token is always tied to an individual user. If that user leaves or their account is deactivated, any automation using their token breaks. JWT Auth decouples authentication from user accounts entirely.
## How It Works
1. Your system requests an access token from your IdP using client credentials (client ID + secret).
2. The IdP returns a signed JWT containing claims such as `iss` (issuer) and `aud` (audience).
3. Your system passes the token as a `Bearer` token in the `Authorization` header when calling the Corgea API.
4. Corgea validates the token signature against the IdP's public keys and checks that the `iss`, `aud`, and `appid`/`cid` claims match your registered configuration.
## Using JWT with Corgea CLI
You can use a JWT access token directly with the CLI login flow:
```bash theme={null}
corgea login YOUR_JWT_TOKEN
```
Or set it via environment variable:
```bash macOS / Linux theme={null}
export CORGEA_TOKEN="your-jwt-access-token"
corgea login
```
```powershell Windows theme={null}
$env:CORGEA_TOKEN="your-jwt-access-token"
corgea login
```
## Setting Up JWT Auth in Corgea
Navigate to **Settings → Integrations** and click **+ Add** in the **JWT Auth** section.
 Fill in the following fields:
| Field | Description |
| --------------------------- | ----------------------------------------------------------------------------------- |
| **Name** | A descriptive label for this configuration (e.g., `Entra CICD Pipeline`). |
| **Issuer** | The token issuer URL — must match the `iss` claim in the access token. |
| **Audience** | Must match the `aud` claim in the access token. |
| **Allowed Application IDs** | One client ID per line — the application that is allowed to use this configuration. |
Use [jwt.io](https://jwt.io) to decode an access token from your IdP and verify the exact values of `iss`, `aud`, and `appid`/`cid` before filling in this form.
**Provider-specific values:**
* **Entra ID issuer**: `https://sts.windows.net/{your-tenant-id}/`
* **Entra ID audience**: your app's Application ID URI (e.g., `api://{client_id}`) — set via **Expose an API** in Entra
* **Okta issuer**: `https://{domain}.okta.com/oauth2/default`
* **Okta audience**: `api://default` (or the custom authorization server audience)
## Microsoft Entra ID Setup
In the [Azure portal](https://portal.azure.com), go to **Microsoft Entra ID → App registrations → New registration**. Give the app a descriptive name (e.g., `corgea-cicd`) and register it.
Go to **Expose an API** in your app registration. Set or confirm the **Application ID URI** — this becomes the `aud` claim in tokens issued for this app.
Fill in the following fields:
| Field | Description |
| --------------------------- | ----------------------------------------------------------------------------------- |
| **Name** | A descriptive label for this configuration (e.g., `Entra CICD Pipeline`). |
| **Issuer** | The token issuer URL — must match the `iss` claim in the access token. |
| **Audience** | Must match the `aud` claim in the access token. |
| **Allowed Application IDs** | One client ID per line — the application that is allowed to use this configuration. |
Use [jwt.io](https://jwt.io) to decode an access token from your IdP and verify the exact values of `iss`, `aud`, and `appid`/`cid` before filling in this form.
**Provider-specific values:**
* **Entra ID issuer**: `https://sts.windows.net/{your-tenant-id}/`
* **Entra ID audience**: your app's Application ID URI (e.g., `api://{client_id}`) — set via **Expose an API** in Entra
* **Okta issuer**: `https://{domain}.okta.com/oauth2/default`
* **Okta audience**: `api://default` (or the custom authorization server audience)
## Microsoft Entra ID Setup
In the [Azure portal](https://portal.azure.com), go to **Microsoft Entra ID → App registrations → New registration**. Give the app a descriptive name (e.g., `corgea-cicd`) and register it.
Go to **Expose an API** in your app registration. Set or confirm the **Application ID URI** — this becomes the `aud` claim in tokens issued for this app.
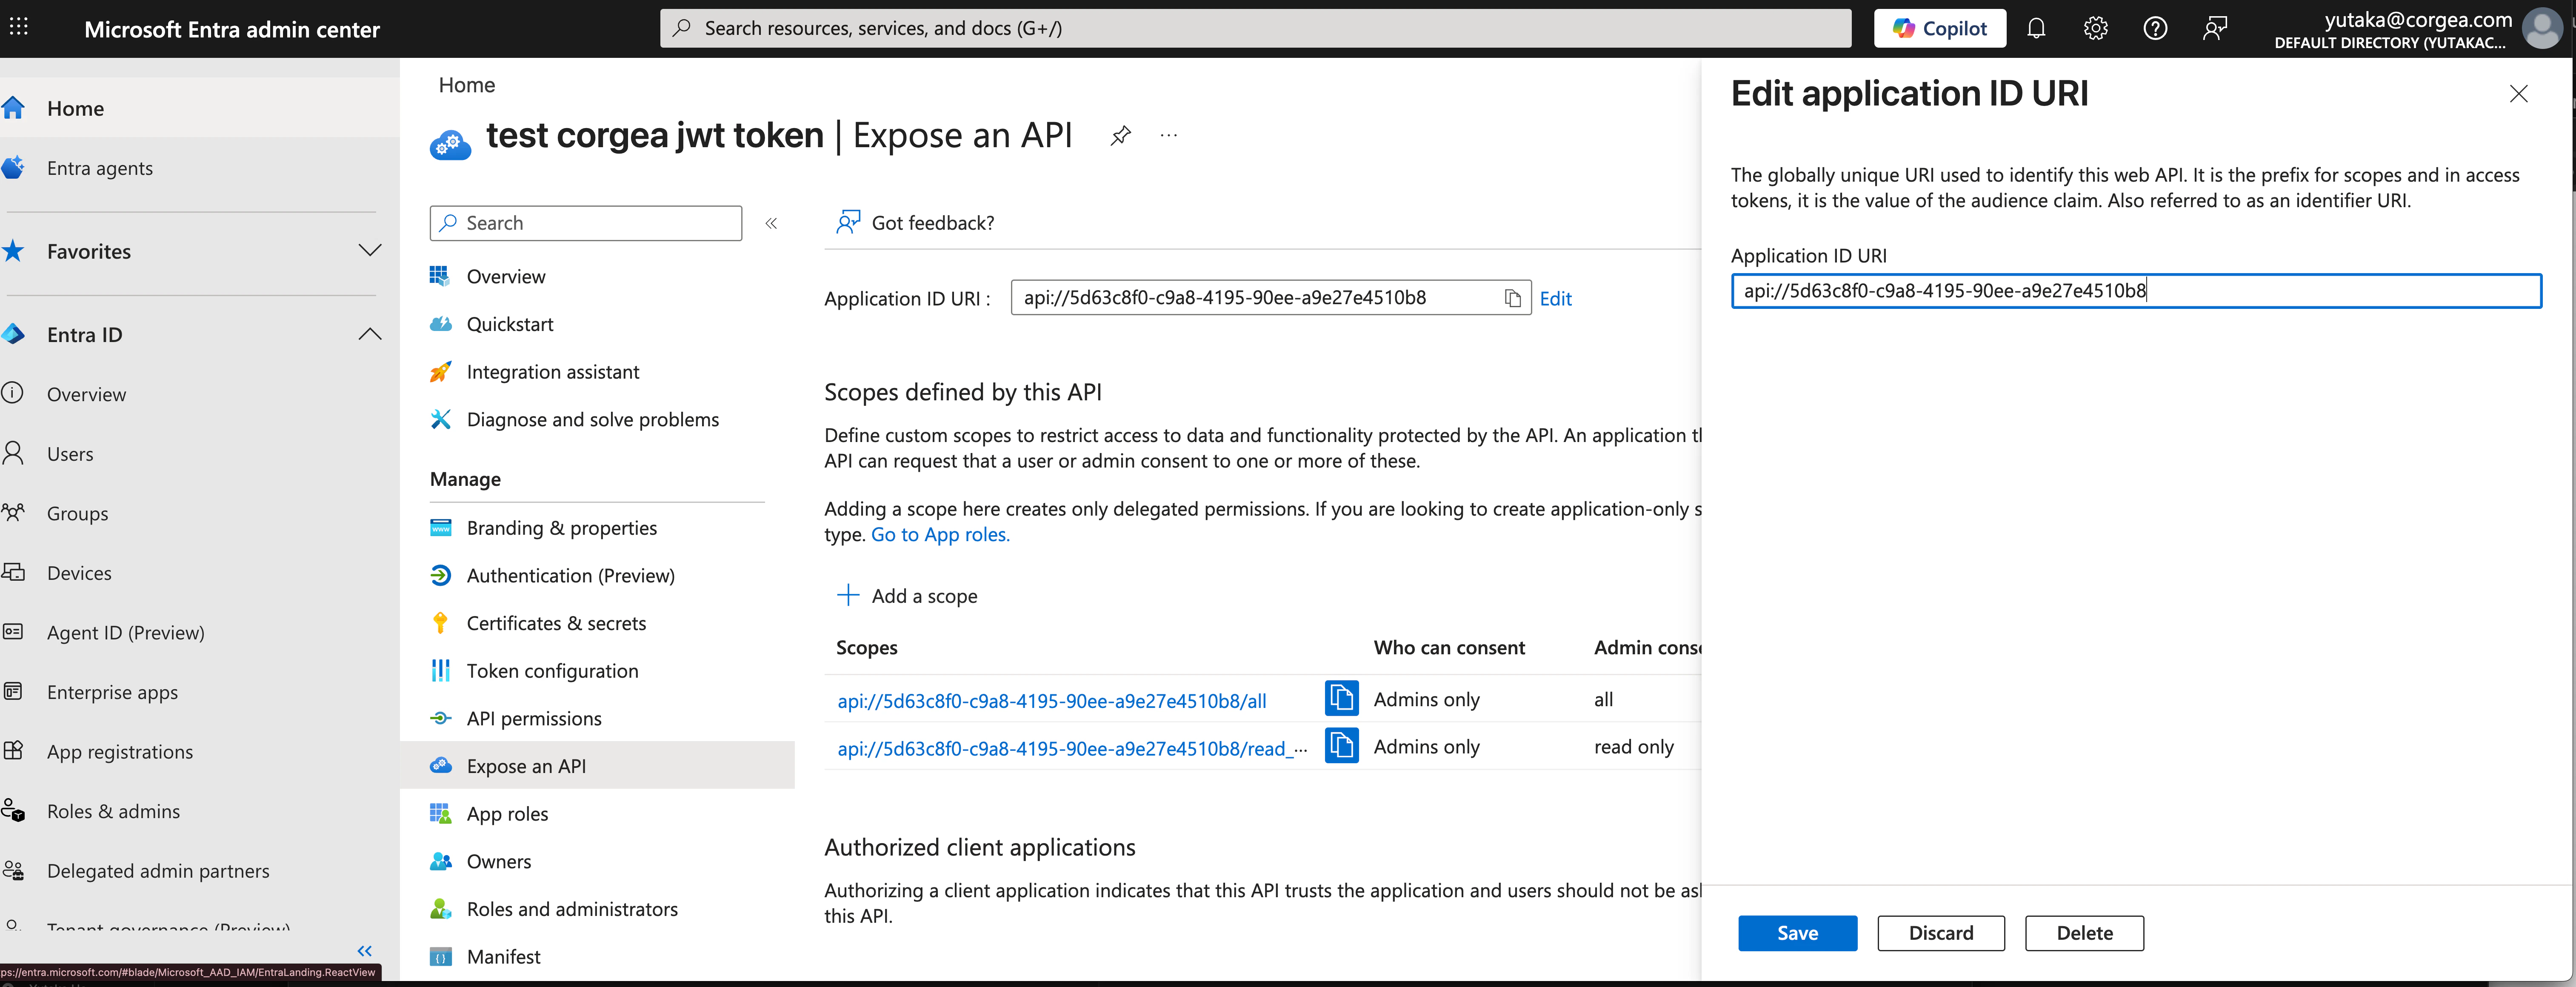 Copy the Application ID URI (e.g., `api://5d63c8f0-c9a8-4195-90ee-a9e27e4510b8`) — you will enter this as the **Audience** in Corgea.
Go to **Certificates & secrets → New client secret**. Add a description and set an expiry, then click **Add**.
Copy the Application ID URI (e.g., `api://5d63c8f0-c9a8-4195-90ee-a9e27e4510b8`) — you will enter this as the **Audience** in Corgea.
Go to **Certificates & secrets → New client secret**. Add a description and set an expiry, then click **Add**.
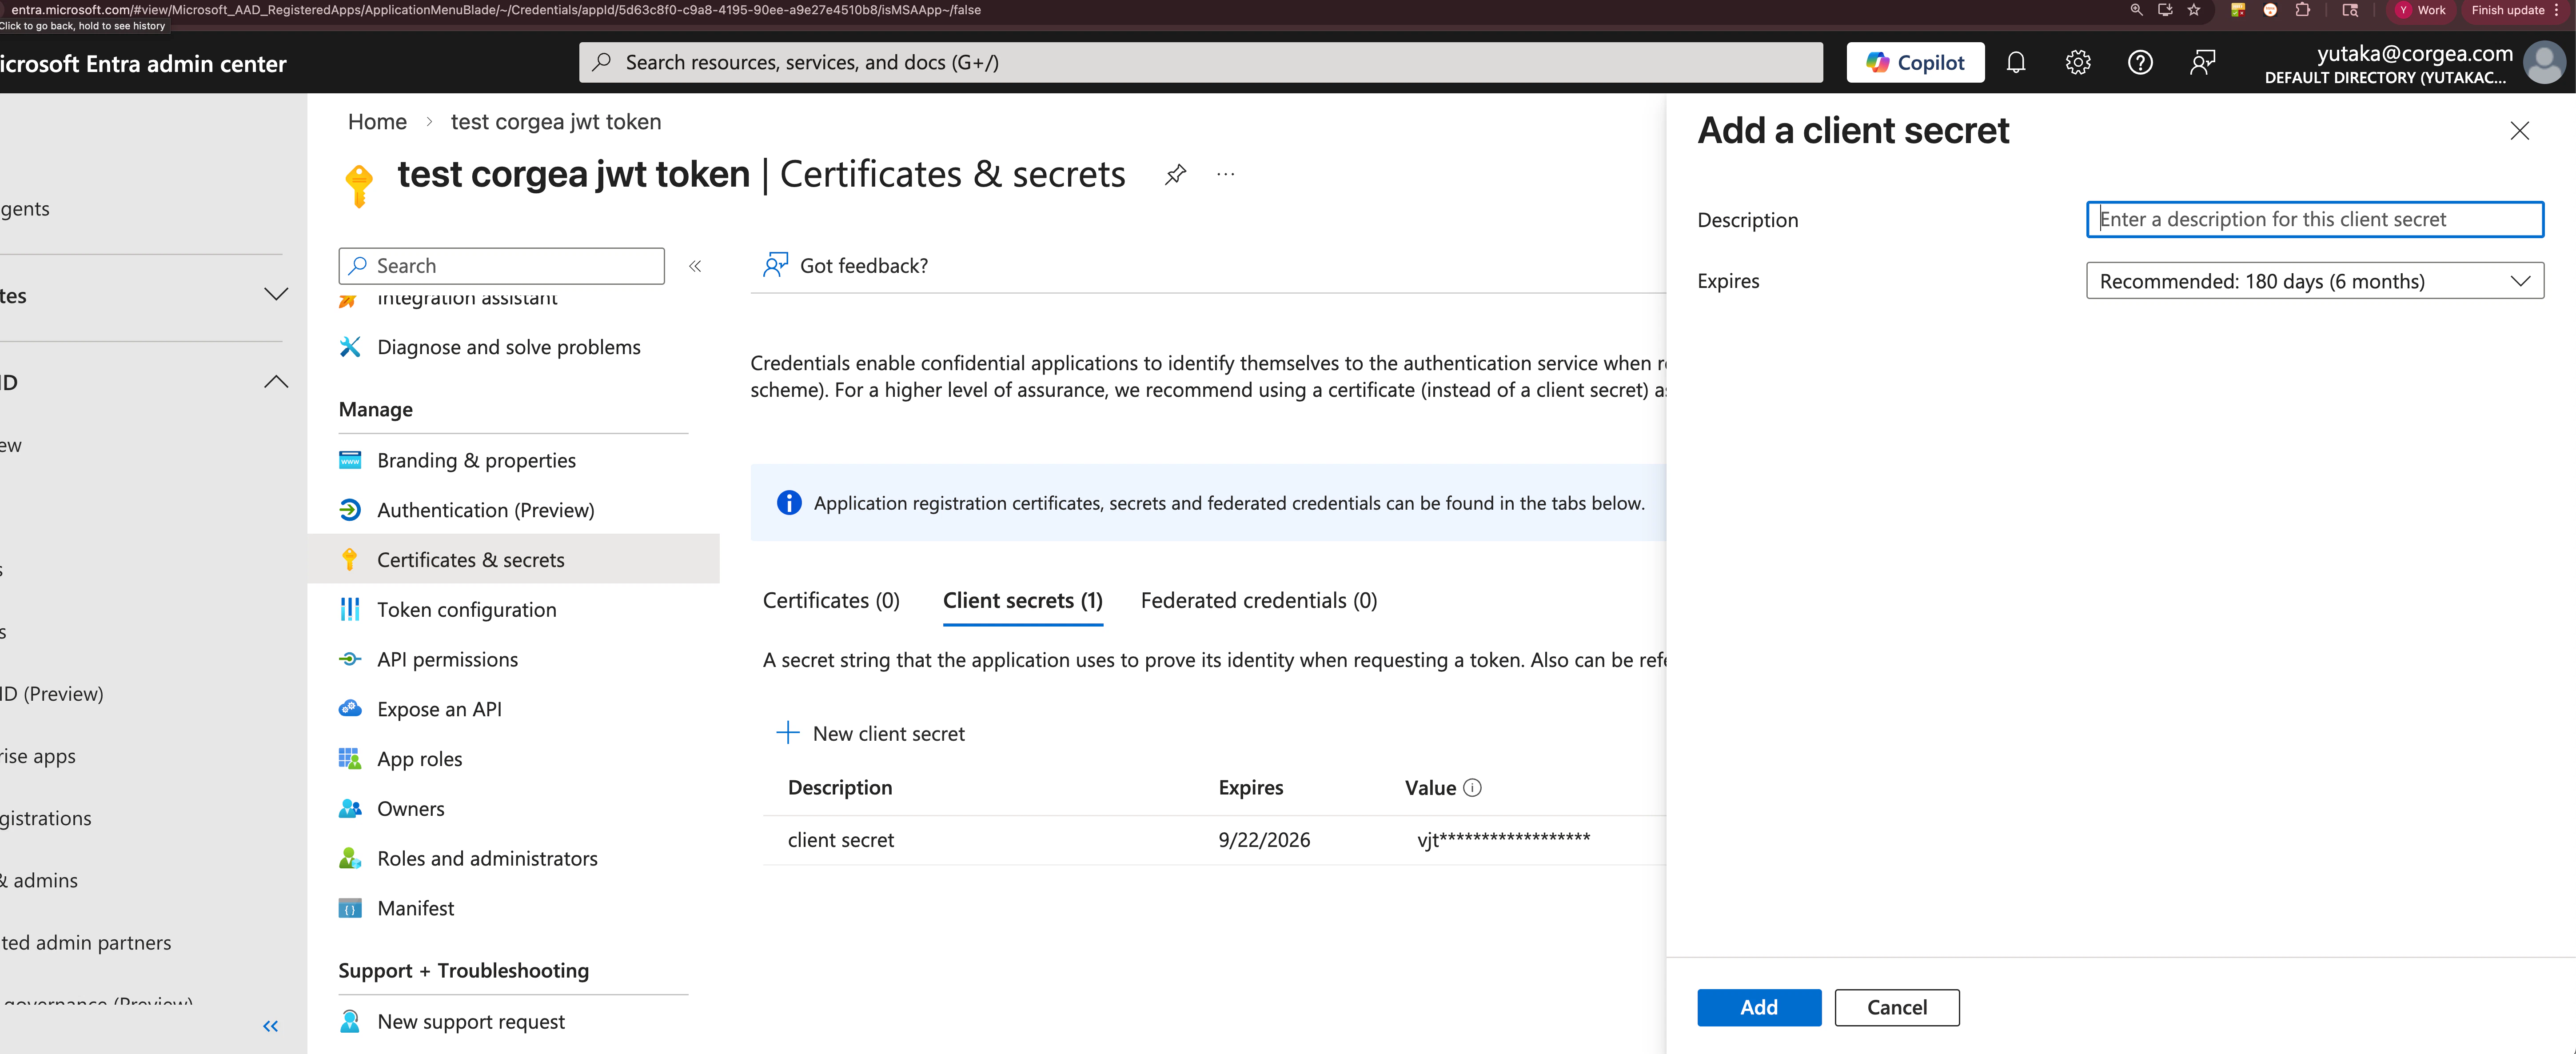 Copy the secret **Value** immediately — it is only shown once. Store it securely (e.g., in your CI/CD secrets store).
Your system requests a token from Entra using the client credentials flow:
```bash macOS / Linux theme={null}
curl -X POST \
https://login.microsoftonline.com/{tenant-id}/oauth2/v2.0/token \
-d "grant_type=client_credentials" \
-d "client_id={client-id}" \
-d "client_secret={client-secret}" \
-d "scope=api://{client-id}/.default"
```
```powershell Windows theme={null}
Invoke-RestMethod -Method Post `
-Uri "https://login.microsoftonline.com/{tenant-id}/oauth2/v2.0/token" `
-Body @{
grant_type = "client_credentials"
client_id = "{client-id}"
client_secret = "{client-secret}"
scope = "api://{client-id}/.default"
}
```
The response contains an `access_token`. Pass this as a Bearer token when calling Corgea:
```bash macOS / Linux theme={null}
curl -H "Authorization: Bearer {access_token}" https://www.corgea.app/api/...
```
```powershell Windows theme={null}
Invoke-RestMethod -Uri "https://www.corgea.app/api/..." `
-Headers @{ Authorization = "Bearer {access_token}" }
```
Replace `https://www.corgea.app` with `https://your_instance.corgea.app` if you are on a private deployment.
In Corgea's **Add JWT Auth Configuration** form, enter:
* **Issuer**: `https://sts.windows.net/{your-tenant-id}/`
* **Audience**: the Application ID URI from Step 2 (e.g., `api://5d63c8f0-...`)
* **Allowed Application IDs**: the **Application (client) ID** from your app registration
Click **Add** to save.
## Testing with Postman
If you prefer a GUI over curl, you can test the token request and API call directly in Postman.
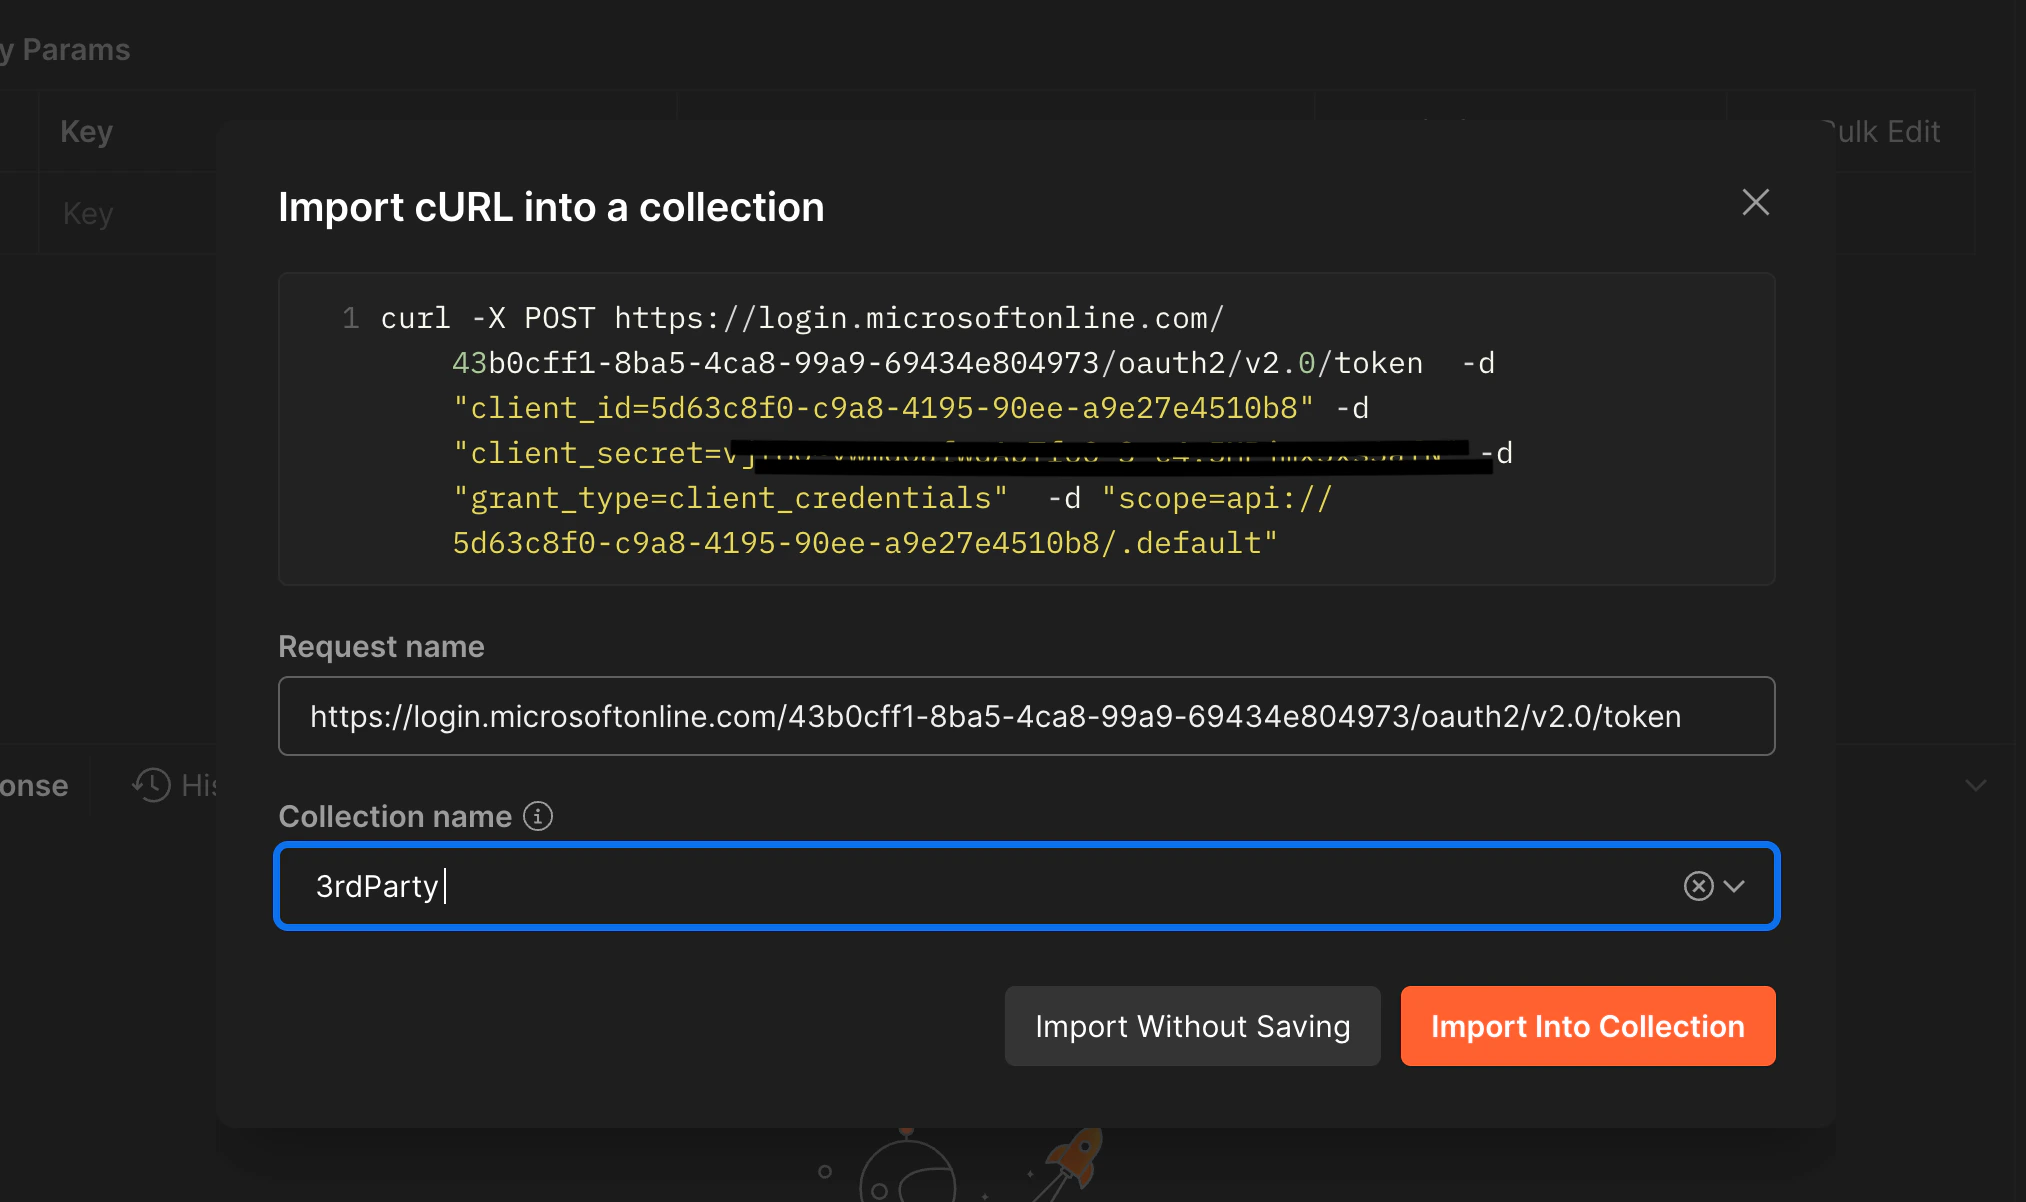
**Import a curl command**
Postman can convert any of the curl commands above into a request. Click **Import** in the top-left, paste the curl command, and Postman will populate the method, URL, headers, and body automatically.
Copy the secret **Value** immediately — it is only shown once. Store it securely (e.g., in your CI/CD secrets store).
Your system requests a token from Entra using the client credentials flow:
```bash macOS / Linux theme={null}
curl -X POST \
https://login.microsoftonline.com/{tenant-id}/oauth2/v2.0/token \
-d "grant_type=client_credentials" \
-d "client_id={client-id}" \
-d "client_secret={client-secret}" \
-d "scope=api://{client-id}/.default"
```
```powershell Windows theme={null}
Invoke-RestMethod -Method Post `
-Uri "https://login.microsoftonline.com/{tenant-id}/oauth2/v2.0/token" `
-Body @{
grant_type = "client_credentials"
client_id = "{client-id}"
client_secret = "{client-secret}"
scope = "api://{client-id}/.default"
}
```
The response contains an `access_token`. Pass this as a Bearer token when calling Corgea:
```bash macOS / Linux theme={null}
curl -H "Authorization: Bearer {access_token}" https://www.corgea.app/api/...
```
```powershell Windows theme={null}
Invoke-RestMethod -Uri "https://www.corgea.app/api/..." `
-Headers @{ Authorization = "Bearer {access_token}" }
```
Replace `https://www.corgea.app` with `https://your_instance.corgea.app` if you are on a private deployment.
In Corgea's **Add JWT Auth Configuration** form, enter:
* **Issuer**: `https://sts.windows.net/{your-tenant-id}/`
* **Audience**: the Application ID URI from Step 2 (e.g., `api://5d63c8f0-...`)
* **Allowed Application IDs**: the **Application (client) ID** from your app registration
Click **Add** to save.
## Testing with Postman
If you prefer a GUI over curl, you can test the token request and API call directly in Postman.
**Import a curl command**
Postman can convert any of the curl commands above into a request. Click **Import** in the top-left, paste the curl command, and Postman will populate the method, URL, headers, and body automatically.
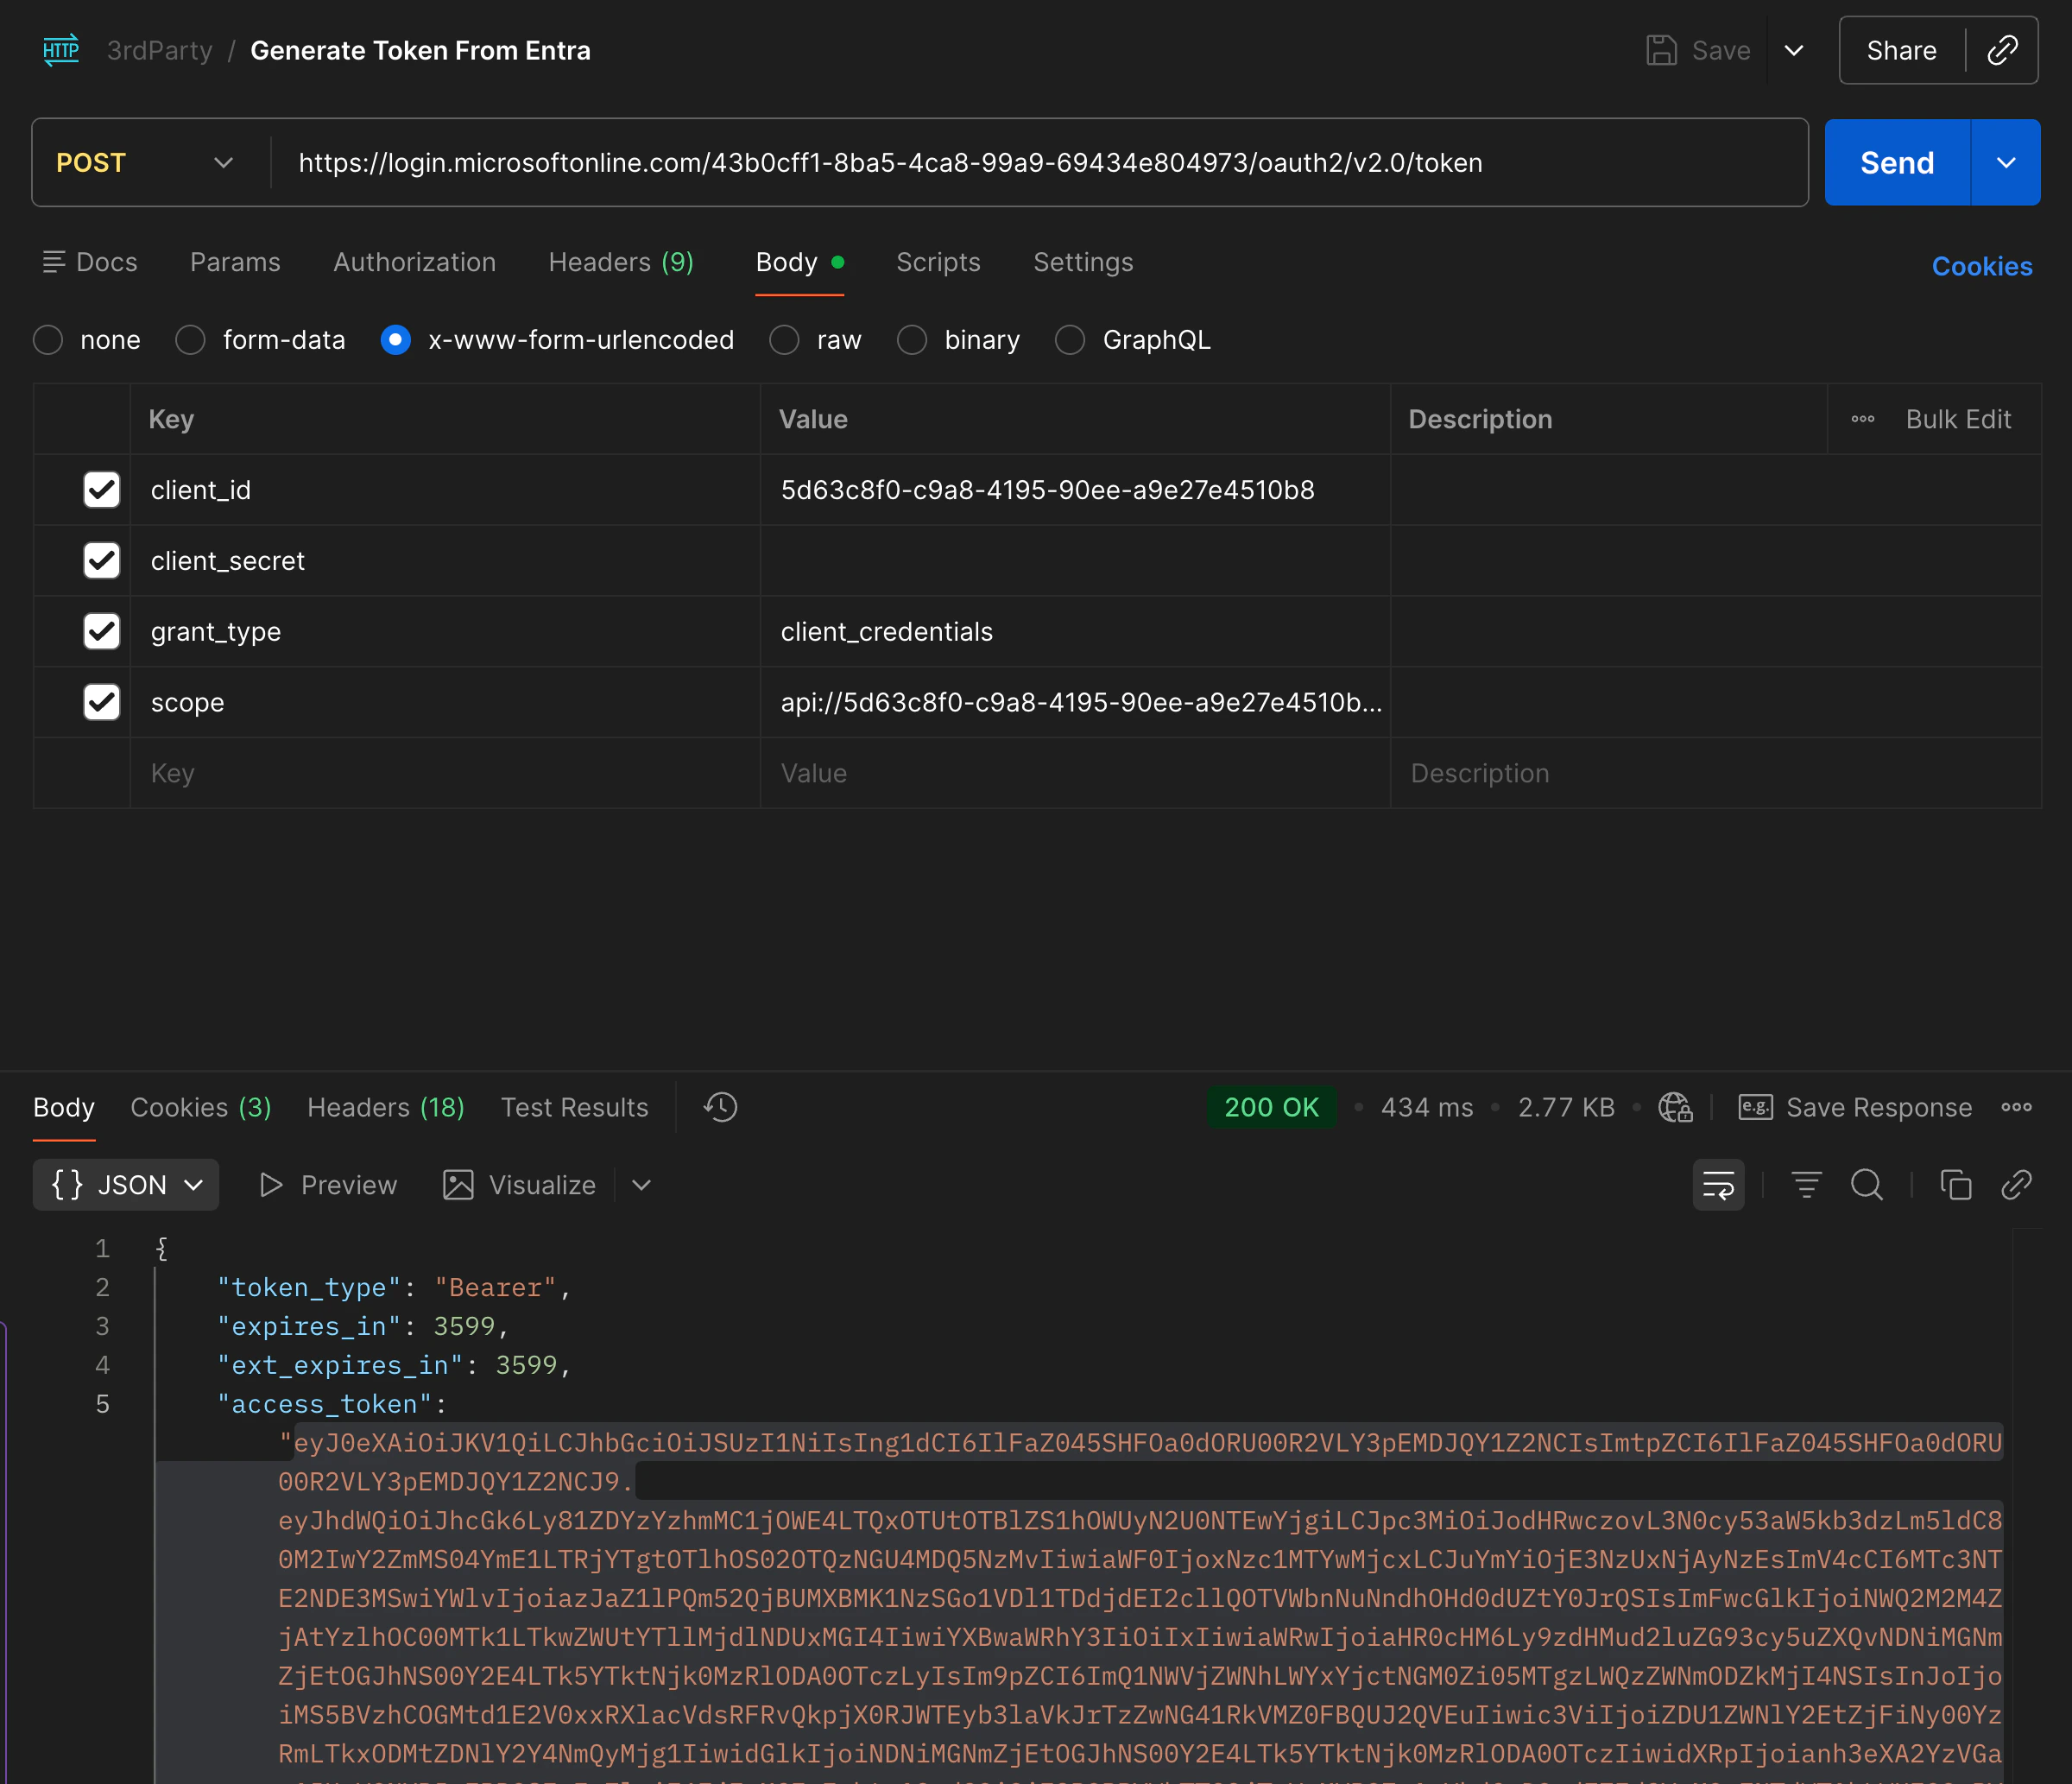
 **Request an access token**
Fill in your `tenant-id`, `client_id`, `client_secret`, and `scope` in the body fields, then send the request. Copy the `access_token` value from the response.
**Request an access token**
Fill in your `tenant-id`, `client_id`, `client_secret`, and `scope` in the body fields, then send the request. Copy the `access_token` value from the response.
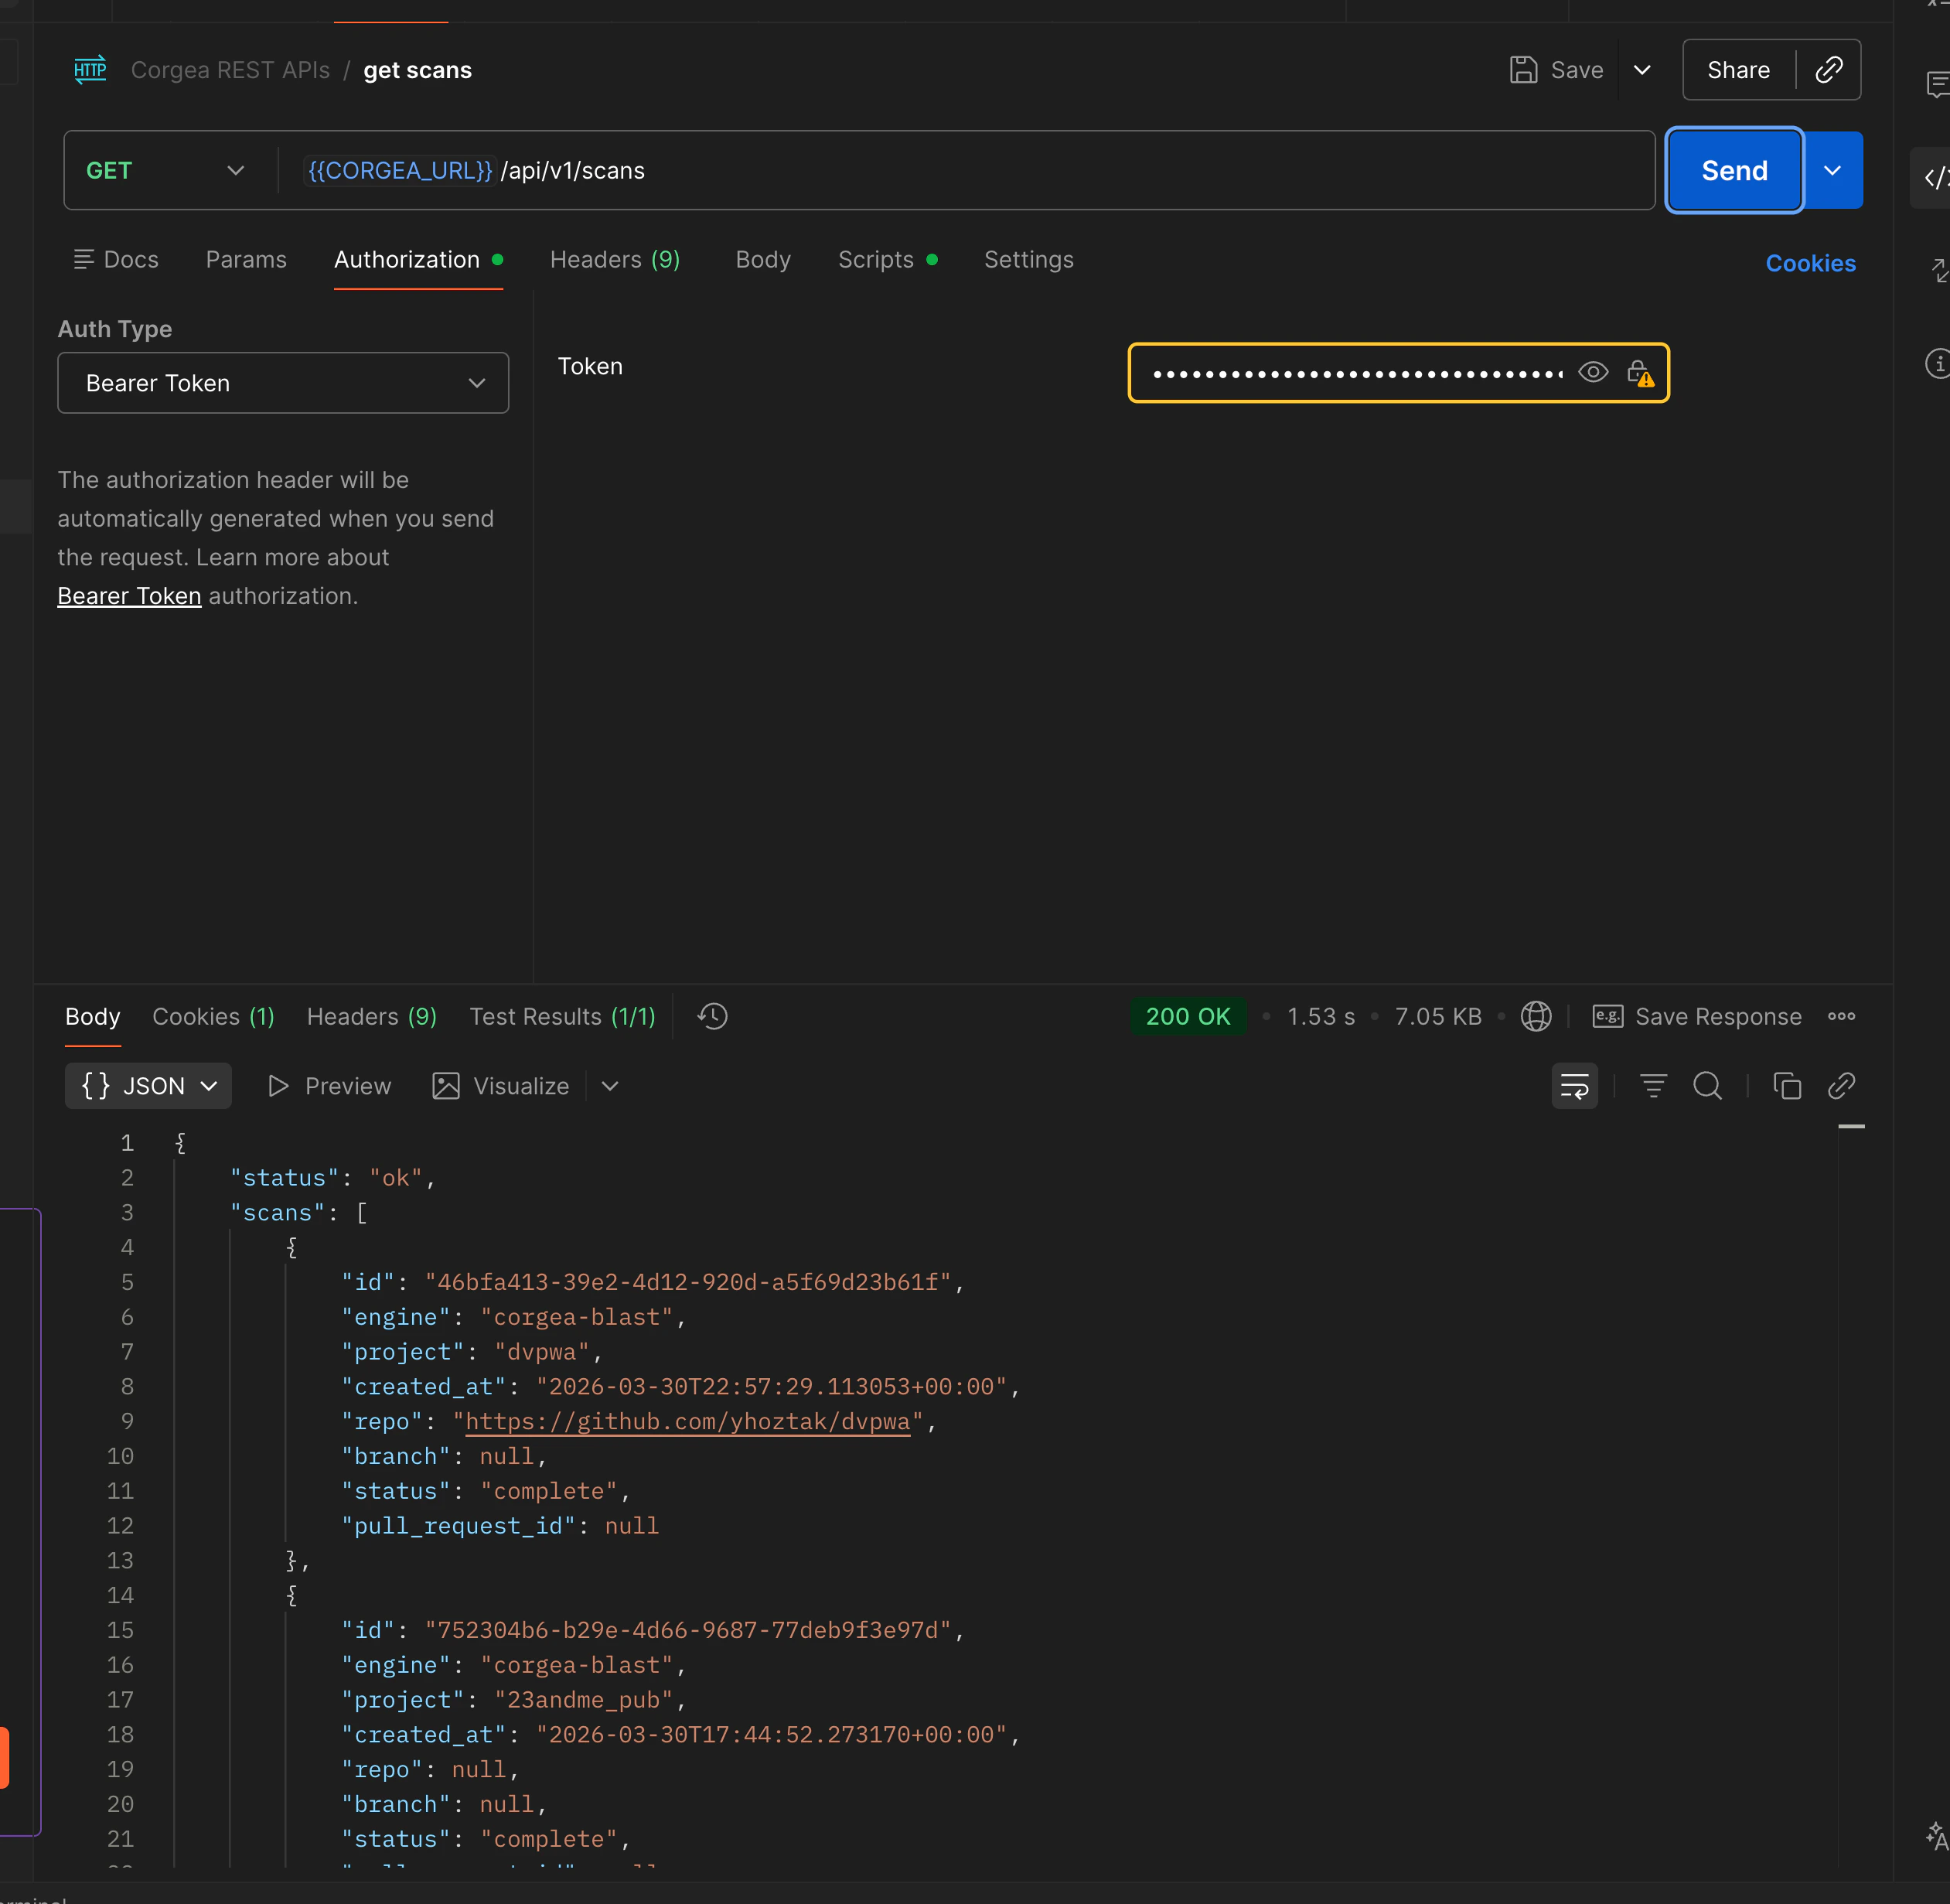
 **Call the Corgea API with the token**
Create a new request to the Corgea endpoint. Under the **Authorization** tab, set the type to **Bearer Token** and paste the `access_token`.
**Call the Corgea API with the token**
Create a new request to the Corgea endpoint. Under the **Authorization** tab, set the type to **Bearer Token** and paste the `access_token`.
 If your company restricts outbound network access, you may need to configure a proxy. In Postman, go to **Settings → Proxy** and add your corporate proxy. For curl, set the `HTTPS_PROXY` environment variable or pass `--proxy https://your-proxy:port`.
## Verifying Your Token
Use [jwt.io](https://jwt.io) to decode an access token before configuring Corgea. Paste your token in the debugger and inspect the **Decoded Payload** to confirm the `iss`, `aud`, and `appid` values.
If your company restricts outbound network access, you may need to configure a proxy. In Postman, go to **Settings → Proxy** and add your corporate proxy. For curl, set the `HTTPS_PROXY` environment variable or pass `--proxy https://your-proxy:port`.
## Verifying Your Token
Use [jwt.io](https://jwt.io) to decode an access token before configuring Corgea. Paste your token in the debugger and inspect the **Decoded Payload** to confirm the `iss`, `aud`, and `appid` values.
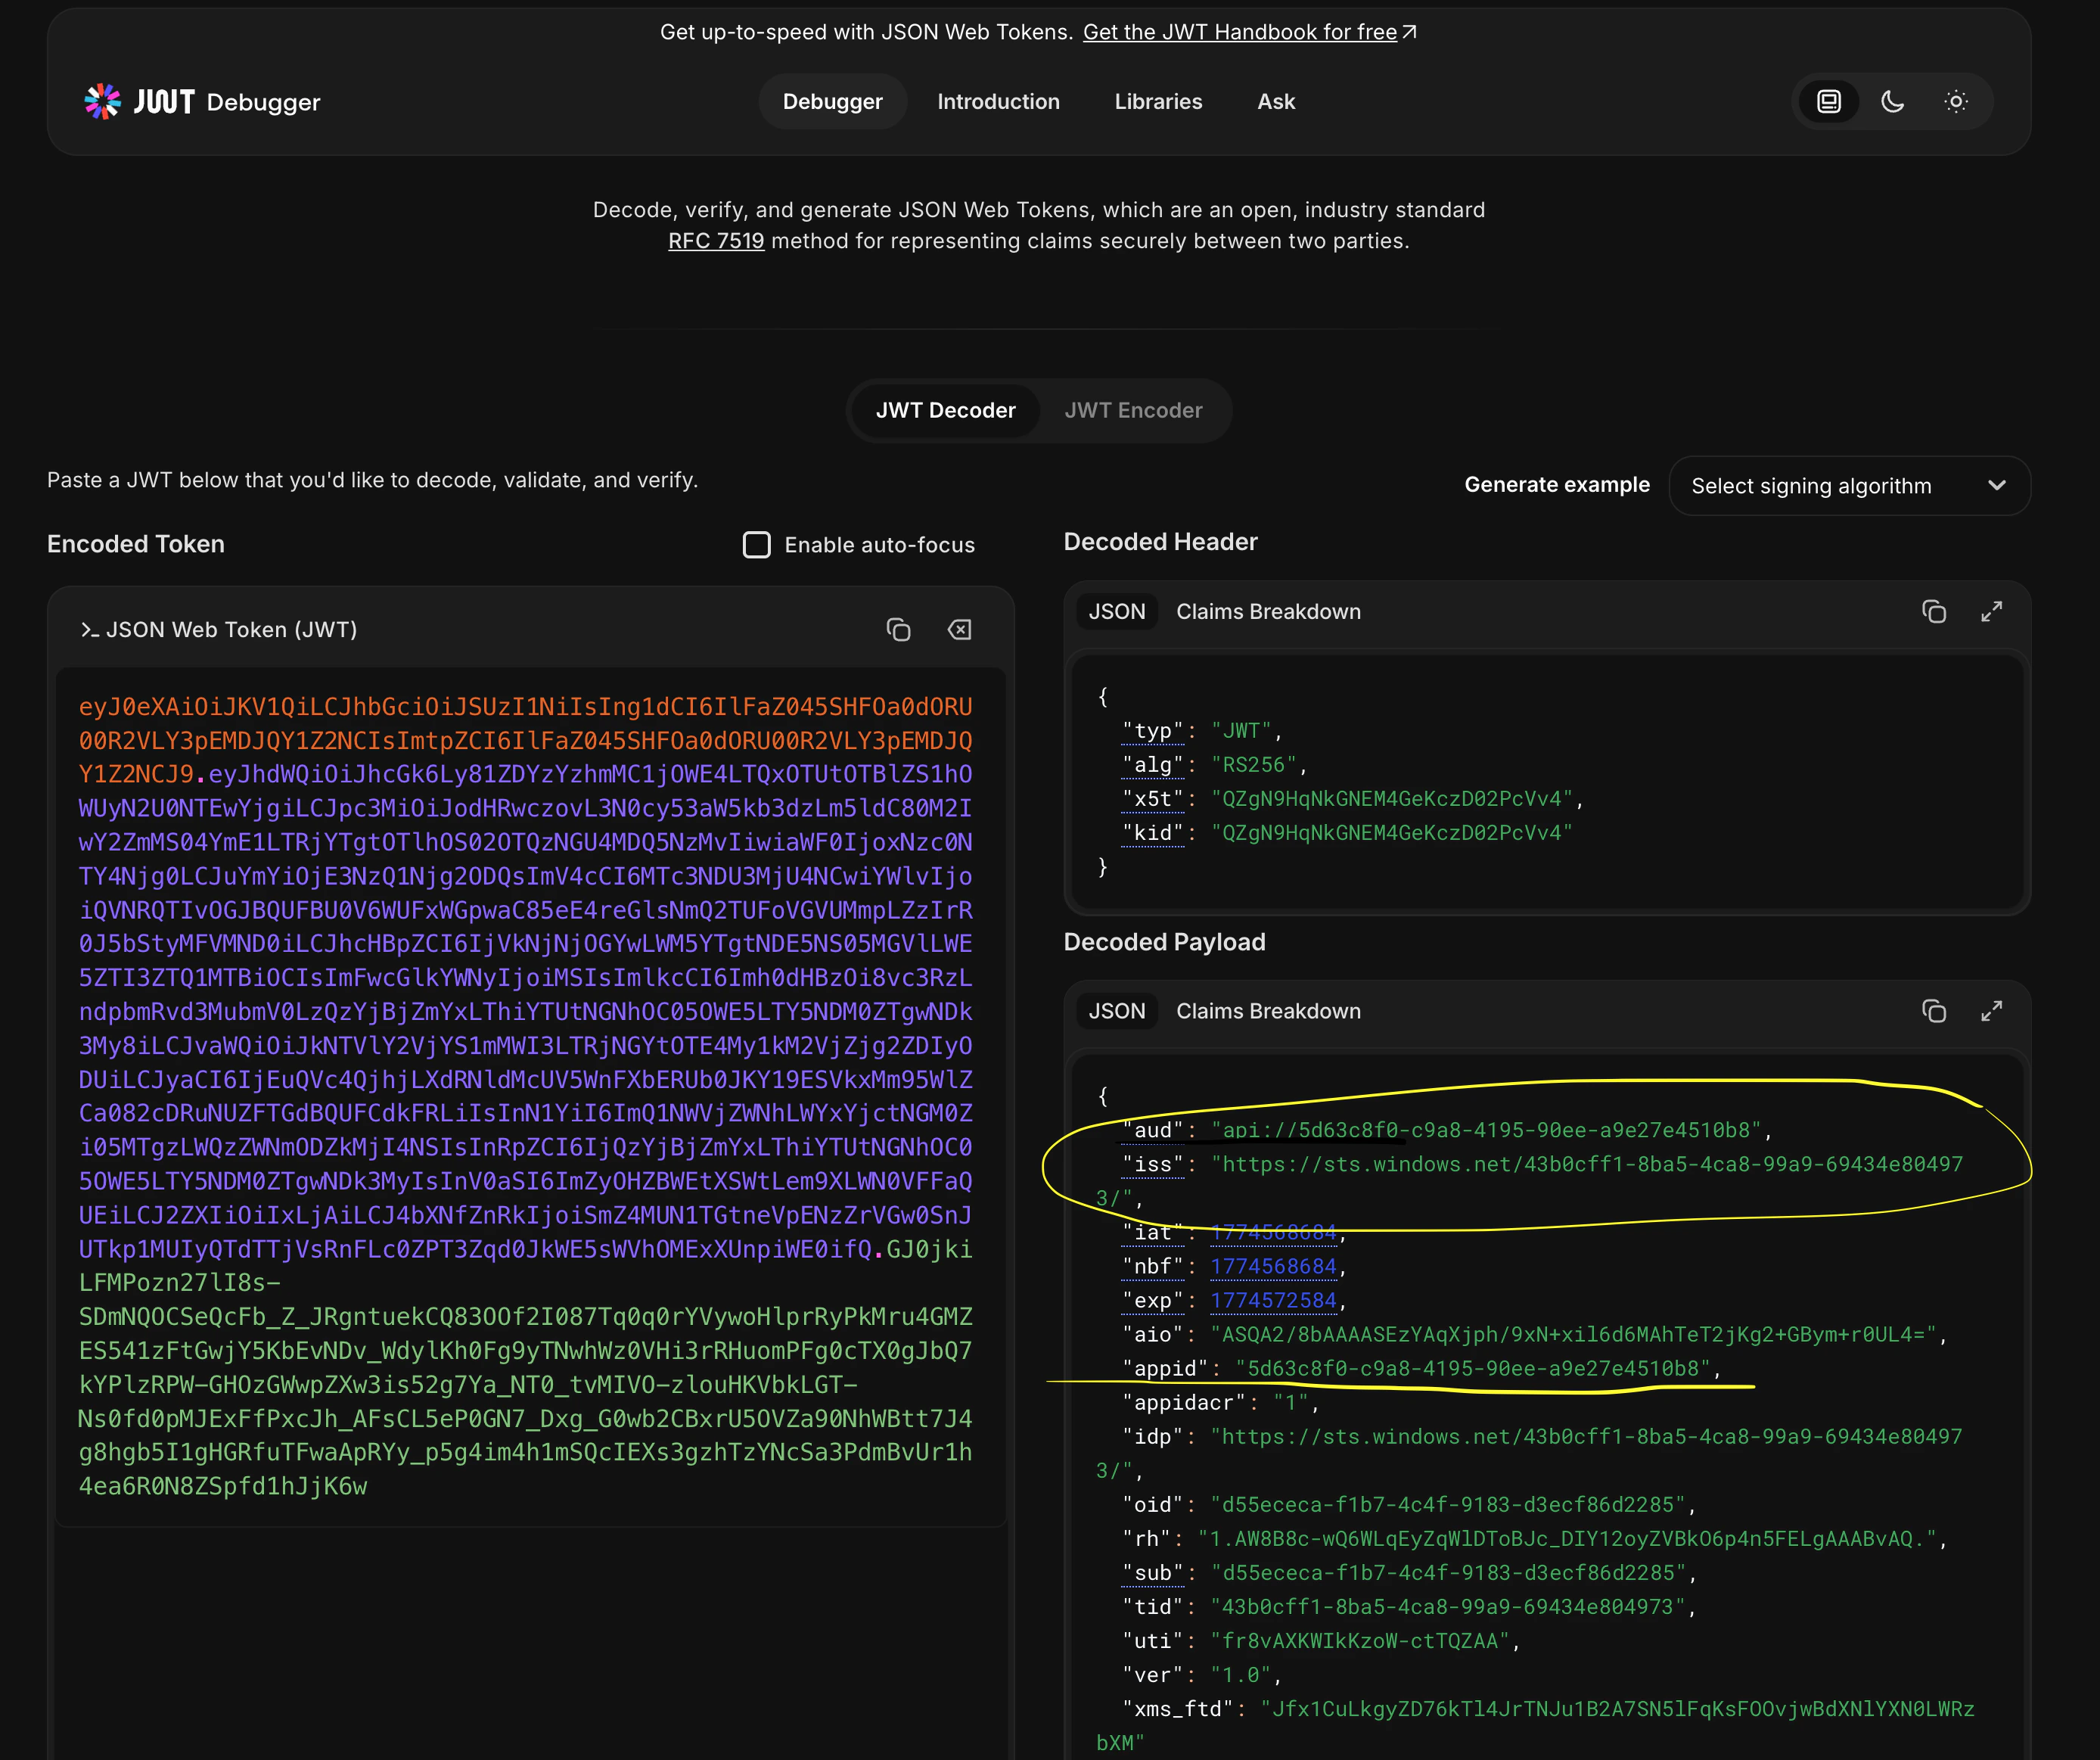 The highlighted `aud` and `iss` fields are exactly what Corgea checks when validating incoming requests.
## Troubleshooting
* **401 Unauthorized**: Decode your token at jwt.io and confirm `iss`, `aud`, and `appid` exactly match the values in your Corgea JWT Auth configuration.
* **Token rejected after rotation**: If you rotated your client secret, ensure the new secret is updated in your CI/CD environment. The Corgea configuration itself does not need to change since it validates token claims, not the secret.
* **Multiple environments**: Create a separate JWT Auth configuration in Corgea for each application or environment (e.g., staging vs. production) using distinct app registrations with different client IDs.
### Network connectivity issues
If the token request or API call fails with a connection error, use these commands to investigate whether a firewall or proxy is blocking the traffic.
```bash macOS / Linux theme={null}
# Check DNS resolution
nslookup login.microsoftonline.com
nslookup www.corgea.app
# Check TCP connectivity on port 443
nc -zv login.microsoftonline.com 443
nc -zv www.corgea.app 443
# Trace the network path
traceroute login.microsoftonline.com
# Test with verbose curl output (shows TLS handshake and redirect chain)
curl -v https://login.microsoftonline.com
# Test through a proxy if required
curl -v --proxy https://your-proxy:port https://login.microsoftonline.com
```
```powershell Windows theme={null}
# Check DNS resolution
Resolve-DnsName login.microsoftonline.com
Resolve-DnsName www.corgea.app
# Check TCP connectivity on port 443
Test-NetConnection -ComputerName login.microsoftonline.com -Port 443
Test-NetConnection -ComputerName www.corgea.app -Port 443
# Trace the network path
tracert login.microsoftonline.com
# Test with verbose curl output
curl.exe -v https://login.microsoftonline.com
# Test through a proxy if required
curl.exe -v --proxy https://your-proxy:port https://login.microsoftonline.com
```
If the TCP connection test fails or traceroute stops at an internal hop, contact your network or security team to allow outbound HTTPS (port 443) to `login.microsoftonline.com` and `www.corgea.app`.
The highlighted `aud` and `iss` fields are exactly what Corgea checks when validating incoming requests.
## Troubleshooting
* **401 Unauthorized**: Decode your token at jwt.io and confirm `iss`, `aud`, and `appid` exactly match the values in your Corgea JWT Auth configuration.
* **Token rejected after rotation**: If you rotated your client secret, ensure the new secret is updated in your CI/CD environment. The Corgea configuration itself does not need to change since it validates token claims, not the secret.
* **Multiple environments**: Create a separate JWT Auth configuration in Corgea for each application or environment (e.g., staging vs. production) using distinct app registrations with different client IDs.
### Network connectivity issues
If the token request or API call fails with a connection error, use these commands to investigate whether a firewall or proxy is blocking the traffic.
```bash macOS / Linux theme={null}
# Check DNS resolution
nslookup login.microsoftonline.com
nslookup www.corgea.app
# Check TCP connectivity on port 443
nc -zv login.microsoftonline.com 443
nc -zv www.corgea.app 443
# Trace the network path
traceroute login.microsoftonline.com
# Test with verbose curl output (shows TLS handshake and redirect chain)
curl -v https://login.microsoftonline.com
# Test through a proxy if required
curl -v --proxy https://your-proxy:port https://login.microsoftonline.com
```
```powershell Windows theme={null}
# Check DNS resolution
Resolve-DnsName login.microsoftonline.com
Resolve-DnsName www.corgea.app
# Check TCP connectivity on port 443
Test-NetConnection -ComputerName login.microsoftonline.com -Port 443
Test-NetConnection -ComputerName www.corgea.app -Port 443
# Trace the network path
tracert login.microsoftonline.com
# Test with verbose curl output
curl.exe -v https://login.microsoftonline.com
# Test through a proxy if required
curl.exe -v --proxy https://your-proxy:port https://login.microsoftonline.com
```
If the TCP connection test fails or traceroute stops at an internal hop, contact your network or security team to allow outbound HTTPS (port 443) to `login.microsoftonline.com` and `www.corgea.app`.