> ## Documentation Index
> Fetch the complete documentation index at: https://docs.corgea.app/llms.txt
> Use this file to discover all available pages before exploring further.
# JetBrains IDEs
> Bring Corgea to IntelliJ IDEA, PyCharm, WebStorm, and other JetBrains IDEs
## Introduction
Corgea is a plugin for IntelliJ-based IDEs that finds insecure code in your project and applies AI-generated fixes without leaving the editor. It works with IntelliJ IDEA, PyCharm, WebStorm, GoLand, PhpStorm, RubyMine, CLion, Rider, DataSpell, DataGrip, and Android Studio.
For any issues or support, please email [support@corgea.com](mailto:support@corgea.com).
## Features
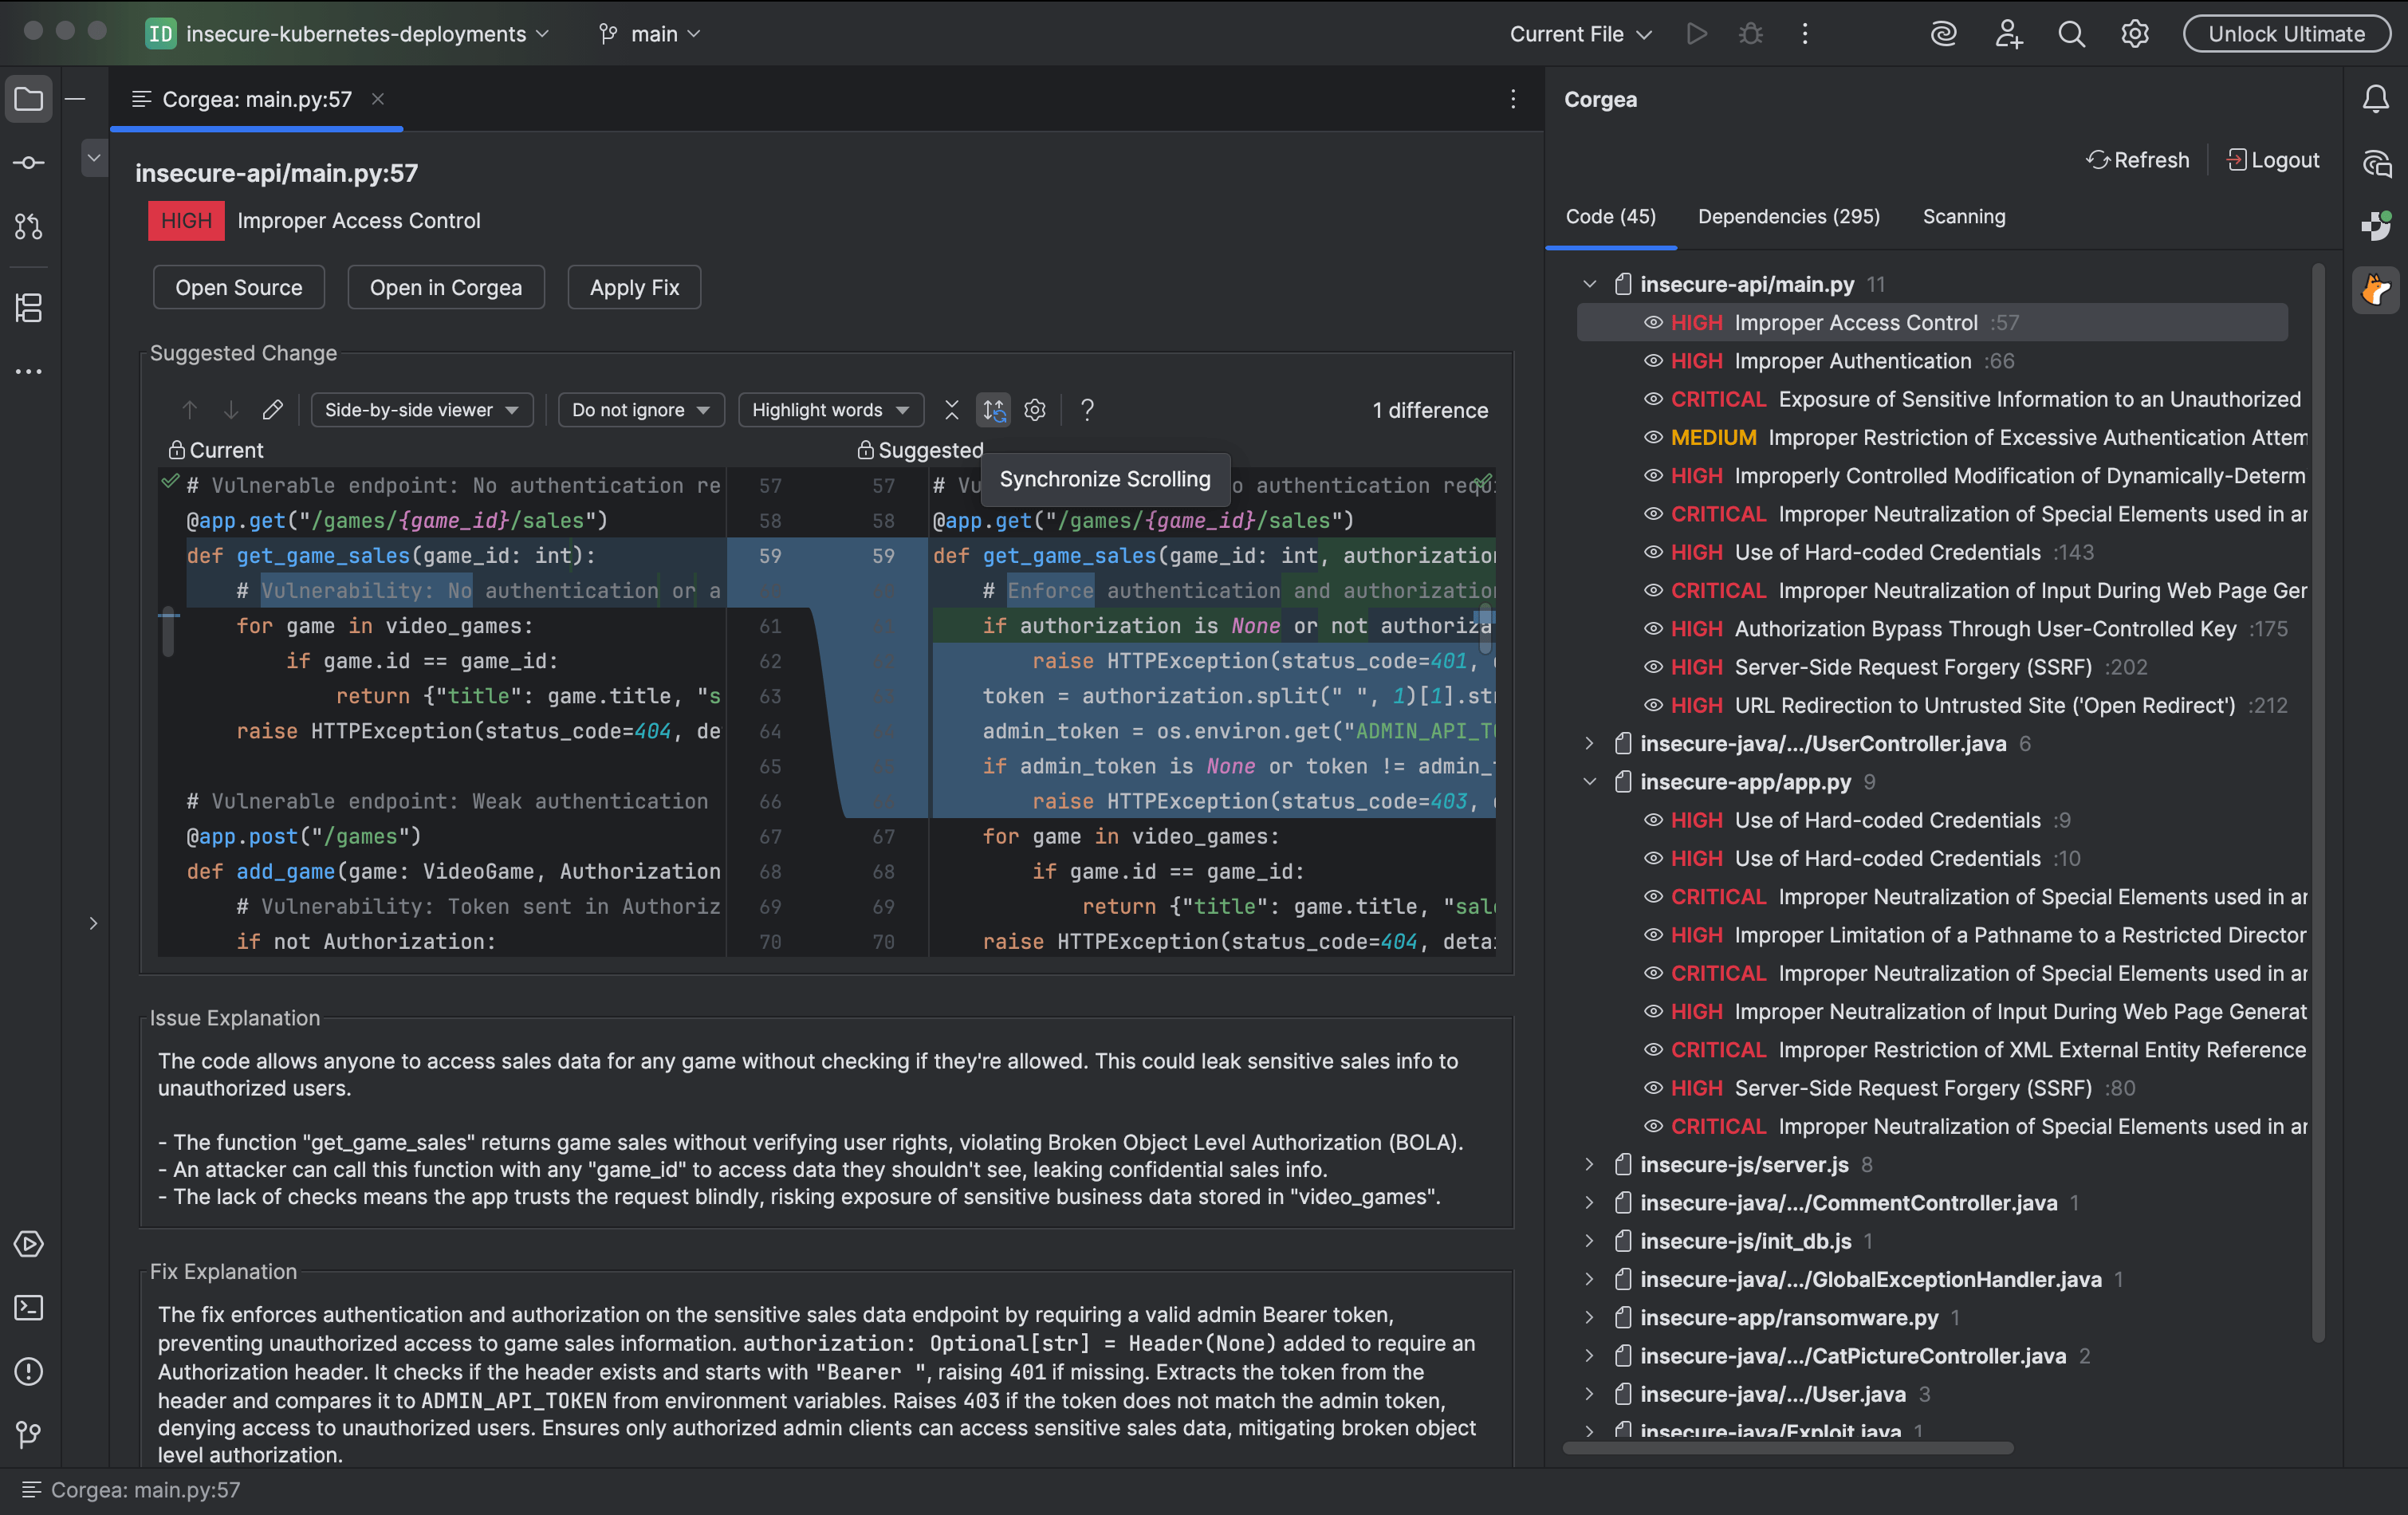 * **Security Scanning**: Scan the whole project, or only your uncommitted changes.
* **Code Vulnerabilities**: Browse findings grouped by file, with severity and line numbers.
* **Dependency Vulnerabilities**: Browse SCA findings grouped by package, with CVE identifiers and fix versions.
* **Editor Highlighting**: Vulnerable lines are underlined and marked with a gutter icon.
* **Finding Details**: Read the explanation for a finding and preview the suggested fix as a diff.
* **One-Click Fixes**: Apply an AI-generated patch from the gutter, the context menu, or `Alt+Enter`.
* **Live Scan Progress**: Watch each scan step and its CLI output while results stream into the tool window.
* **OAuth and API Key Authentication**: Sign in with either method, including on enterprise and self-hosted servers.
## Prerequisites
Before installing the Corgea plugin, ensure you have the following:
* **Corgea account**: have an active Corgea account.
* **A JetBrains IDE (2024.3 or later)**: any IntelliJ-based IDE, including Android Studio Meerkat (2024.3.1) and later.
* **Corgea CLI**: required to run scans from the IDE. Browsing findings from existing scans does not require it. See the [CLI installation guide](/cli#installation-guide).
## Installation Guide
### Step 1: Open the Plugins Settings
* **Security Scanning**: Scan the whole project, or only your uncommitted changes.
* **Code Vulnerabilities**: Browse findings grouped by file, with severity and line numbers.
* **Dependency Vulnerabilities**: Browse SCA findings grouped by package, with CVE identifiers and fix versions.
* **Editor Highlighting**: Vulnerable lines are underlined and marked with a gutter icon.
* **Finding Details**: Read the explanation for a finding and preview the suggested fix as a diff.
* **One-Click Fixes**: Apply an AI-generated patch from the gutter, the context menu, or `Alt+Enter`.
* **Live Scan Progress**: Watch each scan step and its CLI output while results stream into the tool window.
* **OAuth and API Key Authentication**: Sign in with either method, including on enterprise and self-hosted servers.
## Prerequisites
Before installing the Corgea plugin, ensure you have the following:
* **Corgea account**: have an active Corgea account.
* **A JetBrains IDE (2024.3 or later)**: any IntelliJ-based IDE, including Android Studio Meerkat (2024.3.1) and later.
* **Corgea CLI**: required to run scans from the IDE. Browsing findings from existing scans does not require it. See the [CLI installation guide](/cli#installation-guide).
## Installation Guide
### Step 1: Open the Plugins Settings
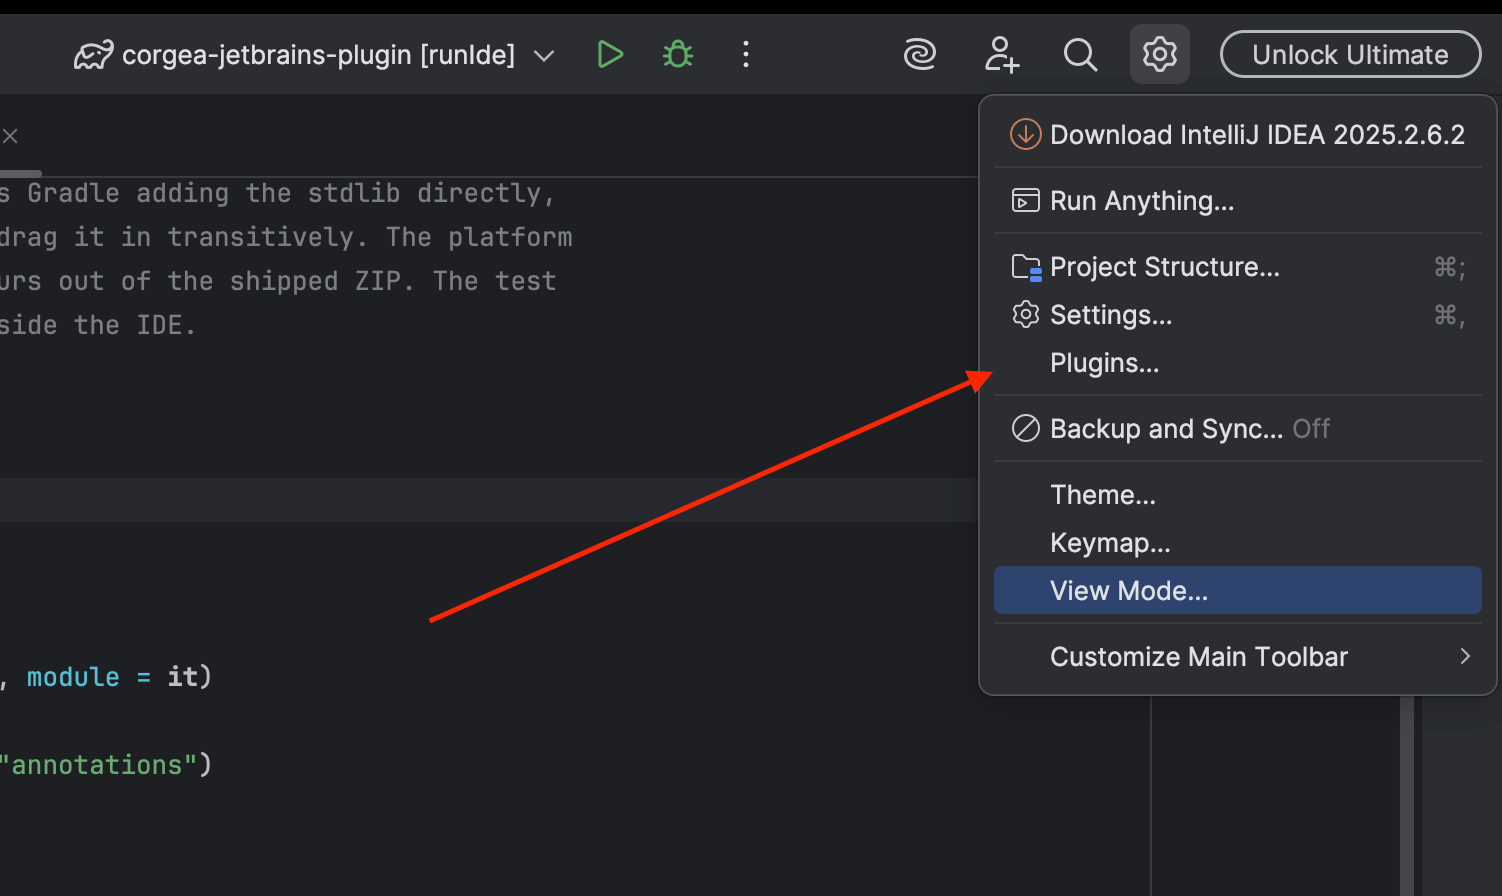 1. Open your JetBrains IDE.
2. Go to `Settings` > `Plugins`.
### Step 2: Install the Plugin
1. Open your JetBrains IDE.
2. Go to `Settings` > `Plugins`.
### Step 2: Install the Plugin
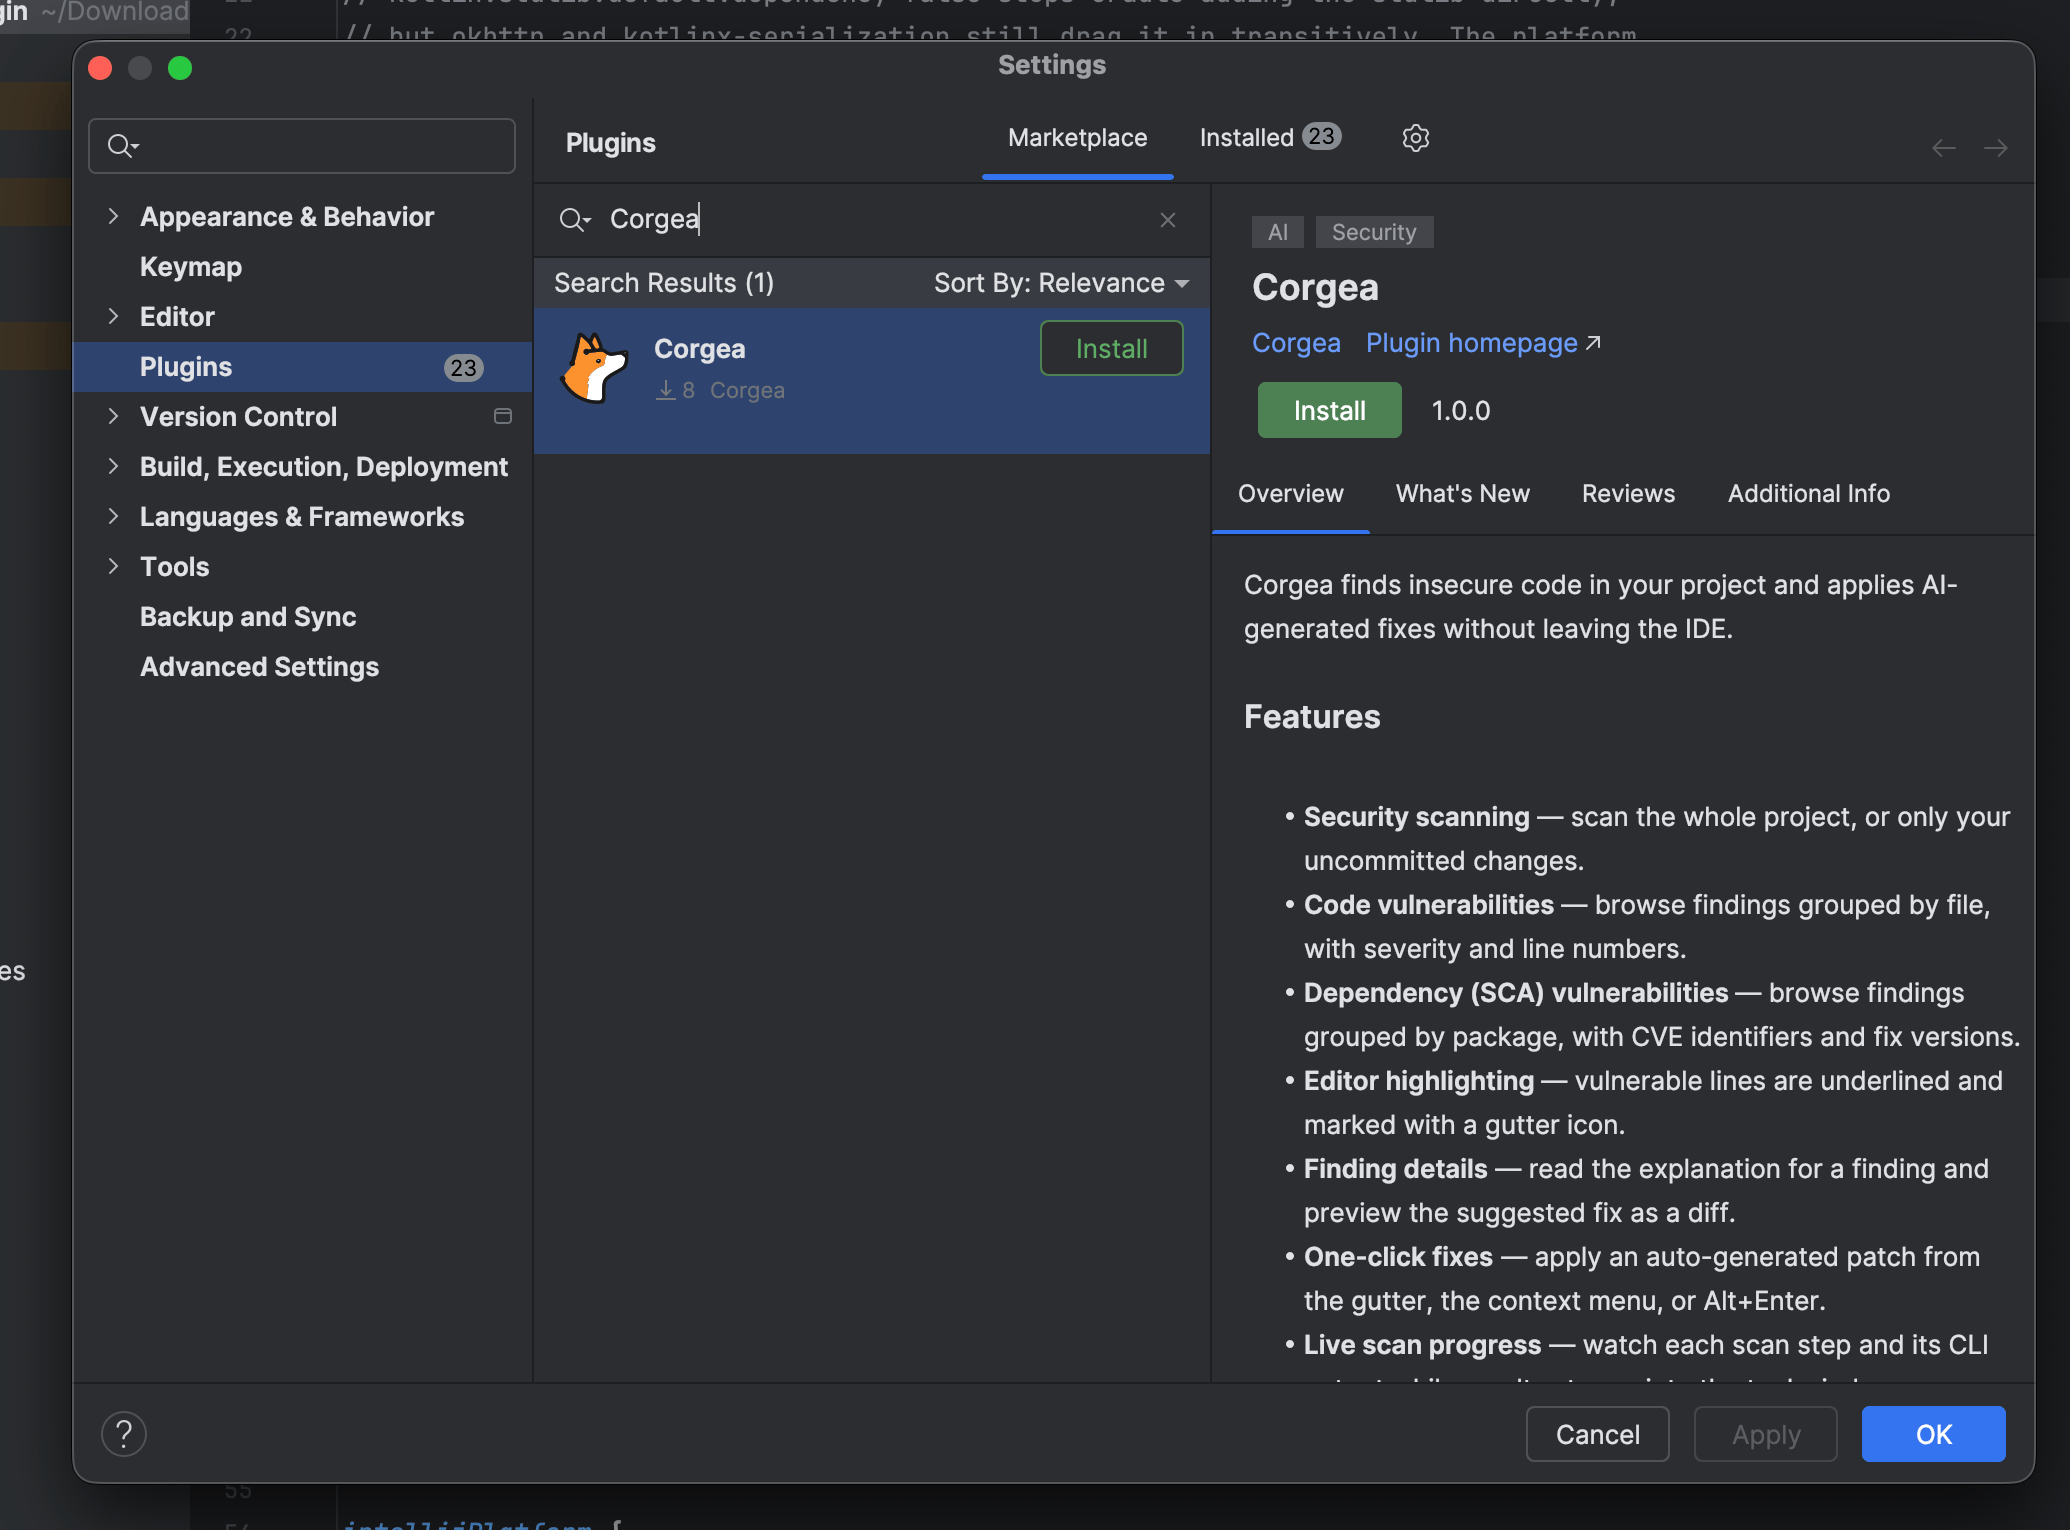 1. Select the `Marketplace` tab and search for "Corgea".
2. Click `Install`.
You can also install the plugin from its [JetBrains Marketplace page](https://plugins.jetbrains.com/plugin/33252-corgea).
### Step 3: Restart the IDE
1. Select the `Marketplace` tab and search for "Corgea".
2. Click `Install`.
You can also install the plugin from its [JetBrains Marketplace page](https://plugins.jetbrains.com/plugin/33252-corgea).
### Step 3: Restart the IDE
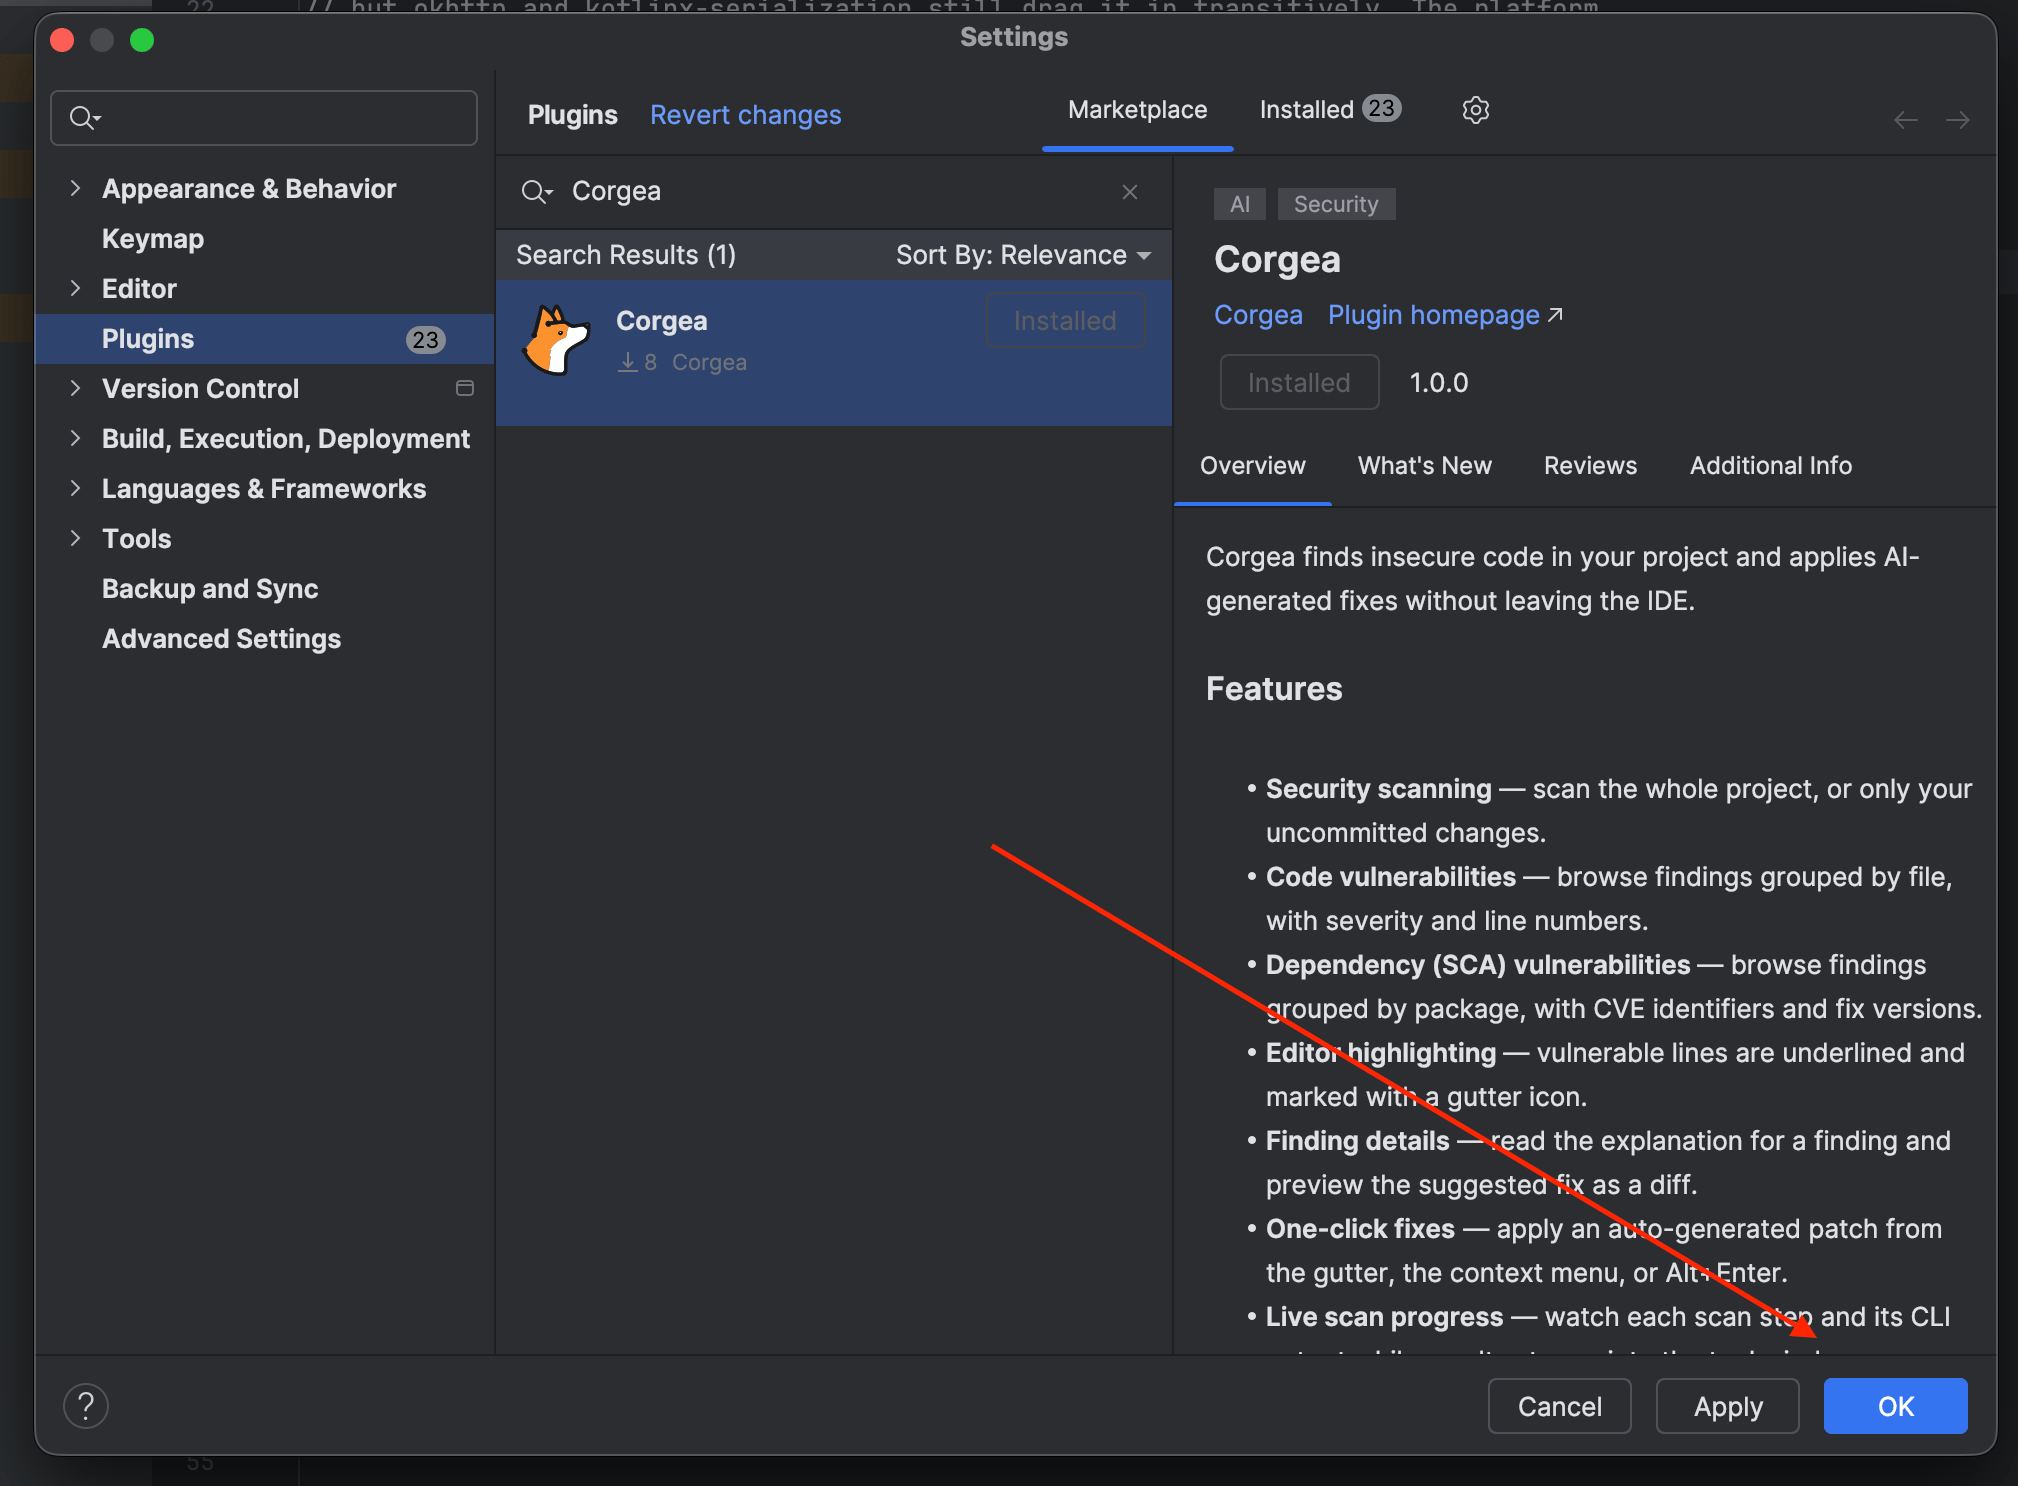 1. Click `OK` to close the settings dialog.
2. Restart the IDE when prompted so the plugin loads.
### Step 4: Login
1. Click `OK` to close the settings dialog.
2. Restart the IDE when prompted so the plugin loads.
### Step 4: Login
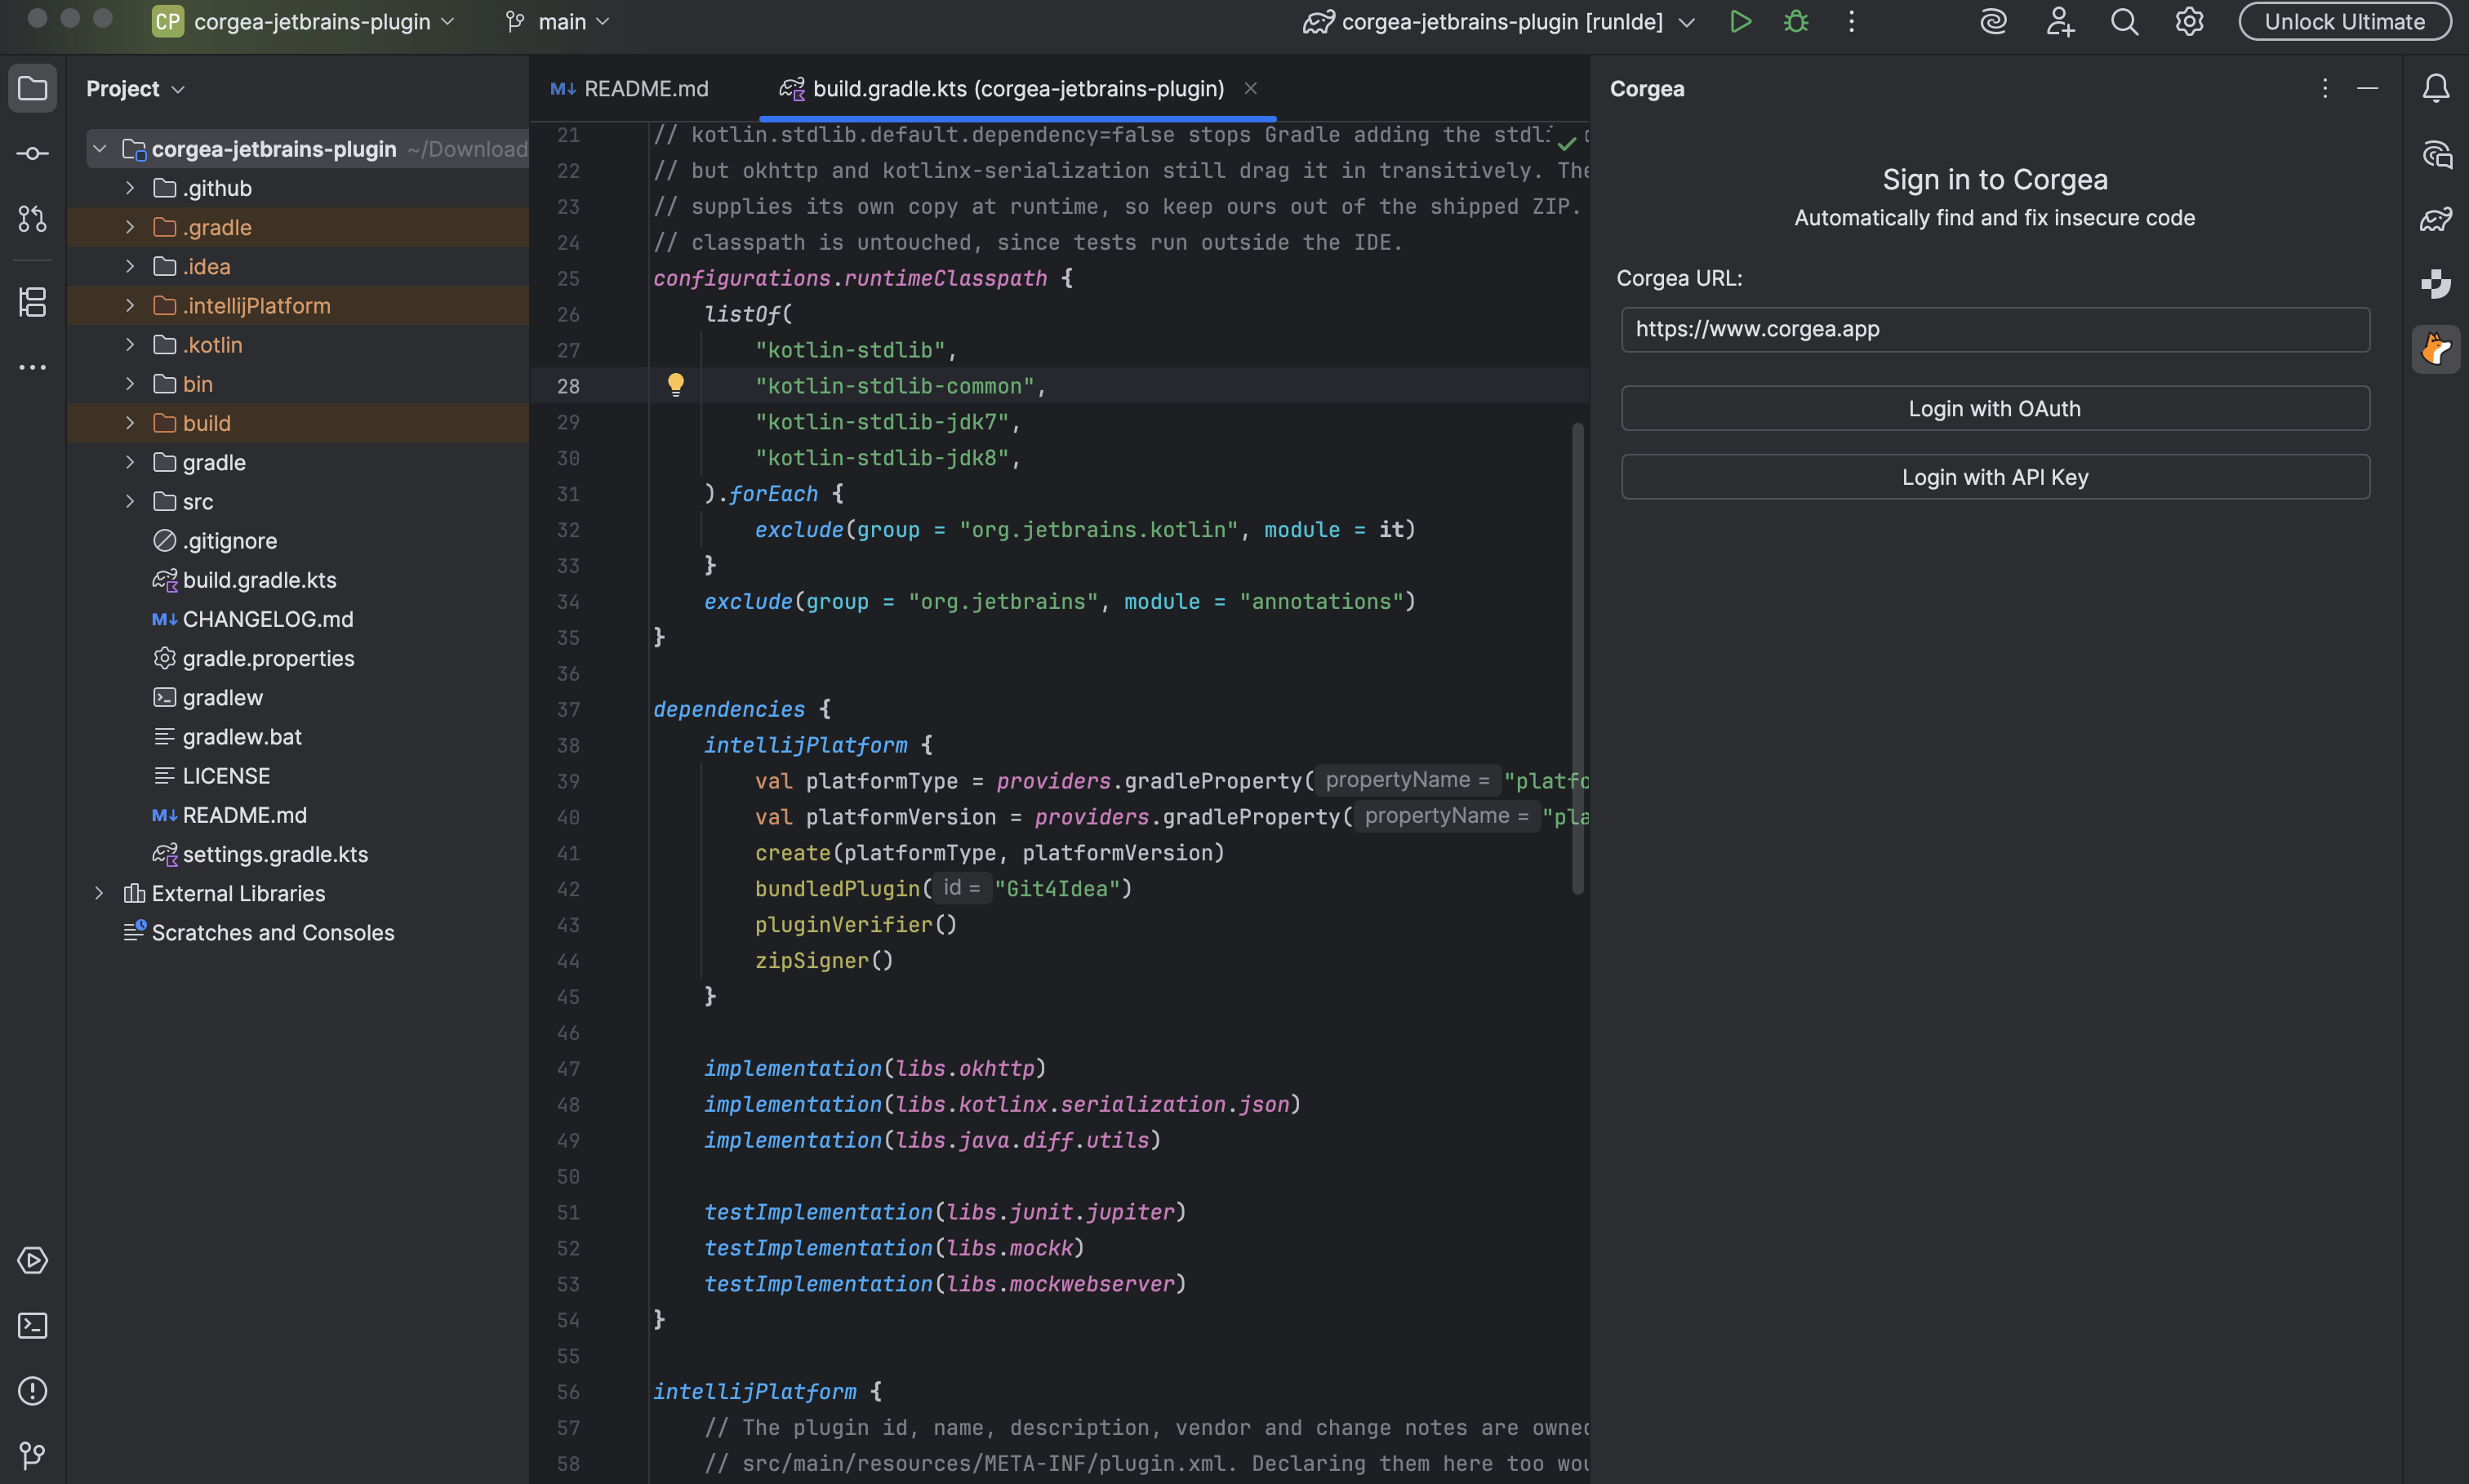 1. Open the `Corgea` tool window from the right sidebar.
2. Confirm your Corgea URL. If you are using the default URL (corgea.app), it will be prefilled. Customers on a single-tenant instance should enter their own server URL.
3. Click `Login with OAuth` and authorize the plugin in your browser. The IDE picks up the token automatically.
4. To use an API key instead, click `Login with API Key`. This key can be obtained from your Corgea dashboard under the integrations section.
Your credentials are stored in the IDE's password safe.
## Usage
### Running a Scan
1. Open the `Corgea` tool window from the right sidebar.
2. Confirm your Corgea URL. If you are using the default URL (corgea.app), it will be prefilled. Customers on a single-tenant instance should enter their own server URL.
3. Click `Login with OAuth` and authorize the plugin in your browser. The IDE picks up the token automatically.
4. To use an API key instead, click `Login with API Key`. This key can be obtained from your Corgea dashboard under the integrations section.
Your credentials are stored in the IDE's password safe.
## Usage
### Running a Scan
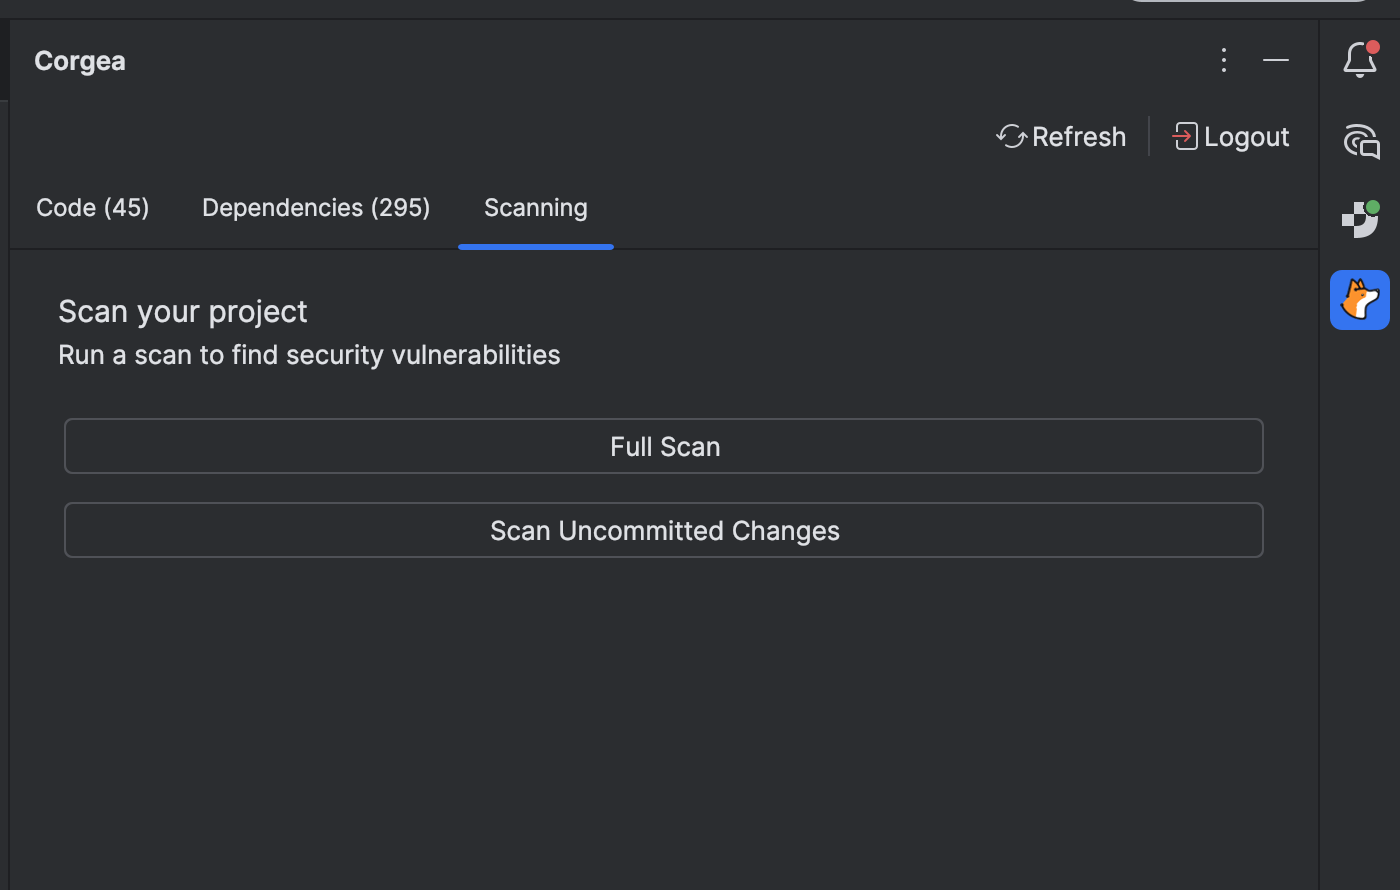 * Open the `Scanning` tab in the Corgea tool window.
* Click `Full Scan` to scan the entire project, or `Scan Uncommitted Changes` to scan only modified files.
* You can also start a scan from `Tools` > `Corgea` > `Full Scan` or `Tools` > `Corgea` > `Scan Uncommitted Changes`.
* While a scan runs, the tab shows each step as it completes along with the CLI output, and the results tabs refresh themselves as findings arrive.
### Viewing Code Vulnerabilities
* Open the `Scanning` tab in the Corgea tool window.
* Click `Full Scan` to scan the entire project, or `Scan Uncommitted Changes` to scan only modified files.
* You can also start a scan from `Tools` > `Corgea` > `Full Scan` or `Tools` > `Corgea` > `Scan Uncommitted Changes`.
* While a scan runs, the tab shows each step as it completes along with the CLI output, and the results tabs refresh themselves as findings arrive.
### Viewing Code Vulnerabilities
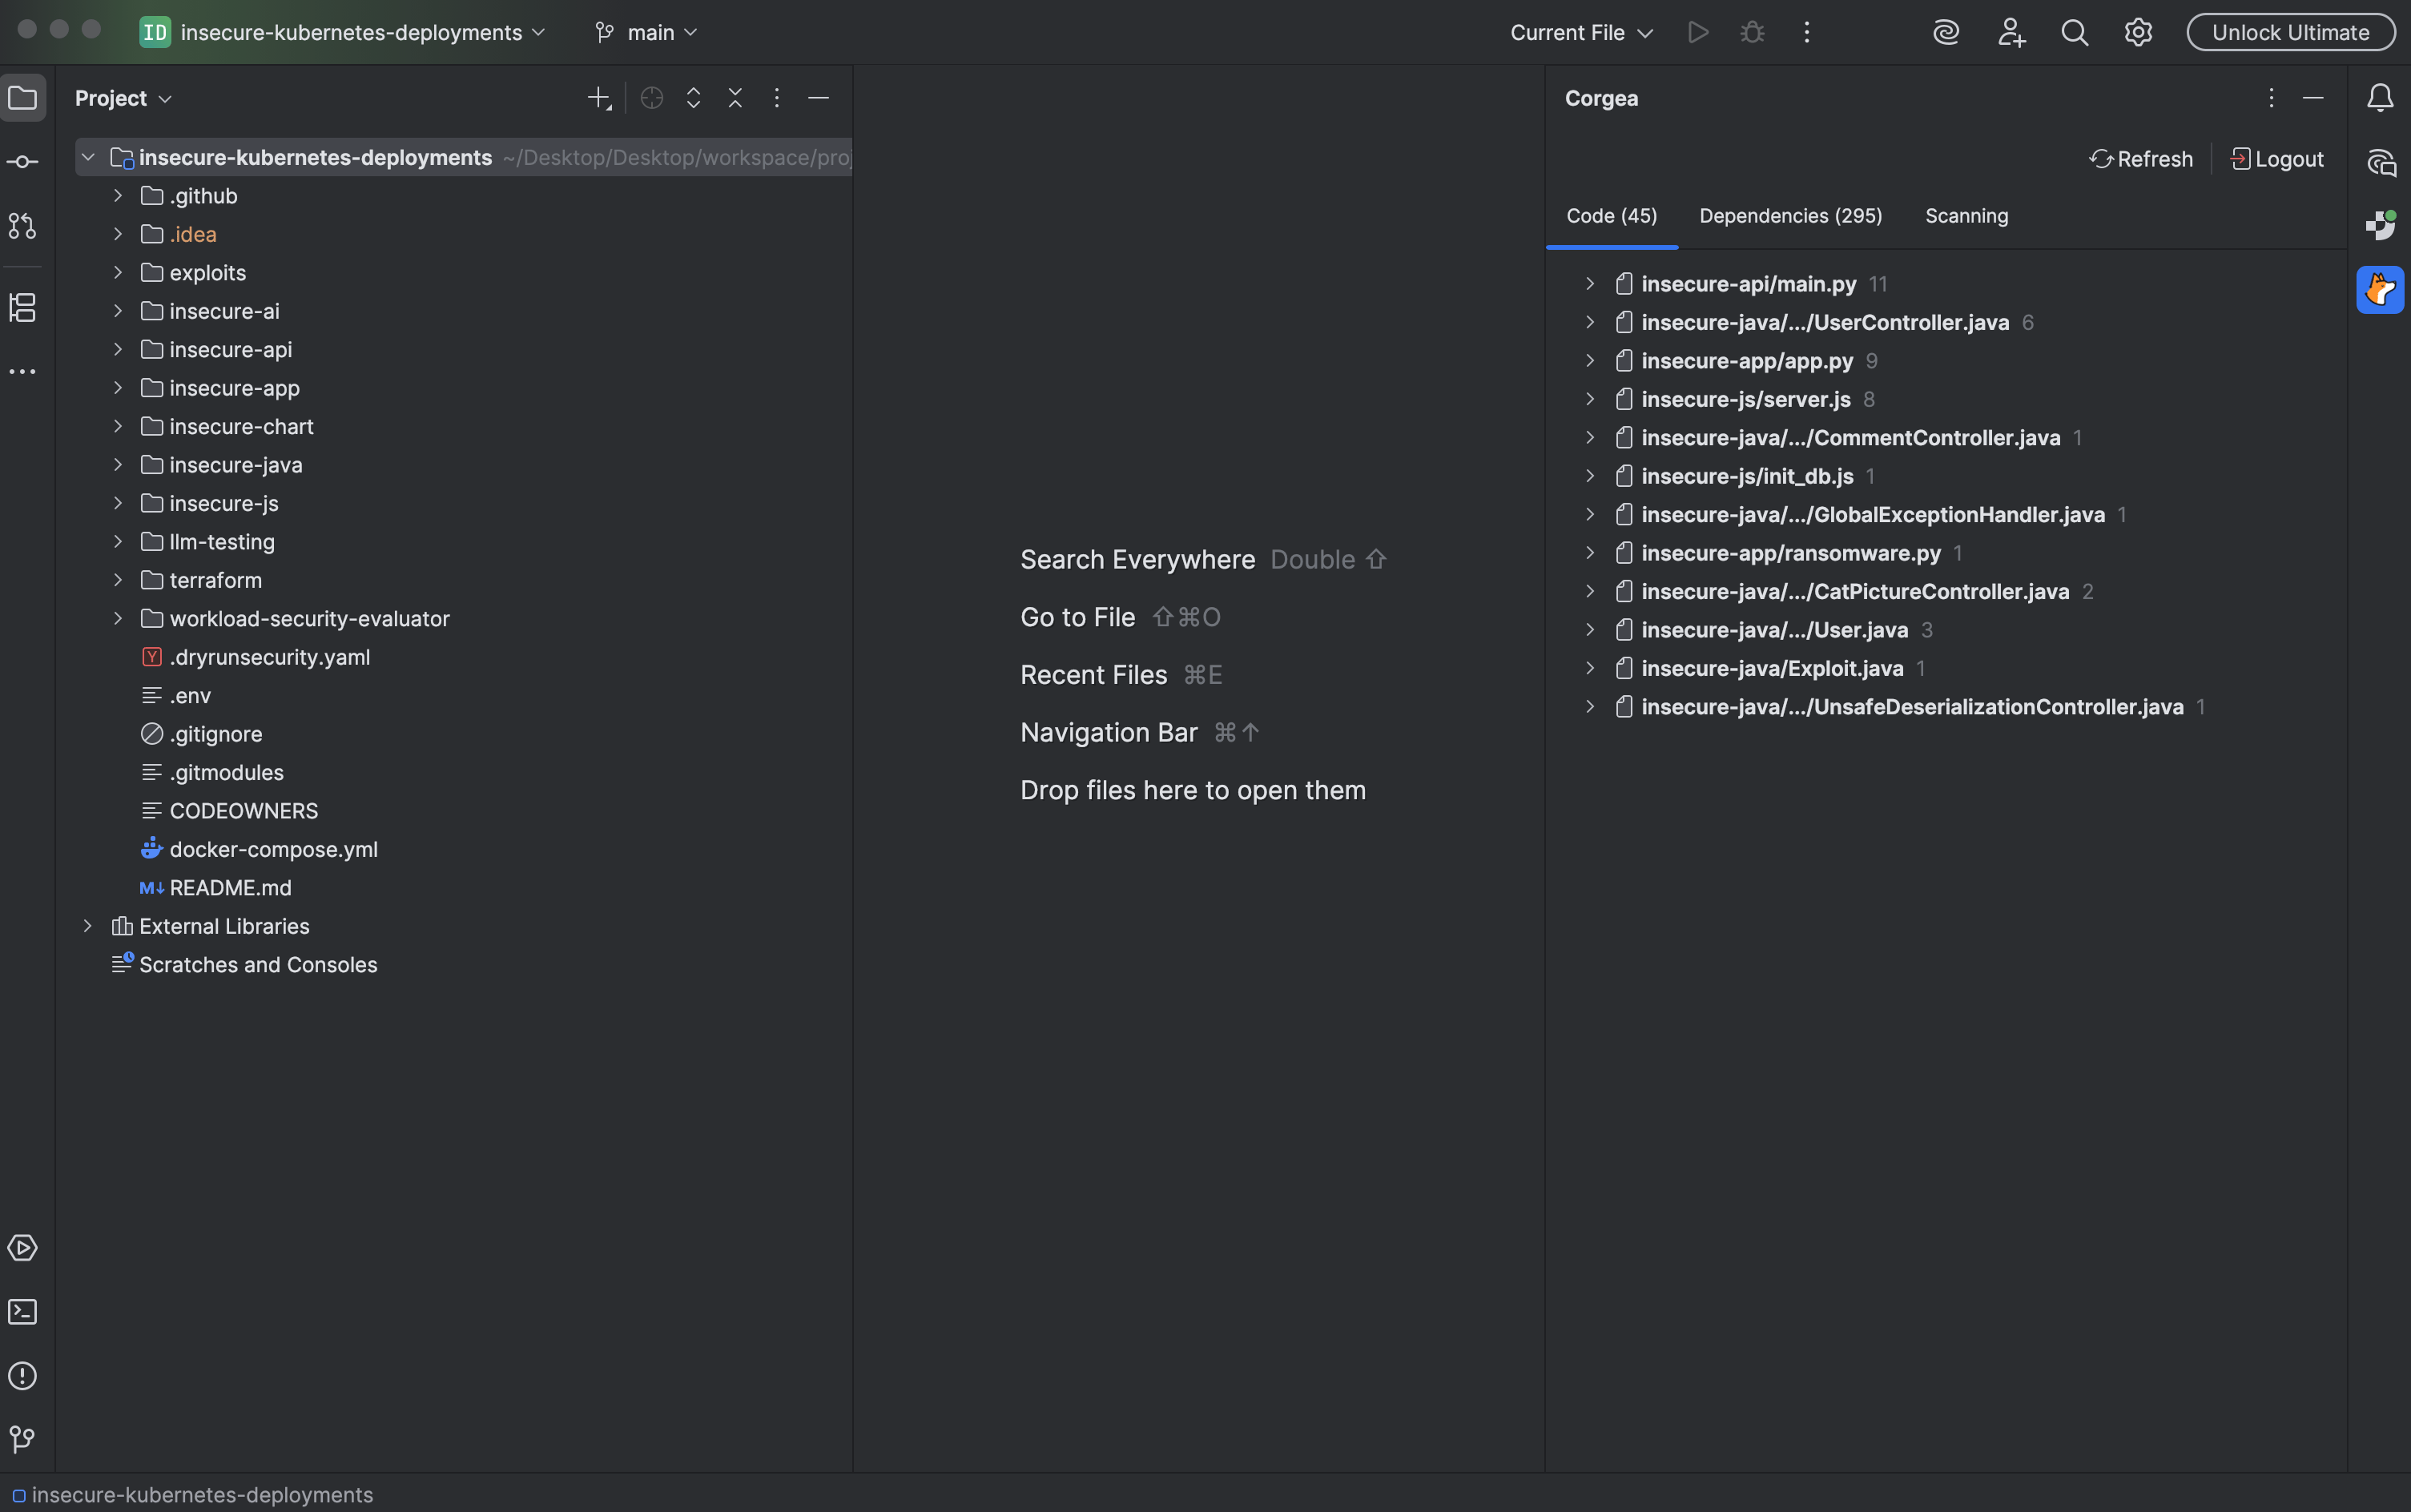 * The `Code` tab lists vulnerabilities grouped by file, with a severity label and the affected line number.
* Click a finding to jump to the affected line in the editor. Vulnerable lines are underlined and marked with a gutter icon.
### Viewing Finding Details
* Click a finding to open its details in a new editor tab. The details view shows the classification, severity, an issue explanation, and a fix explanation.
* When Corgea has generated a fix, the `Suggested Change` section shows it as a side-by-side diff so you can review it before applying anything.
* Click `Open Source` to jump to the vulnerable code, or `Open in Corgea` to view the finding in the web application.
### Applying Fixes
* To apply a fix, click the `Apply Fix` button in the details view. Corgea updates the related files automatically.
* You can also apply a fix directly from the editor: click the gutter icon on a highlighted line, press `Alt+Enter` and select `Apply Corgea fix`, or right-click and choose `Corgea` > `Apply Corgea Fix`.
* Corgea generates fixes with AI and runs quality checks before surfacing them, but you should still validate the change in your codebase.
* Save the updated files.
### Viewing Dependency Vulnerabilities
* The `Code` tab lists vulnerabilities grouped by file, with a severity label and the affected line number.
* Click a finding to jump to the affected line in the editor. Vulnerable lines are underlined and marked with a gutter icon.
### Viewing Finding Details
* Click a finding to open its details in a new editor tab. The details view shows the classification, severity, an issue explanation, and a fix explanation.
* When Corgea has generated a fix, the `Suggested Change` section shows it as a side-by-side diff so you can review it before applying anything.
* Click `Open Source` to jump to the vulnerable code, or `Open in Corgea` to view the finding in the web application.
### Applying Fixes
* To apply a fix, click the `Apply Fix` button in the details view. Corgea updates the related files automatically.
* You can also apply a fix directly from the editor: click the gutter icon on a highlighted line, press `Alt+Enter` and select `Apply Corgea fix`, or right-click and choose `Corgea` > `Apply Corgea Fix`.
* Corgea generates fixes with AI and runs quality checks before surfacing them, but you should still validate the change in your codebase.
* Save the updated files.
### Viewing Dependency Vulnerabilities
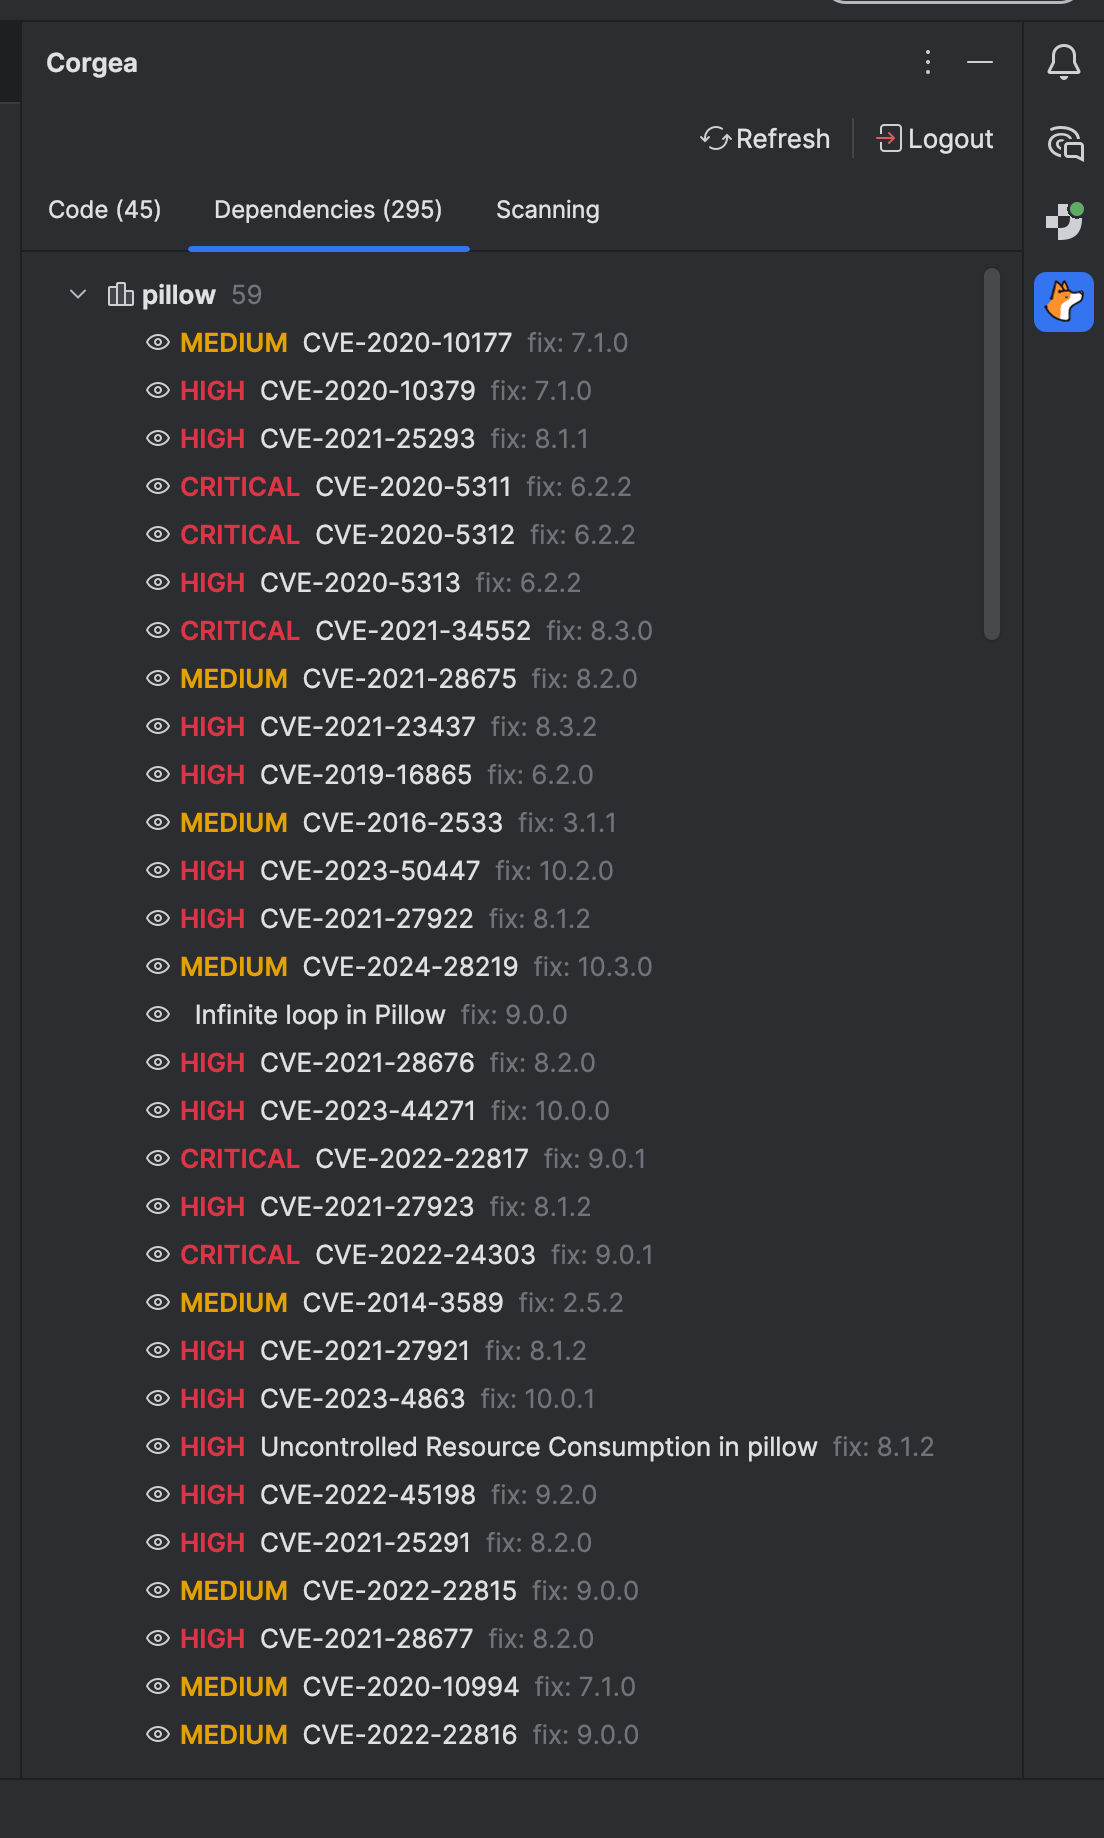 * The `Dependencies` tab lists SCA findings grouped by package, with the severity, CVE identifier, and the version that resolves the vulnerability.
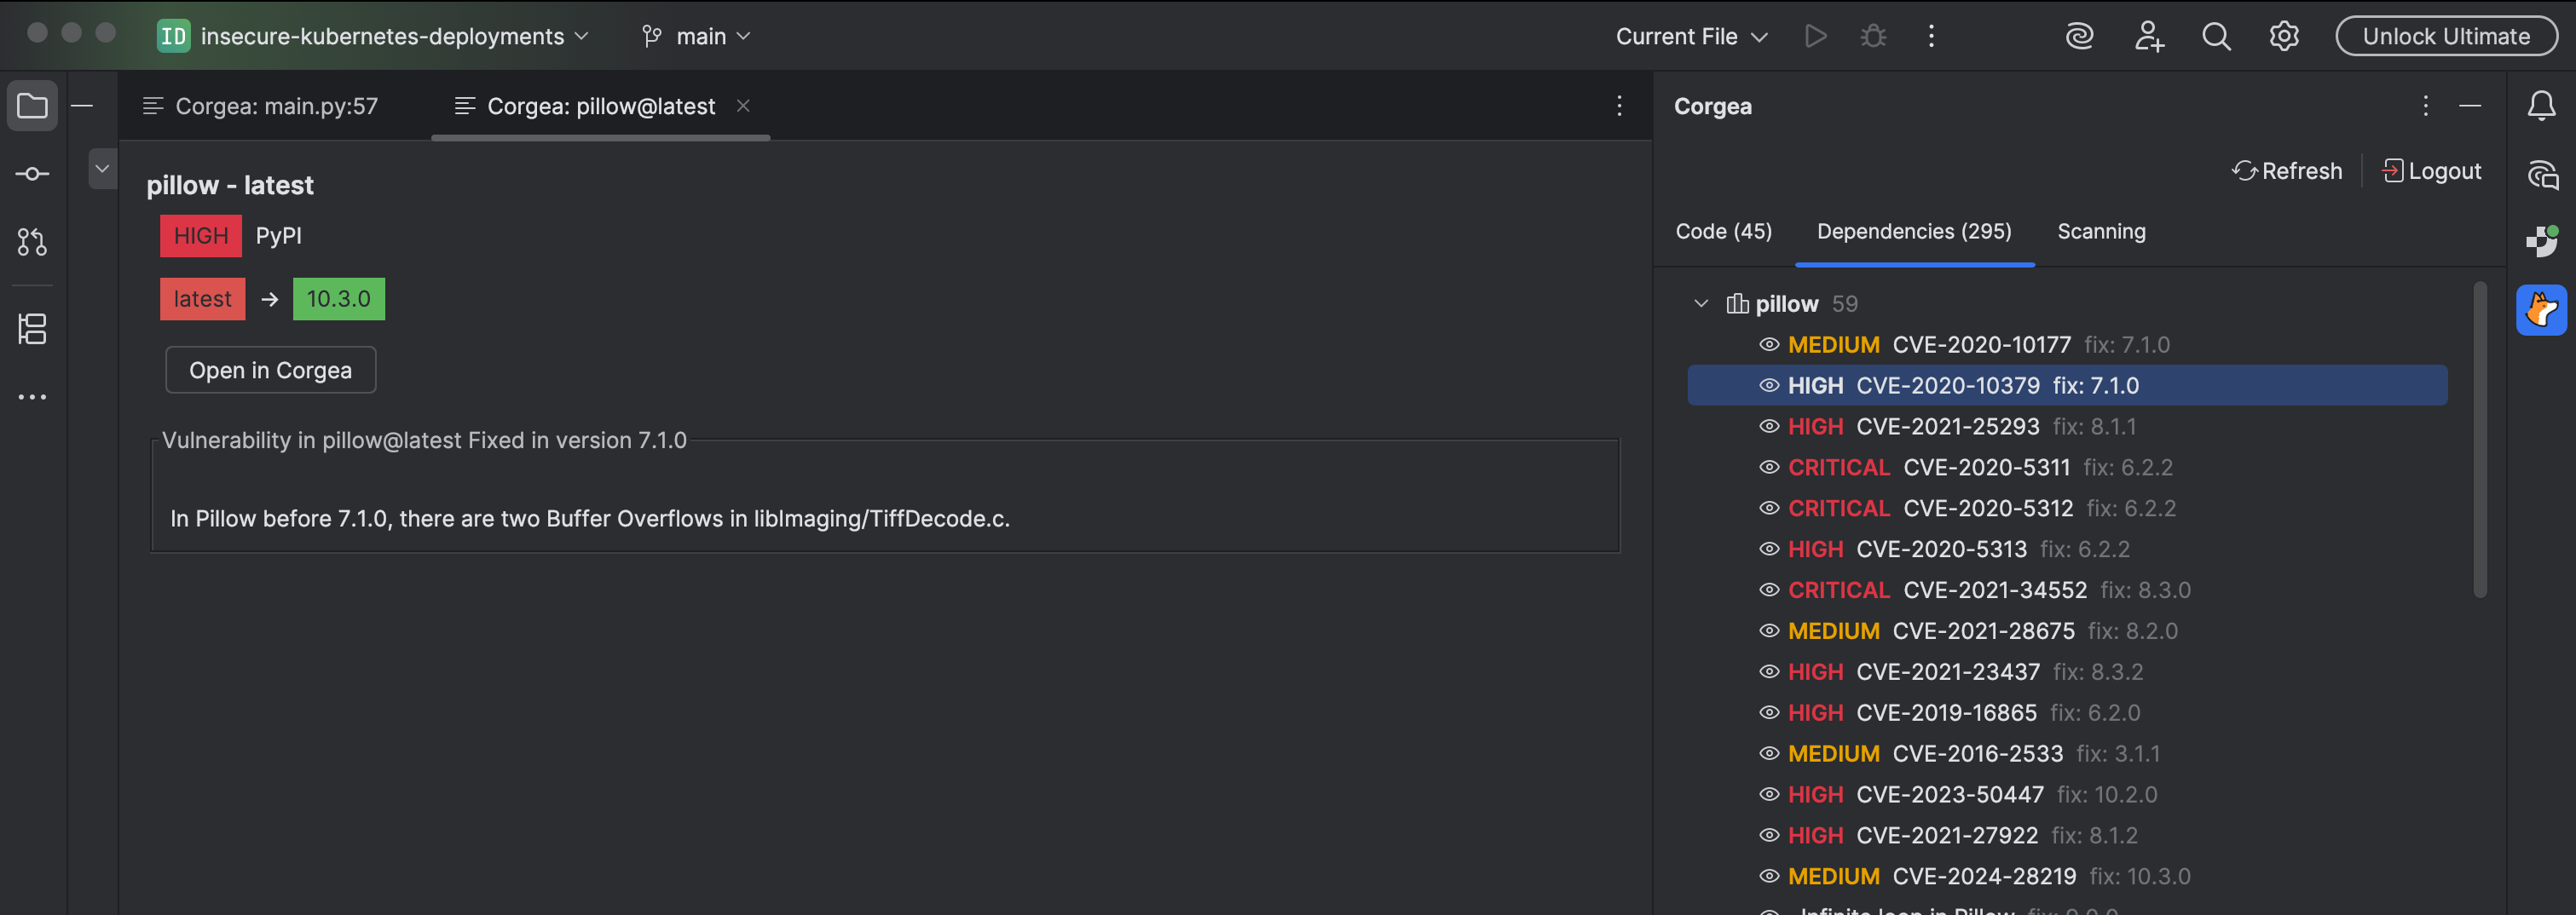 * Click a finding to open its details, showing the package registry, the current and fixed versions, and a description of the vulnerability.
* Click `Open in Corgea` to view the finding in the web application.
### Logging Out
* To log out or sign in as another user, click `Logout` in the Corgea tool window.
## Release Notes
Full release notes are found on the plugin's [JetBrains Marketplace page](https://plugins.jetbrains.com/plugin/33252-corgea/versions).
* Click a finding to open its details, showing the package registry, the current and fixed versions, and a description of the vulnerability.
* Click `Open in Corgea` to view the finding in the web application.
### Logging Out
* To log out or sign in as another user, click `Logout` in the Corgea tool window.
## Release Notes
Full release notes are found on the plugin's [JetBrains Marketplace page](https://plugins.jetbrains.com/plugin/33252-corgea/versions).