> ## Documentation Index
> Fetch the complete documentation index at: https://docs.corgea.app/llms.txt
> Use this file to discover all available pages before exploring further.
# Issue Assignment & Status Management
> Assign and track security issues across your team
This feature allows users to assign issues to specific team members and track the status of each issue throughout its lifecycle. It also introduces a new user inbox where users can view and manage their assigned issues.
## Who it's For
This feature is designed for development teams, project managers, and anyone involved in the software development process who needs to collaborate on identifying, prioritizing, and resolving issues.
## Key Features and Benefits
* Assign issues to specific team members for accountability and efficient task management
* Track the status of issues, such as "not fixed," "fixed," "false positive," "accepted risk," and more
* User inbox provides a centralized location for users to view and manage their assigned issues
* Filter and sort issues in the user inbox based on SLA status (due, overdue, escalated) for better prioritization
* Streamlined communication through email notifications when issues are assigned or updated
## How to Access
This feature is integrated into the main application interface. Users can access the issue assignment and status tracking functionality from the issue details page and the user inbox.
## Setup Instructions
No specific setup is required for this feature. It is enabled by default for all users with the appropriate permissions.
## Usage Guide
### Assigning Issues
Go to the issue details page
Locate the "Assignment & Status" section
Select the desired assignee from the dropdown menu
The assignee will receive an email notification with the issue details
### Updating Issue Status
On the issue details page, locate the "Actions" section
Select the appropriate status for the issue (e.g., "fixed," "false positive," "accepted risk")
Optionally, provide a comment explaining the status update
Click "Update Status" to save the changes
### Managing Accepted Risk Issues
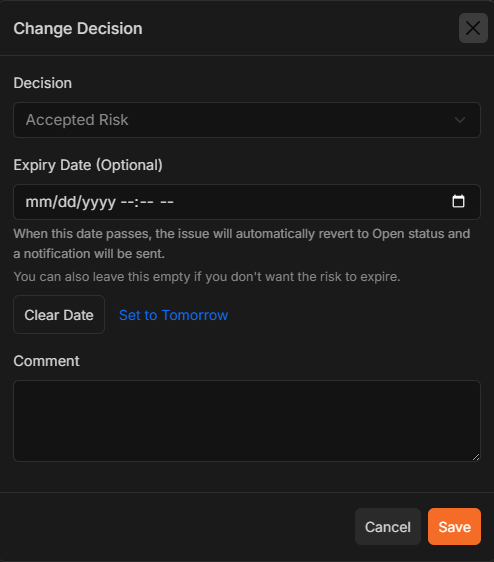
When marking an issue as "Accepted Risk," you can optionally set an expiry date. When this date passes, the issue automatically reverts to Open status and a notification is sent.
Select "Accepted Risk" from the status dropdown
Click the expiry date field to select when this risk status should expire, or leave it empty if you don't want it to expire
Click "Update Status" to apply the changes
 ### Using the User Inbox
Navigate to the user inbox from the main navigation menu
Review the list of issues assigned to you
Filter issues by SLA status using the dropdown menu (due, overdue, escalated)
Click on an issue to view its details and take further action
## Examples
Here are some common scenarios for using issue assignment and tracking:
### Assigning a Critical Issue
A developer discovers a critical security vulnerability in the codebase. They create an issue and assign it to the lead security engineer for immediate attention.
### Marking an Issue as False Positive
After investigating a reported issue, a team member determines that it is a false positive. They update the issue status to "false positive" and provide an explanation in the comment section.
### Prioritizing Overdue Issues
A project manager filters the user inbox to view only overdue issues. They prioritize these issues based on severity and assign them to available team members for resolution.
## Best Practices
* Regularly review and update issue statuses to ensure accurate tracking
* Encourage team members to provide clear and concise comments when updating issue statuses
* Leverage the user inbox filters to prioritize and focus on critical or overdue issues
* Foster a culture of accountability by consistently assigning issues to responsible team members
## Troubleshooting
* If you encounter issues with assigning or updating issues, ensure that you have the necessary permissions
* If email notifications are not being received, check your spam or junk folder, and verify your email settings
* If you experience any other issues, consult the support documentation or contact the support team for assistance
### Using the User Inbox
Navigate to the user inbox from the main navigation menu
Review the list of issues assigned to you
Filter issues by SLA status using the dropdown menu (due, overdue, escalated)
Click on an issue to view its details and take further action
## Examples
Here are some common scenarios for using issue assignment and tracking:
### Assigning a Critical Issue
A developer discovers a critical security vulnerability in the codebase. They create an issue and assign it to the lead security engineer for immediate attention.
### Marking an Issue as False Positive
After investigating a reported issue, a team member determines that it is a false positive. They update the issue status to "false positive" and provide an explanation in the comment section.
### Prioritizing Overdue Issues
A project manager filters the user inbox to view only overdue issues. They prioritize these issues based on severity and assign them to available team members for resolution.
## Best Practices
* Regularly review and update issue statuses to ensure accurate tracking
* Encourage team members to provide clear and concise comments when updating issue statuses
* Leverage the user inbox filters to prioritize and focus on critical or overdue issues
* Foster a culture of accountability by consistently assigning issues to responsible team members
## Troubleshooting
* If you encounter issues with assigning or updating issues, ensure that you have the necessary permissions
* If email notifications are not being received, check your spam or junk folder, and verify your email settings
* If you experience any other issues, consult the support documentation or contact the support team for assistance