> ## Documentation Index
> Fetch the complete documentation index at: https://docs.corgea.app/llms.txt
> Use this file to discover all available pages before exploring further.
# Agentic Integrations
> Empower your AI coding agents to scan, triage, and fix security vulnerabilities autonomously
## The Path to Autonomous Security
Corgea's vision is to make application security fully autonomous — handling the heavy lifting so you can focus on building. Our platform already detects vulnerabilities, reduces false positives, and generates AI-powered fixes automatically. But some tasks still require a developer or security engineer to act on findings, apply fixes, and verify results.
That's where Corgea's agentic integrations come in. By connecting Corgea directly to the AI coding agents you already use — like Cursor, Claude Code, GitHub Copilot, and OpenAI Codex — you give those agents the context and capabilities they need to handle security tasks on your behalf. The result is a development workflow where security issues are not only found but also resolved with minimal manual effort.
Corgea offers two powerful agentic integrations: **Corgea Agent Skill** and **Corgea MCP**.
***
## Corgea Agent Skill
[Agent Skills](https://agentskills.io/) are an open format for giving AI agents new capabilities. A skill is a structured set of instructions, commands, and context that an agent can discover and use on demand — think of it as a playbook that teaches your agent how to interact with a specific tool.
The Corgea Agent Skill teaches your coding agent how to use the Corgea CLI to scan code, list issues, inspect vulnerabilities, view AI-generated fixes, and apply them — all from within your development environment. Unlike MCP (which provides read access to Corgea data), the Agent Skill gives your agent the ability to **take action**: run scans, retrieve diffs, and apply fixes directly to your codebase.
Agent Skills are supported by leading AI development tools including **Cursor**, **Claude Code**, **OpenAI Codex**, **GitHub Copilot**, **VS Code**, **Roo Code**, **Windsurf**, and [many more](https://agentskills.io/).
 ### Prerequisites
Before installing the skill, you need the **Corgea CLI** installed and authenticated on your machine. The skill relies on CLI commands like `corgea scan`, `corgea ls`, and `corgea inspect` to interact with Corgea.
Follow the CLI installation and authentication guide to get set up.
### Installation
The Corgea skill file is hosted on GitHub:
```
https://raw.githubusercontent.com/Corgea/cli/refs/heads/main/skills/corgea/SKILL.md
```
Choose your agent below for specific installation steps.
Cursor discovers skills from `SKILL.md` files placed in designated directories. To install the Corgea skill:
1. Create the skills directory in your project or home folder:
```bash theme={null}
mkdir -p ~/.cursor/skills/corgea
```
2. Download the skill file:
```bash theme={null}
curl -o ~/.cursor/skills/corgea/SKILL.md \
https://raw.githubusercontent.com/Corgea/cli/refs/heads/main/skills/corgea/SKILL.md
```
Once placed, Cursor automatically loads the skill in Agent mode when your request matches a security task. You can also explicitly invoke it using `@corgea` in the chat.
For project-level skills shared with your team, place the file in `.cursor/skills/corgea/SKILL.md` within your repository instead.
Claude Code reads skills from the `.claude/skills/` directory. To install:
1. Create the skills directory:
```bash theme={null}
mkdir -p ~/.claude/skills/corgea
```
2. Download the skill file:
```bash theme={null}
curl -o ~/.claude/skills/corgea/SKILL.md \
https://raw.githubusercontent.com/Corgea/cli/refs/heads/main/skills/corgea/SKILL.md
```
Claude Code will automatically discover the skill and apply it when you ask about security scanning or vulnerability remediation.
For project-level skills shared via git, place the file in `.claude/skills/corgea/SKILL.md` within your repository.
Codex reads skills from the `~/.codex/skills/` directory. To install:
1. Create the skills directory:
```bash theme={null}
mkdir -p ~/.codex/skills/corgea
```
2. Download the skill file:
```bash theme={null}
curl -o ~/.codex/skills/corgea/SKILL.md \
https://raw.githubusercontent.com/Corgea/cli/refs/heads/main/skills/corgea/SKILL.md
```
Codex auto-discovers skills on startup. You can also add an `AGENTS.md` file to your repository root to reference the skill for project-specific use.
GitHub Copilot in VS Code reads skills from `.github/skills/` or `~/.copilot/skills/`. To install:
1. Create the skills directory:
```bash theme={null}
mkdir -p ~/.copilot/skills/corgea
```
2. Download the skill file:
```bash theme={null}
curl -o ~/.copilot/skills/corgea/SKILL.md \
https://raw.githubusercontent.com/Corgea/cli/refs/heads/main/skills/corgea/SKILL.md
```
You can verify the skill is loaded by typing `/skills` in the VS Code chat panel.
For project-level skills, place the file in `.github/skills/corgea/SKILL.md` within your repository.
Windsurf reads skills from `.windsurf/skills/` (project) or `~/.codeium/windsurf/skills/` (global). To install globally:
1. Create the skills directory:
```bash theme={null}
mkdir -p ~/.codeium/windsurf/skills/corgea
```
2. Download the skill file:
```bash theme={null}
curl -o ~/.codeium/windsurf/skills/corgea/SKILL.md \
https://raw.githubusercontent.com/Corgea/cli/refs/heads/main/skills/corgea/SKILL.md
```
Cascade automatically invokes the skill when your request matches its description. You can also explicitly activate it using `@corgea` in the Cascade input.
For project-level skills, place the file in `.windsurf/skills/corgea/SKILL.md` within your repository.
Roo Code reads skills from `.roo/skills/` (project) or `~/.roo/skills/` (global). To install globally:
1. Create the skills directory:
```bash theme={null}
mkdir -p ~/.roo/skills/corgea
```
2. Download the skill file:
```bash theme={null}
curl -o ~/.roo/skills/corgea/SKILL.md \
https://raw.githubusercontent.com/Corgea/cli/refs/heads/main/skills/corgea/SKILL.md
```
Roo Code uses progressive disclosure — it reads the skill's frontmatter for discovery and loads the full instructions when your request matches the skill's description.
For project-level skills, place the file in `.roo/skills/corgea/SKILL.md` within your repository.
Any agent that supports the [Agent Skills](https://agentskills.io/) open format can use the Corgea skill. The general approach is:
1. Find your agent's skills directory (check your agent's documentation).
2. Create a `corgea` subdirectory inside it.
3. Download the skill file into that directory:
```bash theme={null}
curl -o SKILL.md \
https://raw.githubusercontent.com/Corgea/cli/refs/heads/main/skills/corgea/SKILL.md
```
See the [Agent Skills website](https://agentskills.io/) for a full list of compatible agents and their configuration guides.
### Use Cases
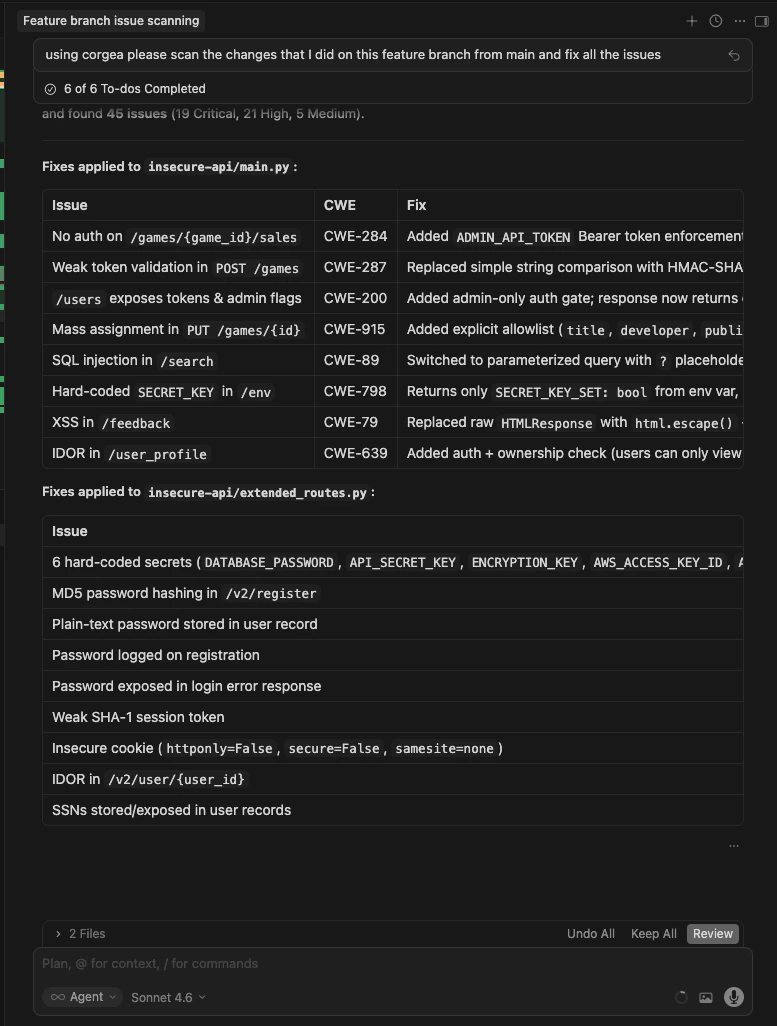
When Corgea scans your pull request and reports vulnerabilities, you no longer need to manually inspect each finding and write fixes. Open your coding agent (Cursor, Claude Code, etc.) and ask it to fix the issues:
> "Fix all the security issues Corgea found in my latest PR scan."
The agent will automatically connect to Corgea, list the issues for your scan, retrieve the AI-generated diffs, and apply the fixes to your codebase — all in one step.
When you're rapidly iterating on code with AI assistance (vibe coding), security can easily slip through the cracks. Use the agent to run a security check before every commit:
> "Scan my uncommitted changes for security issues and fix anything you find."
The agent will run `corgea scan --only-uncommitted`, review the results, and apply fixes — ensuring your fast-moving code stays secure without slowing you down.
Focus the scan on the files or directories you've been working on:
> "Scan the src/auth/ directory for security vulnerabilities."
The agent runs a targeted BLAST scan using `--target src/auth/`, reviews the findings, and can apply fixes on the spot.
When you want to understand a finding before deciding whether to fix it:
> "Show me the details and fix for issue ISSUE\_ID."
The agent retrieves the full issue details, explains the vulnerability, and presents the AI-generated fix with a diff — letting you make an informed decision.
***
## Corgea MCP
The [Model Context Protocol (MCP)](https://modelcontextprotocol.io/) is an open standard that lets AI agents securely connect to external tools and data sources. Corgea's MCP server exposes your scan results, vulnerability details, SCA findings, and blocking rules directly to any MCP-compatible agent.
With Corgea MCP, your AI agent can query scan results, retrieve issue details, list vulnerabilities filtered by severity or project, and check policy configurations — all without you having to copy-paste data or switch between tools.
Full setup instructions, available tools, and client configuration for Claude Desktop, Cursor, and more.
### Use Cases
* **Contextual code review**: Ask your agent "What critical vulnerabilities were found in the last scan?" and get actionable answers grounded in real scan data.
* **Vulnerability triage**: Let the agent prioritize which issues to fix first based on severity, exploitability, and your organization's blocking rules.
* **Remediation planning**: Ask the agent to generate a fix plan for all open high-severity issues in a specific project or scan.
* **Dependency risk assessment**: Query SCA findings to understand which third-party libraries have known vulnerabilities and what versions to upgrade to.
***
## Agent Skill vs. MCP — When to Use Which
| | **Corgea Agent Skill** | **Corgea MCP** |
| --------------------- | --------------------------------------------------------- | --------------------------------------------------- |
| **Best for** | Running scans and applying fixes | Querying and analyzing existing scan data |
| **Capabilities** | Run scans, list issues, inspect findings, apply fix diffs | Read scan results, issues, SCA data, blocking rules |
| **Requires** | Corgea CLI installed and authenticated | API token + MCP client |
| **Agent interaction** | Agent executes CLI commands in your terminal | Agent queries Corgea's API via MCP protocol |
| **Ideal workflow** | "Scan and fix my code" | "What vulnerabilities exist?" |
Use **both together** for the most comprehensive experience: the Agent Skill for taking action on findings, and MCP for querying and understanding your security posture.
***
## Getting Started
Follow the [CLI installation guide](/cli) to install and authenticate.
Add the Corgea skill to your coding agent using the installation instructions above.
Connect your AI agent to Corgea's MCP server for security data access. See the [MCP setup guide](/modelcontextprotocol).
Ask your agent to scan your code, review findings, and apply fixes — all from natural language.
### Prerequisites
Before installing the skill, you need the **Corgea CLI** installed and authenticated on your machine. The skill relies on CLI commands like `corgea scan`, `corgea ls`, and `corgea inspect` to interact with Corgea.
Follow the CLI installation and authentication guide to get set up.
### Installation
The Corgea skill file is hosted on GitHub:
```
https://raw.githubusercontent.com/Corgea/cli/refs/heads/main/skills/corgea/SKILL.md
```
Choose your agent below for specific installation steps.
Cursor discovers skills from `SKILL.md` files placed in designated directories. To install the Corgea skill:
1. Create the skills directory in your project or home folder:
```bash theme={null}
mkdir -p ~/.cursor/skills/corgea
```
2. Download the skill file:
```bash theme={null}
curl -o ~/.cursor/skills/corgea/SKILL.md \
https://raw.githubusercontent.com/Corgea/cli/refs/heads/main/skills/corgea/SKILL.md
```
Once placed, Cursor automatically loads the skill in Agent mode when your request matches a security task. You can also explicitly invoke it using `@corgea` in the chat.
For project-level skills shared with your team, place the file in `.cursor/skills/corgea/SKILL.md` within your repository instead.
Claude Code reads skills from the `.claude/skills/` directory. To install:
1. Create the skills directory:
```bash theme={null}
mkdir -p ~/.claude/skills/corgea
```
2. Download the skill file:
```bash theme={null}
curl -o ~/.claude/skills/corgea/SKILL.md \
https://raw.githubusercontent.com/Corgea/cli/refs/heads/main/skills/corgea/SKILL.md
```
Claude Code will automatically discover the skill and apply it when you ask about security scanning or vulnerability remediation.
For project-level skills shared via git, place the file in `.claude/skills/corgea/SKILL.md` within your repository.
Codex reads skills from the `~/.codex/skills/` directory. To install:
1. Create the skills directory:
```bash theme={null}
mkdir -p ~/.codex/skills/corgea
```
2. Download the skill file:
```bash theme={null}
curl -o ~/.codex/skills/corgea/SKILL.md \
https://raw.githubusercontent.com/Corgea/cli/refs/heads/main/skills/corgea/SKILL.md
```
Codex auto-discovers skills on startup. You can also add an `AGENTS.md` file to your repository root to reference the skill for project-specific use.
GitHub Copilot in VS Code reads skills from `.github/skills/` or `~/.copilot/skills/`. To install:
1. Create the skills directory:
```bash theme={null}
mkdir -p ~/.copilot/skills/corgea
```
2. Download the skill file:
```bash theme={null}
curl -o ~/.copilot/skills/corgea/SKILL.md \
https://raw.githubusercontent.com/Corgea/cli/refs/heads/main/skills/corgea/SKILL.md
```
You can verify the skill is loaded by typing `/skills` in the VS Code chat panel.
For project-level skills, place the file in `.github/skills/corgea/SKILL.md` within your repository.
Windsurf reads skills from `.windsurf/skills/` (project) or `~/.codeium/windsurf/skills/` (global). To install globally:
1. Create the skills directory:
```bash theme={null}
mkdir -p ~/.codeium/windsurf/skills/corgea
```
2. Download the skill file:
```bash theme={null}
curl -o ~/.codeium/windsurf/skills/corgea/SKILL.md \
https://raw.githubusercontent.com/Corgea/cli/refs/heads/main/skills/corgea/SKILL.md
```
Cascade automatically invokes the skill when your request matches its description. You can also explicitly activate it using `@corgea` in the Cascade input.
For project-level skills, place the file in `.windsurf/skills/corgea/SKILL.md` within your repository.
Roo Code reads skills from `.roo/skills/` (project) or `~/.roo/skills/` (global). To install globally:
1. Create the skills directory:
```bash theme={null}
mkdir -p ~/.roo/skills/corgea
```
2. Download the skill file:
```bash theme={null}
curl -o ~/.roo/skills/corgea/SKILL.md \
https://raw.githubusercontent.com/Corgea/cli/refs/heads/main/skills/corgea/SKILL.md
```
Roo Code uses progressive disclosure — it reads the skill's frontmatter for discovery and loads the full instructions when your request matches the skill's description.
For project-level skills, place the file in `.roo/skills/corgea/SKILL.md` within your repository.
Any agent that supports the [Agent Skills](https://agentskills.io/) open format can use the Corgea skill. The general approach is:
1. Find your agent's skills directory (check your agent's documentation).
2. Create a `corgea` subdirectory inside it.
3. Download the skill file into that directory:
```bash theme={null}
curl -o SKILL.md \
https://raw.githubusercontent.com/Corgea/cli/refs/heads/main/skills/corgea/SKILL.md
```
See the [Agent Skills website](https://agentskills.io/) for a full list of compatible agents and their configuration guides.
### Use Cases
When Corgea scans your pull request and reports vulnerabilities, you no longer need to manually inspect each finding and write fixes. Open your coding agent (Cursor, Claude Code, etc.) and ask it to fix the issues:
> "Fix all the security issues Corgea found in my latest PR scan."
The agent will automatically connect to Corgea, list the issues for your scan, retrieve the AI-generated diffs, and apply the fixes to your codebase — all in one step.
When you're rapidly iterating on code with AI assistance (vibe coding), security can easily slip through the cracks. Use the agent to run a security check before every commit:
> "Scan my uncommitted changes for security issues and fix anything you find."
The agent will run `corgea scan --only-uncommitted`, review the results, and apply fixes — ensuring your fast-moving code stays secure without slowing you down.
Focus the scan on the files or directories you've been working on:
> "Scan the src/auth/ directory for security vulnerabilities."
The agent runs a targeted BLAST scan using `--target src/auth/`, reviews the findings, and can apply fixes on the spot.
When you want to understand a finding before deciding whether to fix it:
> "Show me the details and fix for issue ISSUE\_ID."
The agent retrieves the full issue details, explains the vulnerability, and presents the AI-generated fix with a diff — letting you make an informed decision.
***
## Corgea MCP
The [Model Context Protocol (MCP)](https://modelcontextprotocol.io/) is an open standard that lets AI agents securely connect to external tools and data sources. Corgea's MCP server exposes your scan results, vulnerability details, SCA findings, and blocking rules directly to any MCP-compatible agent.
With Corgea MCP, your AI agent can query scan results, retrieve issue details, list vulnerabilities filtered by severity or project, and check policy configurations — all without you having to copy-paste data or switch between tools.
Full setup instructions, available tools, and client configuration for Claude Desktop, Cursor, and more.
### Use Cases
* **Contextual code review**: Ask your agent "What critical vulnerabilities were found in the last scan?" and get actionable answers grounded in real scan data.
* **Vulnerability triage**: Let the agent prioritize which issues to fix first based on severity, exploitability, and your organization's blocking rules.
* **Remediation planning**: Ask the agent to generate a fix plan for all open high-severity issues in a specific project or scan.
* **Dependency risk assessment**: Query SCA findings to understand which third-party libraries have known vulnerabilities and what versions to upgrade to.
***
## Agent Skill vs. MCP — When to Use Which
| | **Corgea Agent Skill** | **Corgea MCP** |
| --------------------- | --------------------------------------------------------- | --------------------------------------------------- |
| **Best for** | Running scans and applying fixes | Querying and analyzing existing scan data |
| **Capabilities** | Run scans, list issues, inspect findings, apply fix diffs | Read scan results, issues, SCA data, blocking rules |
| **Requires** | Corgea CLI installed and authenticated | API token + MCP client |
| **Agent interaction** | Agent executes CLI commands in your terminal | Agent queries Corgea's API via MCP protocol |
| **Ideal workflow** | "Scan and fix my code" | "What vulnerabilities exist?" |
Use **both together** for the most comprehensive experience: the Agent Skill for taking action on findings, and MCP for querying and understanding your security posture.
***
## Getting Started
Follow the [CLI installation guide](/cli) to install and authenticate.
Add the Corgea skill to your coding agent using the installation instructions above.
Connect your AI agent to Corgea's MCP server for security data access. See the [MCP setup guide](/modelcontextprotocol).
Ask your agent to scan your code, review findings, and apply fixes — all from natural language.